Intro
Learn how to create an Excel countdown to date with ease, using formulas and functions like TODAY and DATE. Track time until a specific date with countdown timers and calendars.
The countdown to a specific date is a common requirement in various fields, including business, education, and personal planning. Excel, being one of the most widely used spreadsheet software, provides several ways to create a countdown to a specific date. In this article, we will explore the different methods to create a countdown in Excel, including using formulas, functions, and add-ins.
Excel is a powerful tool that allows users to perform various calculations, including date and time calculations. The countdown to a specific date can be useful in tracking the number of days, hours, minutes, and seconds until a specific event or deadline. This can be particularly useful in project management, where teams need to track progress and meet deadlines.
One of the simplest ways to create a countdown in Excel is by using a formula. The formula can be used to calculate the difference between the current date and the target date. The formula can be written as follows: =TODAY()-A1, where A1 is the cell containing the target date. This formula will return the number of days between the current date and the target date.
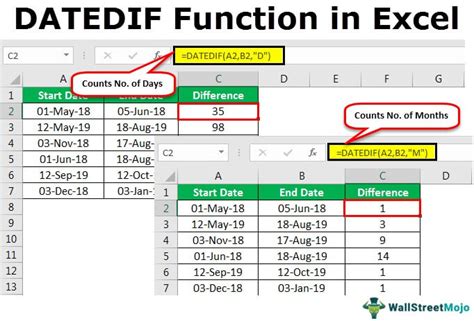
Another way to create a countdown in Excel is by using the DATEDIF function. The DATEDIF function calculates the difference between two dates in a specified interval, such as days, months, or years. The syntax of the DATEDIF function is as follows: =DATEDIF(start_date, end_date, unit), where start_date is the current date, end_date is the target date, and unit is the interval.
Using Formulas to Create a Countdown

To create a countdown using formulas, follow these steps:
- Open a new Excel spreadsheet and enter the target date in a cell, for example,
A1. - In another cell, enter the formula
=TODAY()-A1to calculate the number of days between the current date and the target date. - To display the countdown in a more readable format, you can use the
TEXTfunction to format the result as a string. For example,=TEXT(TODAY()-A1, "0 days").
Using the DATEDIF Function
To create a countdown using the DATEDIF function, follow these steps:
- Open a new Excel spreadsheet and enter the target date in a cell, for example,
A1. - In another cell, enter the formula
=DATEDIF(TODAY(), A1, "d")to calculate the number of days between the current date and the target date. - To display the countdown in a more readable format, you can use the
TEXTfunction to format the result as a string. For example,=TEXT(DATEDIF(TODAY(), A1, "d"), "0 days").
Using Add-ins to Create a Countdown

There are several add-ins available that can help you create a countdown in Excel. One popular add-in is the Countdown add-in, which allows you to create a countdown to a specific date and time. To use the Countdown add-in, follow these steps:
- Download and install the
Countdownadd-in from the Microsoft Office Store. - Open a new Excel spreadsheet and click on the
Countdowntab in the ribbon. - Click on the
Create Countdownbutton to create a new countdown. - Enter the target date and time in the
Countdowndialog box. - Click on the
OKbutton to create the countdown.
Customizing the Countdown
To customize the countdown, you can use various formatting options available in Excel. For example, you can change the font, color, and alignment of the countdown text. You can also use conditional formatting to highlight the countdown text based on certain conditions.
Here are some tips to customize the countdown:
- Use a bold font to make the countdown text stand out.
- Use a bright color to make the countdown text more visible.
- Use conditional formatting to highlight the countdown text when the target date is near.
- Use a custom format to display the countdown text in a specific format, such as "X days, Y hours, Z minutes".
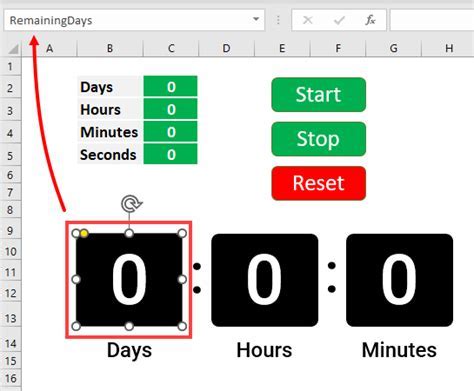
Using VBA to Create a Countdown
VBA (Visual Basic for Applications) is a programming language used to create macros in Excel. You can use VBA to create a countdown in Excel by writing a macro that calculates the difference between the current date and the target date.
To create a countdown using VBA, follow these steps:
- Open the Visual Basic Editor in Excel by pressing
Alt+F11or by navigating toDeveloper>Visual Basicin the ribbon. - In the Visual Basic Editor, click on
Insert>Moduleto create a new module. - In the module, write the following code:
Sub Countdown(),Dim targetDate As Date,targetDate = #12/31/2022#,Dim currentDate As Date,currentDate = Date,Dim daysLeft As Long,daysLeft = DateDiff("d", currentDate, targetDate),MsgBox "There are " & daysLeft & " days left until " & targetDate,End Sub. - Click on
Run>Run Sub/UserFormto run the macro.
Gallery of Excel Countdown Examples
Excel Countdown Image Gallery


How do I create a countdown in Excel?
+To create a countdown in Excel, you can use a formula, the DATEDIF function, or an add-in. You can also use VBA to create a countdown.
What is the DATEDIF function in Excel?
+The DATEDIF function in Excel calculates the difference between two dates in a specified interval, such as days, months, or years.
How do I customize the countdown in Excel?
+To customize the countdown in Excel, you can use various formatting options, such as changing the font, color, and alignment of the countdown text. You can also use conditional formatting to highlight the countdown text based on certain conditions.
In conclusion, creating a countdown in Excel can be a useful tool for tracking progress and meeting deadlines. By using formulas, functions, add-ins, or VBA, you can create a countdown that suits your needs. Remember to customize the countdown to make it more readable and visually appealing. We hope this article has provided you with the necessary information to create a countdown in Excel. If you have any questions or need further assistance, please don't hesitate to comment below. Share this article with your friends and colleagues who may find it useful.