Intro
Discover 5 ways Anova Excel enhances data analysis with advanced statistical tools, regression analysis, and hypothesis testing, boosting business intelligence and data-driven decision making.
The world of data analysis is vast and complex, with numerous tools and techniques at our disposal. One of the most powerful and widely used statistical methods is the Analysis of Variance, commonly referred to as ANOVA. When combined with the versatility of Microsoft Excel, ANOVA becomes an even more formidable tool for uncovering insights and trends within datasets. In this article, we will delve into the realm of ANOVA in Excel, exploring its applications, benefits, and the steps to perform it. Whether you are a seasoned data analyst or just starting your journey into the world of statistics, understanding how to leverage ANOVA in Excel can significantly enhance your data analysis capabilities.
ANOVA is a statistical technique used to compare means of two or more samples to find out if at least one of the means is different. This method is crucial in various fields, including business, healthcare, and social sciences, where comparing different groups or conditions is essential. Excel, with its user-friendly interface and robust statistical functions, provides an ideal platform for performing ANOVA. The integration of ANOVA with Excel not only simplifies the analysis process but also enables users to visualize their data more effectively, using charts and graphs to illustrate findings.
As we navigate the complexities of data analysis, it's essential to understand the different types of ANOVA and how they can be applied in Excel. The one-way ANOVA, for instance, is used to compare the means of three or more samples. This method is particularly useful in experiments where the effect of one variable on another is being studied. On the other hand, two-way ANOVA is used when two independent variables are being considered. Each type of ANOVA has its unique application and can be performed in Excel using the Data Analysis ToolPak or through formulas and functions.
Introduction to ANOVA in Excel

To begin with, let's consider why ANOVA in Excel is such a powerful combination. Excel offers a range of built-in functions and tools that make data analysis more accessible. The Data Analysis ToolPak, for example, provides a straightforward way to perform ANOVA without needing to delve into complex formulas. This accessibility makes ANOVA a viable option for a wide range of users, from students to professionals, who may not have an extensive background in statistics.
Benefits of Using ANOVA in Excel

The benefits of using ANOVA in Excel are multifaceted. Firstly, it allows for the efficient comparison of means across different groups, enabling researchers and analysts to identify significant differences. This capability is crucial in decision-making processes, where understanding the impact of different variables is key. Secondly, Excel's graphical capabilities enhance the presentation of ANOVA results, making it easier to communicate findings to both technical and non-technical audiences. Finally, the ease of use and accessibility of ANOVA in Excel encourage more individuals to engage with statistical analysis, promoting a data-driven approach in various sectors.
Performing ANOVA in Excel

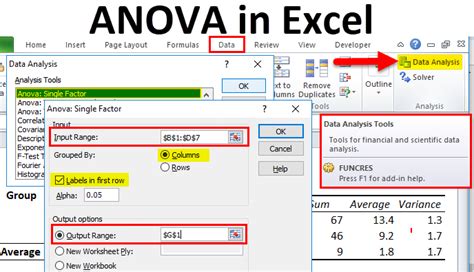
Performing ANOVA in Excel involves several steps. Firstly, ensure that your data is organized appropriately, with each group or condition in separate columns. Next, if you haven't already, install the Data Analysis ToolPak. This add-in provides the ANOVA function, among others, and can be activated through the Excel options. Once the ToolPak is enabled, you can access the ANOVA function by going to the "Data" tab, clicking on "Data Analysis," and selecting the appropriate ANOVA type based on your data and research question.
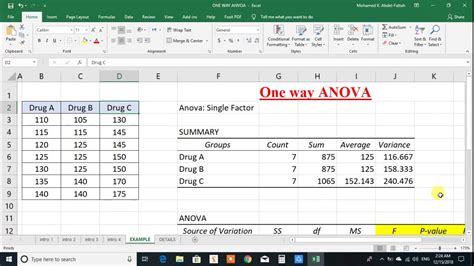
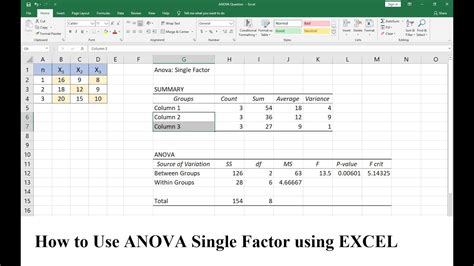
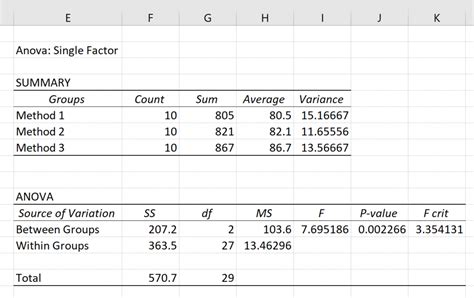
Step-by-Step Guide to One-Way ANOVA
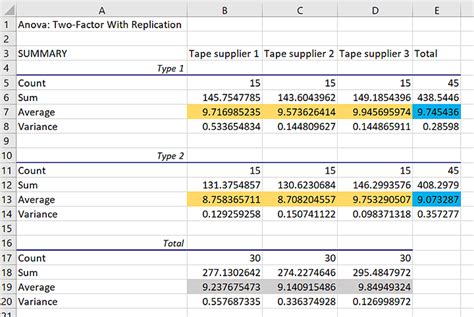
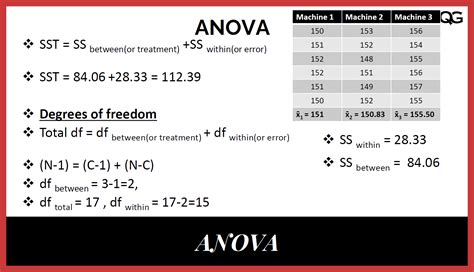
To perform a one-way ANOVA, follow these steps: 1. **Prepare Your Data**: Ensure your data is in a table format with each sample in a separate column. 2. **Access the Data Analysis ToolPak**: Go to the "Data" tab and click on "Data Analysis." 3. **Select ANOVA**: Choose "Anova: Single Factor" and click "OK." 4. **Input Range**: Select the range of cells containing your data, including headers. 5. **Grouped By**: Since we're using columns, select "Columns" and click "OK." 6. **Interpret Results**: Look for the P-value in the output to determine if there's a significant difference between the means.Applications of ANOVA in Excel

The applications of ANOVA in Excel are vast and varied. In business, ANOVA can be used to compare the effectiveness of different marketing strategies or to analyze the impact of various factors on product sales. In healthcare, researchers might use ANOVA to compare the outcomes of different treatments or to study the effects of lifestyle factors on health outcomes. Educational institutions can leverage ANOVA to compare student performance across different teaching methods or to assess the impact of socio-economic factors on academic achievement.
Real-World Examples
- **Marketing**: A company wants to know if different pricing strategies affect sales. They collect data on sales figures under three different price points and use ANOVA to determine if at least one of the pricing strategies results in significantly different sales. - **Healthcare**: Researchers are studying the effect of diet on blood pressure. They collect blood pressure data from participants on three different diets and use ANOVA to compare the mean blood pressure across the groups.Gallery of ANOVA Excel Images
ANOVA Excel Image Gallery


Frequently Asked Questions About ANOVA in Excel
What is ANOVA used for in Excel?
+ANOVA in Excel is used to compare means of two or more samples to find out if at least one of the means is different.
How do I perform ANOVA in Excel?
+To perform ANOVA, use the Data Analysis ToolPak, selecting the appropriate ANOVA type based on your data and research question.
What are the benefits of using ANOVA in Excel?
+The benefits include efficient comparison of means, enhanced data presentation, and accessibility for a wide range of users.
In conclusion, mastering the use of ANOVA in Excel can be a game-changer for anyone involved in data analysis. Whether you're a professional looking to enhance your analytical skills or a student seeking to understand statistical concepts better, ANOVA in Excel offers a powerful and accessible tool. By following the steps and guidelines outlined in this article, you can unlock the full potential of ANOVA and take your data analysis to the next level. Remember, the key to effective data analysis is not just about the tools you use, but also about how you interpret and apply the insights gained from those tools. As you continue on your journey with ANOVA in Excel, we invite you to share your experiences, ask questions, and explore the vast possibilities that this combination has to offer. Together, let's delve deeper into the world of data analysis and uncover the secrets that ANOVA in Excel can reveal.