Intro
The importance of Excel conditional formatting cannot be overstated, as it allows users to highlight cells that meet specific conditions, making it easier to analyze and understand data. One common scenario where conditional formatting is particularly useful is when you want to identify cells that are not blank. This can be especially helpful in data validation, data cleaning, and data visualization tasks. In this article, we will delve into the details of how to apply Excel conditional formatting to identify cells that are not blank, exploring the benefits, steps, and practical examples of this powerful feature.
Conditional formatting is a feature in Excel that allows you to apply different formats to cells based on the value of the cell or the value of a formula. This feature is incredibly versatile and can be used in a wide range of scenarios, from highlighting cells that contain specific text or numbers to identifying cells that fall within a certain range. The ability to visually distinguish between different types of data can significantly enhance your ability to work with and understand your data, making conditional formatting an indispensable tool for anyone working with Excel.
The benefits of using conditional formatting to highlight non-blank cells are numerous. For instance, in a dataset where blank cells indicate missing information, conditional formatting can quickly draw your attention to these gaps, allowing you to address them promptly. Similarly, in a scenario where you need to review or approve data entries, highlighting non-blank cells can help you focus on the cells that require your attention. This feature is also useful for creating dynamic and interactive spreadsheets, where the formatting changes based on the data, providing a more engaging and intuitive user experience.
Understanding Conditional Formatting

To apply conditional formatting to highlight cells that are not blank, you first need to select the range of cells you want to format. This could be a single column, a row, or any range of cells that you specify. Once you have selected your range, go to the "Home" tab in the Excel ribbon and click on the "Conditional Formatting" button in the "Styles" group. This will open a dropdown menu with several options, including "Highlight Cells Rules," "Top/Bottom Rules," "Data Bars," "Color Scales," and "New Rule." For highlighting non-blank cells, you will typically use the "New Rule" option, which allows you to create a custom rule based on a formula.
Creating a New Rule for Non-Blank Cells

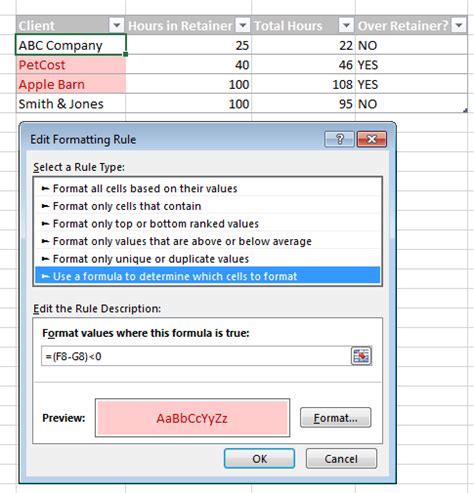
After selecting "New Rule," a dialog box will appear where you can choose the type of rule you want to create. Select "Use a formula to determine which cells to format," and then enter a formula that will be used to determine which cells to format. To highlight cells that are not blank, you can use the formula =A1<>"", assuming A1 is the first cell in your selected range. This formula checks if the cell is not equal to an empty string, effectively identifying non-blank cells. You can then click on the "Format" button to choose how you want these cells to be formatted, selecting options such as fill color, font color, and font style.
Applying Conditional Formatting to a Range
Once you have defined your rule and formatting, click "OK" to apply the conditional formatting to your selected range. Excel will then automatically apply the formatting to any cells in the range that meet the condition of not being blank. This process can be repeated for different ranges or conditions, allowing you to create complex and dynamic formatting schemes that help you analyze and present your data more effectively.
Common Scenarios for Highlighting Non-Blank Cells

There are several common scenarios where highlighting non-blank cells is particularly useful:
- Data Validation: To ensure that all required fields in a form or database are filled in, you can use conditional formatting to highlight any non-blank cells, making it easy to verify that all necessary information has been provided.
- Data Cleaning: When working with large datasets, identifying and addressing missing or blank values is crucial. Conditional formatting can help draw attention to these cells, facilitating the data cleaning process.
- Data Visualization: Highlighting non-blank cells can be used to create interactive and dynamic dashboards, where the user can quickly see which cells contain data and which do not, enhancing the overall user experience.
Advanced Conditional Formatting Techniques

Beyond the basic application of conditional formatting, there are several advanced techniques you can use to further enhance your spreadsheets. For example, you can use multiple conditions to apply different formats based on different criteria, or you can use formulas that reference other cells or worksheets to create more complex rules. Additionally, you can use the "Manage Rules" feature to edit, delete, or reorder existing rules, providing a high degree of flexibility and control over your conditional formatting.
Best Practices for Using Conditional Formatting

To get the most out of conditional formatting and to ensure that your spreadsheets remain organized and easy to understand, follow these best practices:
- Keep it Simple: Avoid using too many different formats, as this can make your spreadsheet look cluttered and confusing.
- Use Consistent Formatting: Apply consistent formatting throughout your spreadsheet to make it easier to read and understand.
- Test Your Rules: Always test your conditional formatting rules to ensure they are working as expected.
Excel Conditional Formatting Gallery


What is conditional formatting in Excel?
+Conditional formatting is a feature in Excel that allows you to apply different formats to cells based on the value of the cell or the value of a formula.
How do I highlight non-blank cells in Excel?
+To highlight non-blank cells, use the conditional formatting feature with a formula such as =A1<>"" to identify cells that are not blank.
What are some common scenarios where highlighting non-blank cells is useful?
+Highlighting non-blank cells is useful in data validation, data cleaning, and data visualization, among other scenarios.
In conclusion, Excel's conditional formatting feature is a powerful tool for highlighting cells that meet specific conditions, including identifying cells that are not blank. By applying the techniques and best practices outlined in this article, you can leverage conditional formatting to enhance your data analysis, presentation, and overall productivity in Excel. Whether you are a beginner or an advanced user, mastering conditional formatting can take your spreadsheet skills to the next level, enabling you to work more efficiently and effectively with your data. We invite you to share your experiences, tips, and questions about using conditional formatting in Excel, and to explore how this feature can be applied in various contexts to improve your workflow and data insights.