Intro
Excel for Mac is a powerful tool used for data analysis, visualization, and organization. One of its most useful features is conditional formatting, which allows users to highlight cells based on specific conditions or rules. This feature is particularly helpful in identifying trends, patterns, and outliers within a dataset. In this article, we will delve into the world of Excel for Mac conditional formatting, exploring its benefits, how it works, and providing step-by-step guides on how to apply it.
Conditional formatting is a dynamic way to visualize data, making it easier to understand and analyze. It applies formatting to cells based on the value of the cell, the value of a formula, or even the format of the cell itself. This can include changing the background color, font color, or applying icons to cells that meet certain criteria. The primary goal is to draw attention to specific data points that are important for analysis or decision-making.
For instance, in a sales dataset, you might use conditional formatting to highlight cells that represent sales figures above a certain threshold, indicating high-performing products or regions. Similarly, in a project management spreadsheet, you could use it to flag tasks that are overdue or near their deadlines, helping you prioritize your work more effectively.
Benefits of Conditional Formatting

The benefits of conditional formatting in Excel for Mac are numerous. It enhances data visualization, making complex data easier to comprehend at a glance. This feature is also highly customizable, allowing users to define their own rules based on formulas, formatting, or specific values. Furthermore, conditional formatting is dynamic; as the data in your spreadsheet changes, the formatting updates automatically, ensuring that your visualizations remain current and relevant.
Types of Conditional Formatting
There are several types of conditional formatting available in Excel for Mac, including:
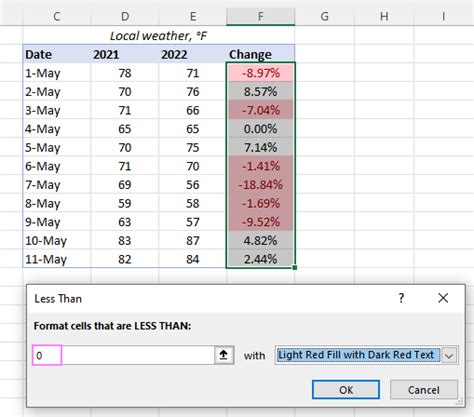
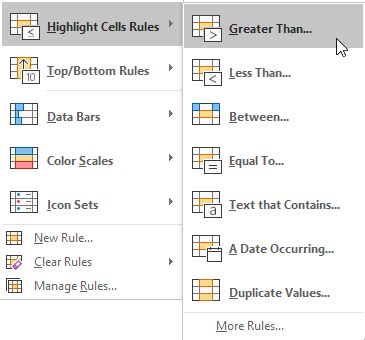
- Highlight Cells Rules: Useful for highlighting cells based on specific conditions such as values greater than, less than, between, or equal to a certain value.
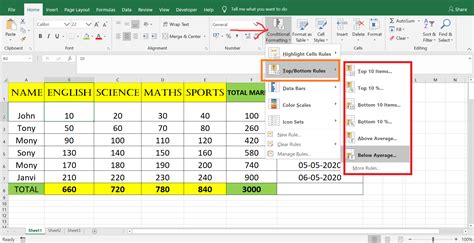
- Top/Bottom Rules: Allows highlighting of the top or bottom percentage or number of cells based on their values.
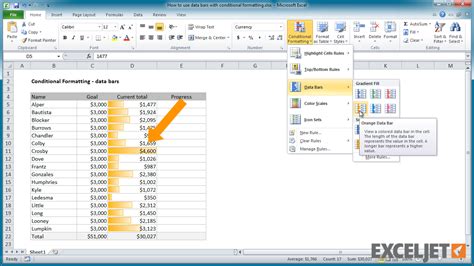
- Data Bars: Represents data distribution within cells using bars, making it easier to compare values.
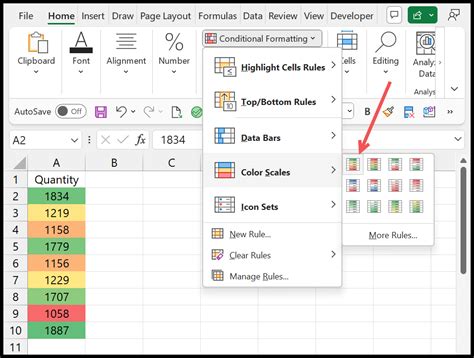
- Color Scales: Applies a color scale to cells to represent different values, useful for showing trends or patterns.
- Icon Sets: Uses icons to categorize and highlight cells based on their values.
Applying Conditional Formatting
To apply conditional formatting in Excel for Mac, follow these steps:
- Select the range of cells you want to format.
- Go to the "Home" tab on the Ribbon.
- Click on "Conditional Formatting" in the "Styles" group.
- Choose the type of formatting rule you want to apply from the dropdown menu.
- Depending on the rule, specify the conditions or criteria.
- Click "OK" to apply the rule.
For example, to highlight cells greater than a specific value, you would select "Highlight Cells Rules" and then "Greater Than." Enter the value you're interested in, choose a format, and click "OK."
Advanced Conditional Formatting Techniques
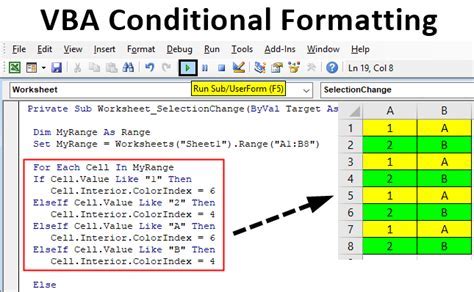
For more complex analyses, Excel for Mac allows the creation of custom rules using formulas. This can be particularly useful when the conditions for formatting are not straightforward or when you need to compare values across different columns or sheets.
To create a custom rule:
- Select your cell range.
- Go to "Conditional Formatting" > "New Rule."
- Choose "Use a formula to determine which cells to format."
- Enter your formula in the format box. For example,
=A1>B1to format cells in column A if their values are greater than the corresponding values in column B. - Click "Format" to choose how you want to format these cells.
- Click "OK" to apply the rule.
Managing and Editing Conditional Formatting Rules
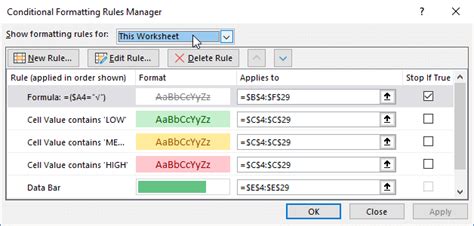
As your spreadsheet evolves, you may need to adjust or remove conditional formatting rules. Excel for Mac provides straightforward ways to manage these rules:
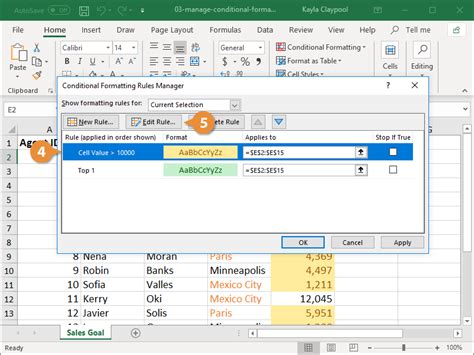
- To edit a rule, go to "Conditional Formatting" > "Manage Rules," select the rule you want to edit, and click "Edit Rule."
- To delete a rule, select it in the "Manage Rules" dialog box and click "Delete Rule."
Common Challenges and Troubleshooting
Sometimes, conditional formatting may not work as expected. Common issues include rules not applying correctly, conflicts between multiple rules, or formatting not updating when data changes. To troubleshoot, ensure that your rules are correctly defined and that there are no conflicts. Also, check that the cells you are trying to format are not locked or protected, as this can prevent formatting from being applied.
Best Practices for Using Conditional Formatting
To get the most out of conditional formatting, follow these best practices:
- Keep it simple: Avoid overly complex rules that might confuse others or become difficult to manage.
- Use it sparingly: Too much formatting can be distracting. Focus on the most critical data.
- Document your rules: Especially in shared spreadsheets, include notes on what each rule is intended to highlight.
Real-World Applications of Conditional Formatting
Conditional formatting has a wide range of real-world applications, from business and finance to education and personal projects. For instance, a teacher might use it to highlight student grades that are below a passing threshold, while a financial analyst might use it to identify stock prices that have reached certain milestones.
Gallery of Conditional Formatting Examples
Conditional Formatting Image Gallery

What is conditional formatting in Excel for Mac?
+Conditional formatting is a feature in Excel for Mac that allows users to highlight cells based on specific conditions or rules, enhancing data visualization and analysis.
How do I apply conditional formatting in Excel for Mac?
+To apply conditional formatting, select the cell range, go to the "Home" tab, click on "Conditional Formatting," choose a rule type, specify the conditions, and click "OK."
Can I create custom conditional formatting rules in Excel for Mac?
+Yes, Excel for Mac allows the creation of custom rules using formulas. This can be done by selecting "Use a formula to determine which cells to format" when creating a new rule.
In conclusion, conditional formatting is a powerful feature in Excel for Mac that can significantly enhance your data analysis and visualization capabilities. By understanding how to apply and manage conditional formatting rules, you can make your spreadsheets more informative, engaging, and easier to understand. Whether you're a beginner or an advanced user, mastering conditional formatting can take your Excel skills to the next level. So, dive in, explore the different types of rules, and discover how conditional formatting can help you uncover insights and trends in your data. Feel free to share your experiences or ask questions about using conditional formatting in Excel for Mac in the comments below.