Intro
Creating and printing name tags can be a crucial aspect of organizing events, meetings, and conferences. Excel, with its versatile spreadsheet capabilities, offers an efficient way to design and manage name tag templates. Utilizing Excel for name tag creation allows for easy customization, data management, and printing. Here, we'll delve into the importance of name tags, how to create a name tag template in Excel, and provide tips for customization and printing.
The use of name tags is not limited to formal events; they can also be beneficial in casual gatherings, team-building activities, and educational settings. Name tags help break the ice, facilitate networking, and ensure that participants can easily identify one another. In professional settings, they add a layer of formality and organization, making events more structured and memorable.
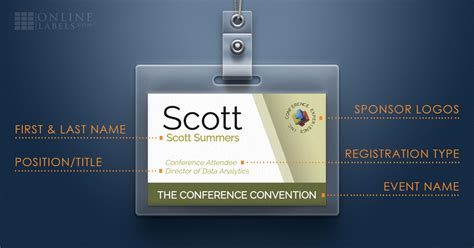
For event organizers, having a well-designed name tag can make a significant difference in the overall experience of attendees. It's not just about displaying names; it's also about creating a visual identity for the event. With Excel, you can easily create, edit, and print name tags that match your event's theme or your organization's branding. This flexibility is particularly useful when dealing with last-minute changes or additions to the guest list.
Creating a Name Tag Template in Excel
To create a basic name tag template in Excel, follow these steps:
- Open Excel: Start by opening a new Excel spreadsheet. You can choose a blank workbook for maximum flexibility.
- Set Up Your Template: Decide on the size and layout of your name tags. A common size is 2 inches by 3 inches, but this can vary based on your needs and the Avery label template you're using.
- Use a Table: Insert a table into your spreadsheet to help you organize the name tag fields. Typically, you'll want columns for First Name, Last Name, Title, and Company.
- Customize Your Template: You can add more columns for additional information such as contact details or a photo. Use Excel's formatting options to adjust font sizes, colors, and alignments to make your name tags visually appealing.
- Merge Cells for Better Layout: If you need to combine fields (like First Name and Last Name) into a single line on the name tag, you can merge cells and use the ampersand (&) symbol in your formulas to concatenate text.
Benefits of Using Excel for Name Tags
Using Excel for creating name tags comes with several benefits:
- Easy Data Management: Excel allows you to easily manage and update your guest list. You can sort, filter, and edit names and details efficiently.
- Customization: With Excel, you have complete control over the design and layout of your name tags. You can choose fonts, colors, and add logos or images as per your event's theme.
- Integration with Label Templates: Excel can be used in conjunction with Avery label templates, making it simple to print your name tags on sticker labels or cardstock.
Designing and Printing Name Tags

When designing your name tags, consider the following tips:
- Keep it Simple: Ensure that the font is clear and large enough to read from a distance. Typically, a font size between 18 and 24 points works well.
- Use Contrasting Colors: Choose a background and text color that provides good contrast, making the name tags easier to read.
- Include Essential Information: Decide what information is crucial for your event. For most events, the name and title of the attendee are sufficient.
For printing, make sure to:
- Use the Right Paper: If you're printing on cardstock or sticker labels, ensure your printer is set to the correct paper type for the best results.
- Align Your Printer: Before printing a large batch, print a test page to ensure that the alignment is correct and the name tags will print within the designated area.
- Cut Carefully: If you're not using pre-cut labels, use a paper cutter or scissors to cut out your name tags neatly.
Advanced Customization and Automation
For those looking to take their name tag creation to the next level, Excel offers advanced features such as:
- Mail Merge: This feature allows you to automatically populate your name tag template with data from an Excel spreadsheet, making it easier to create multiple name tags at once.
- Conditional Formatting: You can use conditional formatting to highlight specific attendees, such as speakers or VIP guests, making them easily identifiable.
Gallery of Excel Name Tag Templates
Excel Name Tag Template Gallery


What is the best font size for name tags?
+A font size between 18 and 24 points is typically recommended for name tags to ensure they are easily readable from a distance.
How do I print name tags on sticker labels?
+To print name tags on sticker labels, use an Excel template designed for your specific label size, and ensure your printer settings match the label type for accurate printing.
Can I use Excel to create name tags with photos?
+Yes, Excel allows you to insert images into your name tag template. You can use the "Insert" feature to add photos, making your name tags more personalized and engaging.
In conclusion, utilizing Excel for creating name tags offers a versatile, efficient, and customizable solution for event organizers. By following the steps and tips outlined above, you can create professional-looking name tags that enhance the experience of your attendees. Whether you're organizing a small meeting or a large conference, Excel's capabilities can help you manage your guest list and produce high-quality name tags with ease. Feel free to share your experiences with creating name tags in Excel or ask for further assistance in the comments below.