Intro
Calculate averages in Excel by name with ease. Learn how to use formulas and functions to average data by name, including AVERAGEIF and VLOOKUP, for efficient data analysis and reporting in spreadsheets.
Calculating averages in Excel is a fundamental task, and doing so based on specific names or categories can be particularly useful for analyzing data. The ability to average values by name allows users to summarize large datasets efficiently, making it easier to understand trends, performance, or any other metric of interest. Excel offers several methods to achieve this, including using formulas, pivot tables, and even some of its built-in functions. Here, we'll explore how to calculate an average by name in Excel, covering various scenarios and tools.
The importance of averaging data by specific criteria like names cannot be overstated. It helps in making informed decisions, evaluating performance, and identifying patterns that might not be immediately visible when looking at raw data. Whether you're a student analyzing grades, a manager evaluating employee performance, or a researcher looking at experimental data, being able to average by name is a crucial skill.
To get started with averaging by name, you typically need a dataset that includes at least two columns: one for the names (or categories) and another for the values you want to average. Excel's versatility means you can approach this task from multiple angles, depending on what you're most comfortable with and the specifics of your data.
Averaging by Name Using Formulas
One of the most direct methods to average values by name is by using Excel formulas. The AVERAGEIF and AVERAGEIFS functions are particularly useful for this purpose. AVERAGEIF allows you to average a set of values based on a single criterion, while AVERAGEIFS extends this capability to multiple criteria.
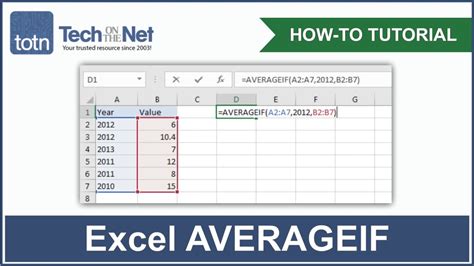
For example, if you have a list of names in column A and corresponding scores in column B, and you want to find the average score for a specific name, say "John," you could use the following formula:
=AVERAGEIF(A:A, "John", B:B)
This formula looks through column A for the name "John" and averages the corresponding values in column B.
Using AVERAGEIFS for Multiple Criteria
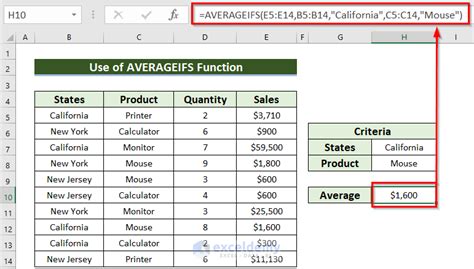
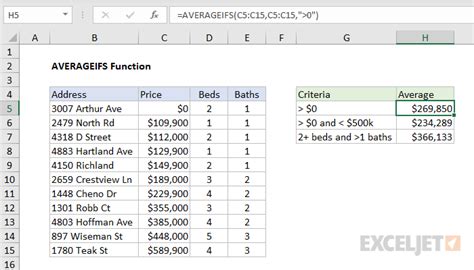
If your data requires averaging based on more than one condition, AVERAGEIFS is the way to go. This function allows you to specify multiple ranges and criteria, making it highly flexible for complex data analysis.
The syntax for AVERAGEIFS is:
AVERAGEIFS(average_range, criteria_range1, criteria1, [criteria_range2], [criteria2],...)
For instance, if you want to average scores for "John" but only for a specific category (say, "Math") found in column C, you could use:
=AVERAGEIFS(B:B, A:A, "John", C:C, "Math")
This formula averages the scores in column B for rows where the name in column A is "John" and the subject in column C is "Math."
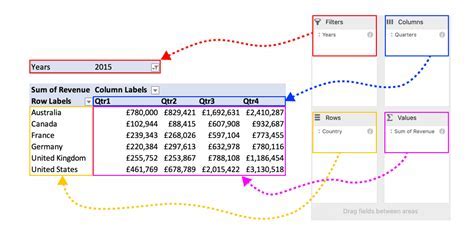
Averaging by Name Using Pivot Tables

Pivot tables are another powerful tool in Excel for summarizing data, including averaging values by name. They offer a dynamic way to analyze data, allowing for easy filtering, grouping, and calculation of averages.
To create a pivot table that averages by name:
- Select your data range.
- Go to the "Insert" tab and click on "PivotTable."
- Choose a cell to place your pivot table and click "OK."
- Drag the "Name" field to the "Row Labels" area.
- Drag the field containing the values you want to average to the "Values" area. Right-click on this field in the "Values" area and select "Value Field Settings." Choose "Average" as the calculation type.
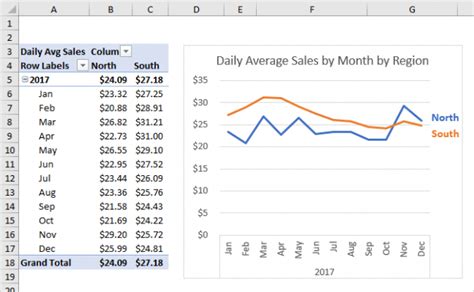
This setup will give you a table that shows the average value for each name in your dataset.
Benefits of Using Pivot Tables
Pivot tables offer several benefits, including the ability to easily change the calculation type, filter data based on multiple criteria, and drill down into detailed data. They are especially useful for large datasets and for scenarios where you need to analyze data from different angles.
Additional Tips for Averaging by Name

- Data Preparation: Ensure your data is clean and well-organized. Names should be spelled consistently, and there should be no leading or trailing spaces.
- Using Helper Columns: For more complex scenarios, consider using helper columns to extract or manipulate data before averaging.
- Array Formulas: For advanced users, array formulas can offer another method for averaging by name, especially when dealing with complex conditions.
Gallery of Excel Averaging Techniques
Excel Averaging Techniques Image Gallery


What is the main difference between AVERAGEIF and AVERAGEIFS?
+AVERAGEIF allows averaging based on a single criterion, while AVERAGEIFS can handle multiple criteria, making it more versatile for complex data analysis.
How do I create a pivot table in Excel?
+To create a pivot table, select your data range, go to the "Insert" tab, click on "PivotTable," choose a cell for the pivot table, and then customize it by dragging fields to the "Row Labels," "Column Labels," and "Values" areas.
What are the benefits of using pivot tables for averaging by name?
+Pivot tables offer dynamic analysis, easy filtering, and the ability to change calculation types, making them highly beneficial for averaging by name and other data analysis tasks.
In conclusion, averaging by name in Excel is a versatile and powerful analytical tool that can be approached through various methods, including the use of formulas like AVERAGEIF and AVERAGEIFS, and the dynamic capabilities of pivot tables. By mastering these techniques, users can efficiently summarize and analyze large datasets, uncovering insights that might otherwise remain hidden. Whether for personal, academic, or professional purposes, the ability to average by name is an essential skill in the world of data analysis. So, go ahead and explore these methods, and discover how Excel can help you make the most of your data.