Intro
Highlighting every 5th row in Excel can be a useful feature for organizing and analyzing data. This can be particularly helpful when dealing with large datasets, as it allows for easier visual distinction between different data points. To achieve this, you can use Excel's built-in formatting features or utilize formulas to create rules for highlighting.
The importance of highlighting rows in Excel cannot be overstated, as it aids in data visualization, making patterns and trends more apparent, and can significantly improve the readability of your spreadsheets. Whether you're working on financial reports, inventory management, or any other type of data analysis, being able to highlight specific rows can enhance your productivity and understanding of the data.
For individuals who frequently work with Excel, knowing how to apply conditional formatting to highlight every nth row is a valuable skill. It not only adds to the aesthetic appeal of your spreadsheet but also serves a practical purpose in data analysis. Moreover, this technique can be adapted for various intervals, not just every 5th row, offering flexibility in how you choose to organize and present your data.
Using Conditional Formatting to Highlight Every 5th Row

To highlight every 5th row in Excel using conditional formatting, follow these steps:
- Select the range of cells you want to apply the formatting to.
- Go to the "Home" tab on the Excel ribbon.
- Click on "Conditional Formatting" in the "Styles" group.
- Choose "New Rule."
- Select "Use a formula to determine which cells to format."
- In the formula bar, enter the formula
=MOD(ROW(),5)=0if you want to highlight every 5th row starting from the first row. If your data starts from a different row, adjust the formula accordingly. - Click "Format" and choose the formatting you want to apply (e.g., fill color).
- Click "OK" to apply the rule.
Understanding the MOD Formula
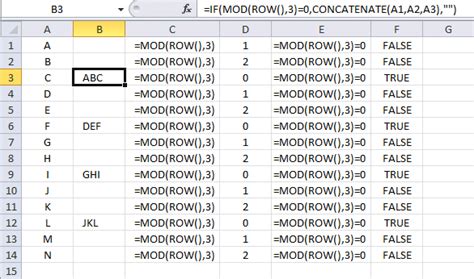
The MOD formula, =MOD(ROW(),5)=0, is key to highlighting every 5th row. Here's how it works:
ROW()returns the row number of the current cell.MODcalculates the remainder of the division of the row number by 5.- If the remainder is 0, it means the row is a multiple of 5, and thus, every 5th row is highlighted.
Adjusting the Formula for Different Intervals
To highlight rows at different intervals (for example, every 3rd or 10th row), you simply adjust the number in the MOD formula. For instance, to highlight every 3rd row, you would use `=MOD(ROW(),3)=0`.Applying the Formula to Specific Ranges
If your data does not start from the first row or you want to apply this formatting to a specific range (for example, A1:A100), you need to adjust the formula to account for the offset. For data starting from row 2 and wanting to highlight every 5th row, you might use =MOD(ROW()-1,5)=0 if you're applying the formula from row 1 downwards, assuming the first row of data is in row 2.
Practical Applications of Highlighting Rows
Highlighting every nth row has numerous practical applications: - **Data Analysis:** In financial analysis, highlighting every nth row can help in identifying patterns or trends over regular intervals. - **Inventory Management:** For inventory that needs to be checked or rotated at regular intervals, highlighting rows can serve as a visual reminder. - **Scheduling:** In scheduling applications, highlighting rows can help distinguish between different shifts, days, or weeks.Using VBA Macros for Advanced Formatting
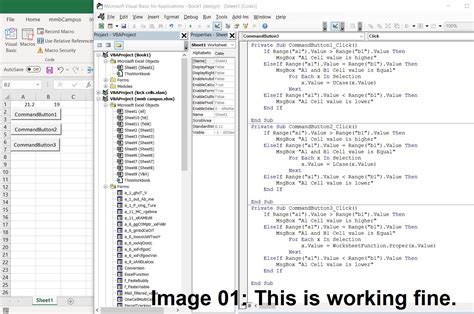
For more advanced or dynamic formatting needs, VBA macros can be used. Macros allow for automation of tasks, including applying formatting rules based on complex conditions. To use a VBA macro to highlight every 5th row:
- Open the Visual Basic Editor (VBE) by pressing
Alt + F11or navigating to Developer > Visual Basic. - Insert a new module by right-clicking on any of the objects for your workbook in the "Project" window and choosing
Insert>Module. - Paste the following code into the module window:
Sub HighlightEvery5thRow()
    Dim ws As Worksheet
    Set ws = ActiveSheet

    For Each cell In ws.UsedRange
        If cell.Row Mod 5 = 0 Then
            cell.Interior.ColorIndex = 6 'Yellow color, adjust as needed
        End If
    Next cell
End Sub
- Close the VBE and run the macro by pressing
Alt + F8, selectingHighlightEvery5thRow, and clicking "Run."
Benefits of Using VBA Macros
VBA macros offer several benefits for tasks like highlighting rows: - **Flexibility:** Macros can be easily modified to accommodate different conditions or intervals. - **Automation:** Once set up, macros can automate the formatting process, saving time. - **Customization:** Macros allow for advanced customization that may not be possible with built-in Excel functions.Gallery of Excel Formatting Techniques
Excel Formatting Gallery


Frequently Asked Questions
How do I highlight every other row in Excel?
+To highlight every other row, you can use the formula `=MOD(ROW(),2)=0` in conditional formatting.
Can I use VBA to automatically apply formatting when a worksheet is opened?
+Yes, you can use the Workbook_Open event in VBA to run a macro that applies formatting automatically when the workbook is opened.
How do I remove conditional formatting from a range of cells?
+Select the range of cells, go to the Home tab, click on Conditional Formatting, and then select "Clear Rules" to remove the formatting.
In conclusion, highlighting every 5th row in Excel is a straightforward process that can be accomplished through either the use of conditional formatting or VBA macros. Both methods offer flexibility and can be adapted for various intervals or specific ranges within your spreadsheet. By mastering these techniques, you can enhance your data analysis capabilities, improve the readability of your spreadsheets, and increase your overall productivity in Excel. We invite you to share your experiences with highlighting rows in Excel, ask any questions you may have about the process, or explore more advanced formatting techniques to further customize your spreadsheets.