Intro
Protect your Excel data with 5 ways to lock cells, including formulas, worksheets, and entire workbooks, using passwords, permissions, and cell formatting to secure spreadsheets and prevent editing.
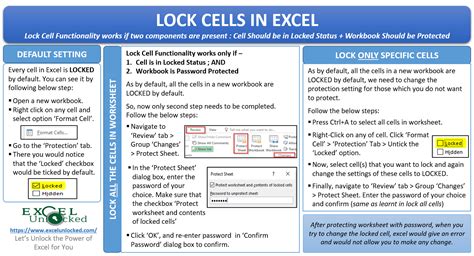
Protecting Excel worksheets from unauthorized changes is crucial for maintaining data integrity and security. One of the key features Excel offers to achieve this is the ability to lock cells, preventing them from being edited or modified. Locking cells in Excel can be particularly useful in a variety of scenarios, such as when you want to share a workbook but need to restrict access to certain data, or when you're working on a collaborative project and want to ensure that critical information isn't altered. Here are five ways to lock Excel cells, each serving a slightly different purpose but all contributing to enhanced security and control over your spreadsheets.
Excel's locking mechanism is quite versatile, allowing you to protect not just the data within cells but also the cell formatting, ensuring that the layout and appearance of your worksheet remain consistent. This is especially important in professional environments where the presentation of data is as critical as the data itself. By locking cells, you can prevent accidental changes, such as deletion, modification, or formatting changes, thereby safeguarding your data and the overall structure of your worksheets.
Locking cells is a two-step process that involves first selecting the cells you want to protect and then applying protection to the worksheet. By default, all cells in an Excel worksheet are locked, but this locking applies only after you protect the worksheet. Therefore, to effectively lock cells, you must select the cells you wish to remain editable, unlock them, and then apply worksheet protection. This method allows for a granular control over what can be changed and what cannot, giving you the flexibility to collaborate while maintaining control.
Understanding Excel Cell Locking
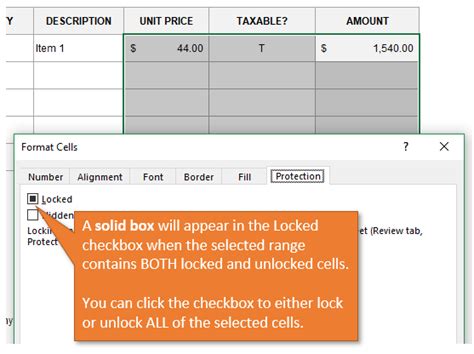
Before diving into the methods of locking cells, it's essential to understand the basics of Excel cell locking. Excel differentiates between locked and unlocked cells, with all cells being locked by default. However, the lock only comes into effect once the worksheet is protected. To unlock cells, you select them, right-click, and choose "Format Cells," then uncheck the "Locked" checkbox in the Protection tab. After unlocking the desired cells, you can protect the worksheet to ensure that only the unlocked cells can be edited.
Method 1: Locking Specific Cells
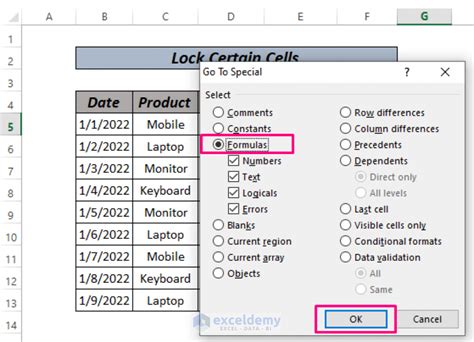
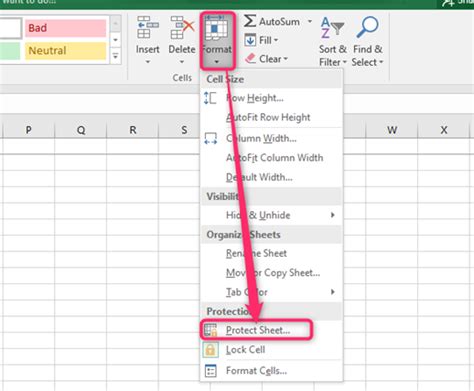
To lock specific cells in Excel, start by selecting the entire worksheet by pressing Ctrl+A. Then, go to the Home tab, find the "Cells" group, click on "Format," and select "Lock Cell" to lock all cells. Next, select the specific cells you want to keep editable, right-click on them, choose "Format Cells," and in the Protection tab, uncheck "Locked." After setting up your cells, go to the Review tab, click on "Protect Sheet," and follow the prompts to protect your worksheet. This method allows for precise control over which cells can be edited.
Method 2: Locking an Entire Row or Column
Sometimes, you might want to lock an entire row or column. This can be useful for headers or for data that should not be altered. To do this, select the row or column you wish to lock, right-click, and choose "Format Cells." In the Protection tab, ensure that the "Locked" checkbox is selected. Since all cells are locked by default, this step essentially confirms that these cells should remain locked. Then, protect your worksheet as described before. This method is particularly useful for maintaining the integrity of your spreadsheet's structure.
Method 3: Using Conditional Formatting
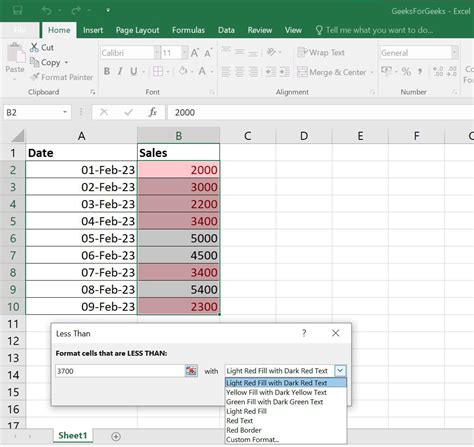
While not a direct method of locking cells, conditional formatting can be used to highlight cells that should not be changed, serving as a visual deterrent. Select the cells you want to highlight, go to the Home tab, click on "Conditional Formatting," and choose a formatting rule that stands out, such as filling the cells with a specific color if they contain certain data. This doesn't prevent changes but makes it clear which cells are critical.

Method 4: Protecting a Worksheet
Protecting a worksheet is the final step in locking cells and is crucial for ensuring that the locking mechanism is effective. To protect a worksheet, go to the Review tab, click on "Protect Sheet," enter a password, and choose what users can do. You can allow users to select locked cells, select unlocked cells, format cells, insert rows or columns, and more. This step is essential as it activates the cell locking and unlocking settings you've applied.
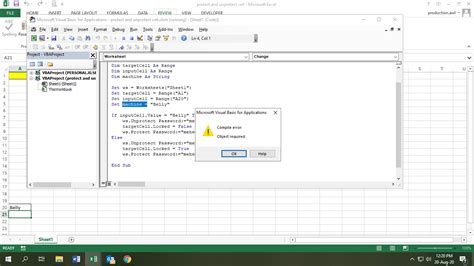
Method 5: Using VBA to Lock Cells
For more advanced control, you can use Visual Basic for Applications (VBA) to lock cells based on specific conditions. This involves writing a script that checks conditions and then locks or unlocks cells accordingly. While this method requires some programming knowledge, it offers a high degree of flexibility and automation, making it ideal for complex spreadsheets or for implementing custom security rules.
Benefits of Locking Excel Cells
Locking Excel cells offers several benefits, including enhanced security, improved collaboration, and better data integrity. By controlling what can be edited and what cannot, you ensure that critical data remains safe and that the structure of your worksheets is maintained. This is particularly important in professional and academic environments where data accuracy and presentation are paramount.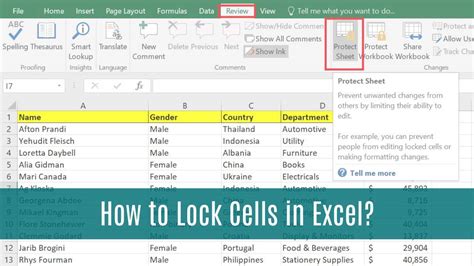
Common Uses of Locked Cells
Locked cells are commonly used in a variety of scenarios, including budgeting spreadsheets, where certain financial data should not be altered; educational materials, where formulas or critical information need to be protected; and collaborative projects, where different team members have different levels of access to the data.
Best Practices for Locking Cells
When locking cells, it's essential to follow best practices to ensure that your worksheets are both secure and functional. This includes clearly communicating which cells are locked and why, using strong passwords for worksheet protection, and regularly reviewing and updating locked cells as needed.
Gallery of Excel Cell Locking:
Excel Cell Locking Image Gallery


How do I lock cells in Excel to prevent editing?
+To lock cells in Excel, select the cells you want to lock, right-click, and choose "Format Cells." In the Protection tab, ensure the "Locked" checkbox is selected. Then, protect your worksheet by going to the Review tab, clicking on "Protect Sheet," and following the prompts.
Can I lock specific cells while allowing others to be edited?
+Yes, you can lock specific cells while allowing others to be edited. First, select all cells and unlock them. Then, select the cells you want to lock, right-click, and choose "Format Cells." In the Protection tab, check the "Locked" checkbox. Finally, protect your worksheet to apply these settings.
How do I unlock cells in a protected worksheet?
+To unlock cells in a protected worksheet, you first need to unprotect the sheet. Go to the Review tab, click on "Unprotect Sheet," and enter the password if prompted. Then, select the cells you want to unlock, right-click, choose "Format Cells," and in the Protection tab, uncheck the "Locked" checkbox.
In conclusion, locking cells in Excel is a powerful feature that enhances the security and integrity of your worksheets. By understanding how to lock cells, unlock them, and protect worksheets, you can better control access to your data and ensure that critical information remains safe and consistent. Whether you're working on personal projects, collaborative efforts, or professional assignments, mastering the art of cell locking in Excel can significantly improve your workflow and data management. So, the next time you're working on an Excel spreadsheet, consider the benefits of locking cells to protect your data and streamline your work process.