Intro
Learn to turn a row into a column in Excel with ease. Discover simple steps for transposing data, using pivot tables, and more Excel formatting tips.
When working with data in Excel, it's common to need to rearrange the layout to better suit your analysis or presentation needs. One such rearrangement is turning a row into a column, or vice versa. This can be particularly useful for data visualization, reporting, or when you need to reorganize your data for further analysis. Excel provides several methods to achieve this, including using the transpose function, pivot tables, and manual copying and pasting. Let's explore these methods in detail.
To start, let's consider why you might want to turn a row into a column. Perhaps you have a dataset where categories are listed horizontally but would be more readable or usable if they were stacked vertically. Whatever the reason, Excel's flexibility allows you to easily manipulate your data to meet your needs.
Method 1: Using the Transpose Function
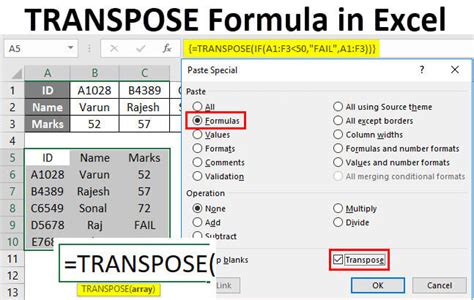
One of the most straightforward methods to turn a row into a column is by using the transpose function. This function is available in the formula tab under the "Function Library" group, but it's more commonly accessed through the "Paste Special" option after copying your data.
- Select the Row: Click on the row you want to transpose. If your row has headers, include them in your selection.
- Copy: Right-click on the selection and choose "Copy" or use the keyboard shortcut Ctrl+C.
- Select Destination: Click on the cell where you want the transposed data to start.
- Paste Special: Right-click and select "Paste Special" or use the keyboard shortcut Ctrl+Alt+V.
- Transpose: In the "Paste Special" dialog box, check the "Transpose" box and click OK.
Your row will now be converted into a column, starting from the cell you selected as the destination.
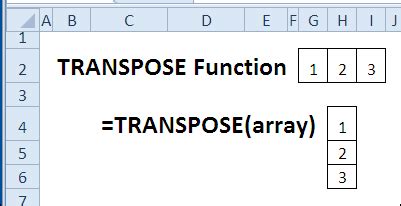
Method 2: Using the TRANSPOSE Function Directly in a Formula
For a more dynamic approach, especially in Excel versions that support dynamic arrays (Excel 2019, Excel 365), you can use the TRANSPOSE function directly in a formula.
- Select the Destination Range: Choose a range of cells that matches the number of columns in your original row (since you're transposing, the number of columns becomes the number of rows).
- Enter the Formula: Type
=TRANSPOSE(, then select the original row, and close the parenthesis). - Press Enter: If you're using a version of Excel that supports dynamic arrays, pressing Enter will automatically fill the selected range with the transposed data.
Considerations for Dynamic Arrays
When using the TRANSPOSE function in dynamic arrays, ensure that the destination range is not manually filled with data, as this can lead to a #SPILL! error. The beauty of dynamic arrays is that they automatically adjust the output range based on the formula's result, so you don't need to pre-select the exact range in most cases.
Method 3: Using Power Query

Power Query is a powerful tool in Excel that allows for advanced data manipulation. You can use it to transpose data as well.
- Select Your Data: Choose the row you want to transpose, including headers if applicable.
- Go to Power Query: Navigate to the "Data" tab and click "From Table/Range" to open Power Query.
- Transpose: In the Power Query Editor, go to the "Transform" tab, find the "Transpose" option under the "Table" group, and click it.
- Load: Once your data is transposed, click "Close & Load" to load it back into your Excel worksheet.
Benefits of Using Power Query
Using Power Query offers the advantage of being able to refresh your data if the original dataset changes, assuming your data is connected to an external source or if you set up a query to refresh from the worksheet.
Method 4: Manual Transpose with Copy and Paste

For smaller datasets or when you need more control over the process, you can manually transpose data by copying and pasting it.
- Copy the Row: Select the row you want to transpose and copy it.
- Select the Destination: Choose the cell where you want the first item of your row to be pasted as a column.
- Paste Transpose: Right-click on the destination cell, select "Paste Special," and then check "Transpose" before clicking OK.
Tips for Manual Transpose
When manually transposing, ensure you have enough space below your destination cell to accommodate all the items from your original row.
Choosing the Right Method

The method you choose depends on your specific needs and the version of Excel you're using. For most users, the built-in transpose function through "Paste Special" will suffice. However, if you're working with dynamic data or need to perform this operation frequently, using the TRANSPOSE function in a formula or leveraging Power Query might be more efficient.
Conclusion and Next Steps
Turning a row into a column in Excel is a straightforward process that can greatly enhance your data analysis and presentation capabilities. Whether you're using the transpose function, a formula, Power Query, or a manual method, Excel provides the flexibility to manipulate your data as needed. As you become more comfortable with these methods, you'll find that rearranging your data to better suit your needs becomes second nature, allowing you to focus on the insights and actions that your data can inform.
Gallery of Transpose Operations
Transpose Operations Image Gallery


FAQs
What is the easiest way to transpose data in Excel?
+The easiest way is often using the "Paste Special" > "Transpose" option after copying your data.
Can I transpose data without using formulas or Power Query?
+Yes, you can use the "Paste Special" option to transpose data without formulas or Power Query.
Is there a limit to how much data I can transpose at once?
+The limit depends on your version of Excel and your computer's memory. Generally, you can transpose large datasets, but extremely large ones might require more powerful tools or methods.
If you've found this guide helpful, consider sharing it with others who might benefit from learning how to transpose data in Excel. Whether you're a beginner looking to enhance your Excel skills or an advanced user seeking to refine your data manipulation techniques, mastering the art of transposing data can significantly improve your productivity and data analysis capabilities.