Intro
Unlock efficient Excel editing with 5 ways to auto-enable features, boosting productivity via formulas, macros, and cell formatting, streamlining spreadsheet management and data analysis.
The importance of efficient data management and analysis cannot be overstated in today's fast-paced business environment. Microsoft Excel, with its robust features and versatility, has become an indispensable tool for professionals across various industries. However, one common hurdle users face is the need to enable editing in Excel, especially when dealing with protected or read-only files. This necessity can significantly slow down workflow and productivity. In this article, we will delve into the world of Excel, exploring the reasons behind the need to enable editing and providing comprehensive guides on how to auto-enable Excel editing, thereby streamlining your work processes.
Understanding the fundamentals of Excel and its editing features is crucial for any professional looking to maximize their productivity. Excel offers a wide range of tools and functionalities that can transform data into actionable insights. However, when Excel files are protected or set to read-only, accessing these tools can become challenging. The reasons behind file protection vary, from preventing accidental changes to safeguarding sensitive information. Nonetheless, there are legitimate scenarios where enabling editing is not just desirable but necessary.
Whether you are a seasoned Excel user or just starting to explore its capabilities, the ability to seamlessly edit and manipulate data is essential. The good news is that there are several methods to auto-enable Excel editing, catering to different needs and skill levels. From using built-in Excel features to leveraging external tools and macros, the solutions are diverse and accessible. By mastering these techniques, you can significantly enhance your workflow efficiency, focus on high-value tasks, and make data-driven decisions with confidence.
Understanding Excel Editing Restrictions
Before diving into the methods for auto-enabling Excel editing, it's crucial to understand the types of editing restrictions you might encounter. Excel files can be protected in various ways, including password protection, read-only recommendations, and workbook or worksheet protection. Each type of protection serves a specific purpose, such as preventing unauthorized changes or limiting access to sensitive data. Recognizing the type of restriction is the first step towards finding an appropriate solution.
Types of Excel File Protections
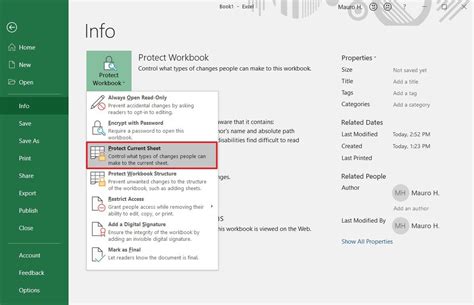
- **Password Protection:** Requires a password to open or edit the file. - **Read-Only Recommendation:** Prompts users to open the file as read-only but allows them to enable editing. - **Workbook Protection:** Restricts changes to the workbook structure, such as adding or deleting worksheets. - **Worksheet Protection:** Limits changes to worksheet data, formatting, or structure.Method 1: Using Excel's Built-in Features
For files with read-only recommendations or those that are not password-protected, Excel offers straightforward methods to enable editing. If a file opens in read-only mode, look for the "Edit Anyway" button in the notification bar at the top of the Excel window. Clicking this button allows you to override the read-only status and make changes to the file. However, for password-protected files, you will need the password to unlock the file for editing.
Steps to Enable Editing Using Built-in Features
1. Open the Excel file. 2. If prompted, click on "Edit Anyway" to override read-only status. 3. For password-protected files, enter the password when prompted.Method 2: Utilizing VBA Macros
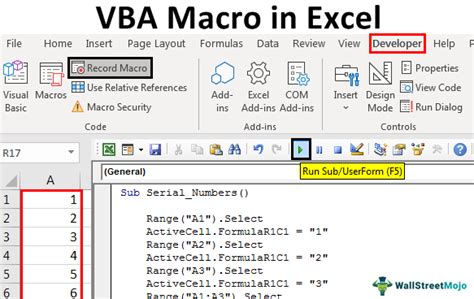
Visual Basic for Applications (VBA) macros can be a powerful tool for automating tasks in Excel, including enabling editing in protected files. By creating or using existing macros, you can bypass certain protections and edit files that would otherwise be inaccessible. However, using macros requires caution, as they can pose security risks if sourced from untrusted locations.
Creating a Macro to Enable Editing
1. Open the Visual Basic Editor (VBE) by pressing Alt + F11. 2. Insert a new module by right-clicking on any of the objects for your workbook listed in the "Project" window and choosing Insert > Module. 3. Paste the appropriate VBA code into the module. 4. Save the workbook as an Excel Macro-Enabled Workbook (*.xlsm).Method 3: Third-Party Tools and Software

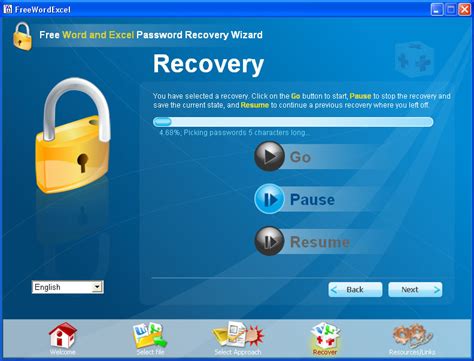
There are various third-party tools and software available that can help remove or bypass Excel file protections, thereby enabling editing. These tools can be especially useful for files where the password is unknown or has been lost. However, it's essential to use reputable software to avoid potential security risks or data corruption.
Using Third-Party Tools
1. Research and select a reputable tool designed for Excel password recovery or protection removal. 2. Download and install the software. 3. Follow the tool's instructions to remove the protection and enable editing.Method 4: Online Services

Several online services offer Excel password recovery and protection removal capabilities. These services can be convenient, as they do not require downloading or installing software. However, users must be cautious when uploading files to online services, especially if the files contain sensitive information.
Using Online Services
1. Search for and select a reputable online service for Excel password recovery. 2. Upload your Excel file to the service. 3. Follow the service's instructions to recover the password or remove protection.Method 5: Manual Password Recovery
For users who have forgotten their Excel file passwords, manual recovery methods can be a last resort. This approach involves attempting to guess the password or using brute force methods, which can be time-consuming and may not always be successful.
Manual Password Recovery Steps
1. Attempt to recall the password based on common patterns or previously used passwords. 2. Use a brute force method, trying all possible combinations of characters, numbers, and symbols.Excel Editing Gallery


How do I protect my Excel file from unauthorized editing?
+To protect your Excel file, go to the "Review" tab, click on "Protect Workbook" or "Protect Sheet," and follow the prompts to set a password.
Can I recover a forgotten Excel file password?
+Yes, there are several methods to recover a forgotten Excel file password, including using third-party software, online services, or attempting manual recovery.
How do I enable editing in a read-only Excel file?
+If the file is not password-protected, you can click on the "Edit Anyway" button when prompted. For password-protected files, you will need to enter the password or use a method to recover or bypass it.
In conclusion, enabling editing in Excel files can be straightforward or complex, depending on the type of protection and the tools at your disposal. By understanding the various methods available, from using Excel's built-in features to leveraging VBA macros, third-party tools, online services, and manual password recovery, you can effectively manage and edit your Excel files. Whether you are a professional analyst, a student, or an entrepreneur, mastering these techniques will enhance your productivity and proficiency in Excel, allowing you to unlock the full potential of your data. We invite you to share your experiences, tips, and questions regarding Excel editing and protection in the comments below, and don't forget to share this article with anyone who might benefit from these insights.