Intro
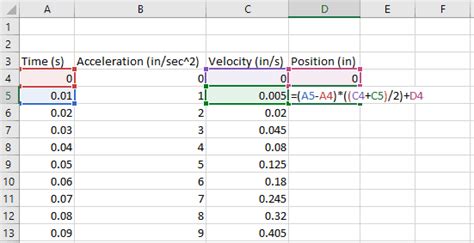
Calculating the area under a curve in Excel can be a useful tool for various applications, including engineering, economics, and data analysis. The area under a curve can represent the accumulation of quantities over a given interval, such as the total distance traveled by an object or the total amount of work done. In this article, we will explore the different methods to calculate the area under a curve in Excel, including the use of formulas, charts, and add-ins.
The importance of calculating the area under a curve lies in its ability to provide valuable insights into the behavior of functions and the accumulation of quantities over time. For instance, in physics, the area under a velocity-time curve represents the total distance traveled by an object, while in economics, the area under a demand curve represents the total revenue generated by a product. By calculating the area under a curve, we can gain a deeper understanding of the underlying phenomena and make informed decisions.
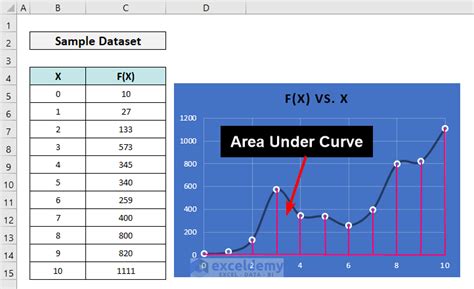
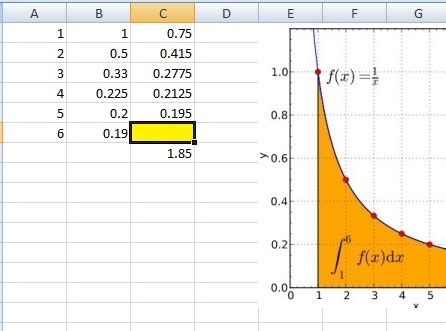
To calculate the area under a curve in Excel, we need to have a set of data points that define the curve. These data points can be in the form of x-y coordinates, where x represents the independent variable and y represents the dependent variable. Once we have the data points, we can use various methods to calculate the area under the curve, including the trapezoidal rule, Simpson's rule, and numerical integration.
Method 1: Using Formulas

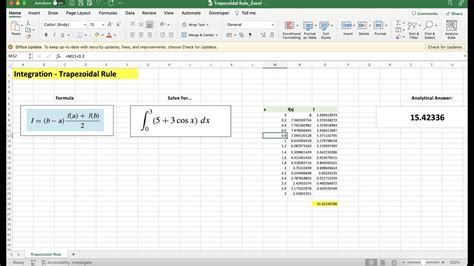
One of the simplest methods to calculate the area under a curve in Excel is to use formulas. We can use the trapezoidal rule, which approximates the area under the curve by dividing it into trapezoids and summing up their areas. The formula for the trapezoidal rule is:
Area = (h/2) * (y1 + y2 + 2*y3 + 2*y4 +... + 2*yn-1 + yn)
where h is the width of each subinterval, and y1, y2,..., yn are the function values at the corresponding x-coordinates.
To implement this formula in Excel, we can create a table with the x-coordinates and corresponding function values, and then use the formula to calculate the area under the curve.
Step-by-Step Instructions
- Create a table with the x-coordinates and corresponding function values.
- Calculate the width of each subinterval (h) by subtracting the x-coordinates of consecutive points.
- Use the trapezoidal rule formula to calculate the area under the curve.
- Sum up the areas of all the trapezoids to get the total area under the curve.
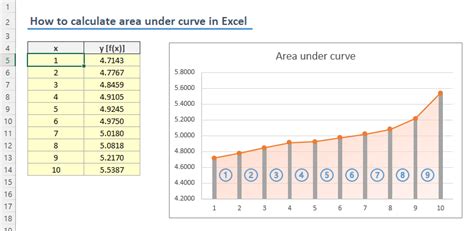
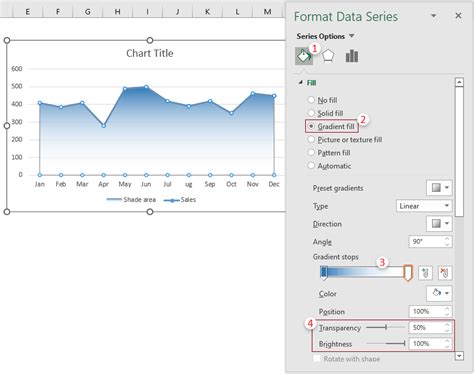
Method 2: Using Charts
Another method to calculate the area under a curve in Excel is to use charts. We can create a chart of the function and then use the chart tools to calculate the area under the curve.
To create a chart of the function, we can follow these steps:
- Select the data range that contains the x-coordinates and function values.
- Go to the "Insert" tab and click on the "Scatter" button to create a scatter plot.
- Right-click on the chart and select "Chart Options" to customize the chart.
- In the "Chart Options" dialog box, select the "Area" tab and check the box next to "Area under the curve".
Once we have created the chart, we can use the chart tools to calculate the area under the curve. We can right-click on the chart and select "Calculate Area" to get the total area under the curve.
Advantages of Using Charts
- Easy to create and customize charts.
- Can be used to visualize the function and the area under the curve.
- Can be used to calculate the area under the curve quickly and easily.
Method 3: Using Add-ins

There are several add-ins available for Excel that can be used to calculate the area under a curve. These add-ins can provide more advanced features and functions than the built-in Excel formulas and charts.
Some popular add-ins for calculating the area under a curve in Excel include:
- Analysis ToolPak: This add-in provides a range of statistical and mathematical functions, including numerical integration and area under the curve calculations.
- XLSTAT: This add-in provides a range of statistical and data analysis functions, including area under the curve calculations.
- Origin: This add-in provides a range of data analysis and visualization functions, including area under the curve calculations.
To use an add-in to calculate the area under a curve, we can follow these steps:
- Install the add-in and activate it in Excel.
- Select the data range that contains the x-coordinates and function values.
- Use the add-in's functions and tools to calculate the area under the curve.
Advantages of Using Add-ins
- Provide more advanced features and functions than built-in Excel formulas and charts.
- Can be used to calculate the area under the curve quickly and easily.
- Can be used to perform other data analysis and visualization tasks.
Area Under Curve Excel Image Gallery


What is the area under a curve in Excel?
+The area under a curve in Excel represents the accumulation of quantities over a given interval, such as the total distance traveled by an object or the total amount of work done.
How do I calculate the area under a curve in Excel?
+There are several methods to calculate the area under a curve in Excel, including using formulas, charts, and add-ins. The method you choose will depend on the complexity of the function and the desired level of accuracy.
What are the advantages of using charts to calculate the area under a curve in Excel?
+The advantages of using charts to calculate the area under a curve in Excel include ease of use, visualization of the function and area, and quick calculation of the area.
In conclusion, calculating the area under a curve in Excel can be a useful tool for various applications. By using formulas, charts, or add-ins, we can calculate the area under a curve quickly and easily. Whether you are an engineer, economist, or data analyst, understanding how to calculate the area under a curve in Excel can provide valuable insights into the behavior of functions and the accumulation of quantities over time. We invite you to share your experiences and tips for calculating the area under a curve in Excel, and to ask any questions you may have about this topic.