Intro
Learn to delete empty rows in Excel using formulas, filters, and shortcuts, improving data analysis and spreadsheet organization with efficient row removal techniques.
Deleting empty rows in Excel can be a tedious task, especially when dealing with large datasets. However, there are several methods to accomplish this, each with its own advantages and disadvantages. In this article, we will explore the different ways to delete empty rows in Excel, including using the built-in features, formulas, and macros.
The importance of deleting empty rows in Excel cannot be overstated. Empty rows can make your dataset appear cluttered and disorganized, making it difficult to analyze and understand the data. Moreover, empty rows can also affect the performance of your Excel workbook, especially if you are working with large datasets. By deleting empty rows, you can improve the overall appearance and performance of your Excel workbook.
Deleting empty rows in Excel is a crucial step in data cleaning and preparation. It helps to remove unnecessary data, reduce file size, and improve data analysis. Whether you are working with a small dataset or a large one, deleting empty rows is an essential task that can help you to work more efficiently and effectively. In the following sections, we will explore the different methods of deleting empty rows in Excel, including the benefits and limitations of each method.
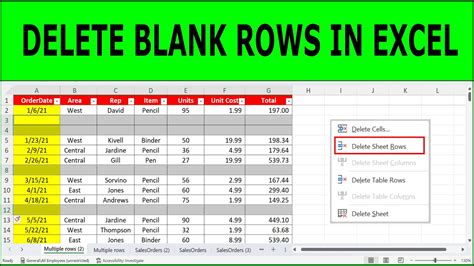
Method 1: Using the Built-in Feature
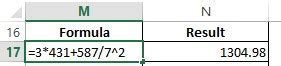
Method 2: Using Formulas
Method 3: Using Macros
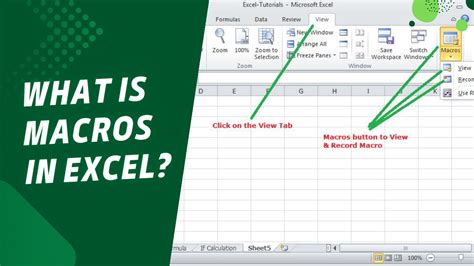
Benefits of Using Macros
Using macros to delete empty rows has several benefits. Firstly, it saves time and effort, as you don't have to manually select and delete the empty rows. Secondly, it reduces the risk of errors, as the macro will perform the task consistently and accurately. Finally, it improves productivity, as you can focus on other tasks while the macro does the work for you.Method 4: Using Power Query
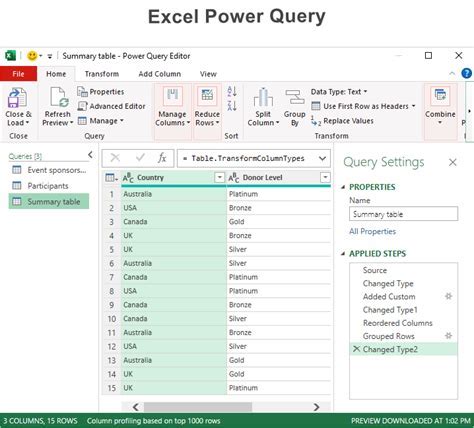
Benefits of Using Power Query
Using Power Query to delete empty rows has several benefits. Firstly, it is a flexible and powerful tool that can handle large datasets with ease. Secondly, it allows you to perform multiple tasks in a single step, such as filtering, sorting, and deleting empty rows. Finally, it improves data analysis, as you can use Power Query to create custom queries and reports.Excel Image Gallery


How do I delete empty rows in Excel?
+To delete empty rows in Excel, select the entire dataset, go to the "Home" tab, and click on the "Find & Select" button. From the dropdown menu, select "Go To Special" and then choose "Blanks". This will select all the empty cells in the dataset. Once the empty cells are selected, you can right-click on any of the selected cells and choose "Delete Row" to delete the empty rows.
What are the benefits of deleting empty rows in Excel?
+Deleting empty rows in Excel has several benefits, including improving the appearance and performance of your Excel workbook, reducing file size, and improving data analysis. By deleting empty rows, you can also reduce the risk of errors and improve productivity.
How do I use Power Query to delete empty rows in Excel?
+To use Power Query to delete empty rows in Excel, select the dataset, go to the "Data" tab, and click on the "From Table/Range" button. Then, click on the "Remove Rows" button and select "Remove Empty Rows" from the dropdown menu.
In conclusion, deleting empty rows in Excel is an essential task that can help you to work more efficiently and effectively. By using the built-in feature, formulas, macros, or Power Query, you can delete empty rows and improve the appearance and performance of your Excel workbook. Whether you are working with a small dataset or a large one, deleting empty rows is a crucial step in data cleaning and preparation. We hope this article has provided you with the necessary information and techniques to delete empty rows in Excel. If you have any further questions or need more assistance, please don't hesitate to comment below. Share this article with your friends and colleagues who may benefit from it, and subscribe to our blog for more Excel tips and tricks.