Intro
Learn how to apply the Excel Less Than Date Filter to narrow data by specific dates, using formulas and conditional formatting to simplify tasks and improve workflow efficiency with date-based filtering and data analysis techniques.
When working with dates in Excel, filtering data to show records that are less than a specific date can be incredibly useful for analyzing trends, identifying outdated information, and making informed decisions. Excel provides several ways to achieve this, including using the built-in filter feature, formulas, and pivot tables. Understanding how to apply these methods can significantly enhance your data analysis capabilities.
The importance of filtering data by date cannot be overstated, especially in environments where data is constantly updated and decisions need to be made based on the most current information. For instance, in sales analysis, being able to quickly identify all transactions that occurred before a certain date can help in assessing sales performance over time, identifying seasonal trends, and planning future sales strategies.
Moreover, the ability to filter data by date is crucial in financial reporting, where transactions need to be categorized by periods (e.g., quarterly, annually). It helps in generating reports that are timely and relevant, ensuring that financial decisions are based on up-to-date and accurate data.
Given the widespread use of Excel in both personal and professional settings, mastering the skill of filtering data by date is essential for anyone looking to leverage data for decision-making purposes. Whether you're a student analyzing data for a project, a business owner tracking sales, or a financial analyst preparing reports, Excel's date filtering capabilities can streamline your workflow and improve the accuracy of your analyses.
Using Excel's Built-in Filter Feature
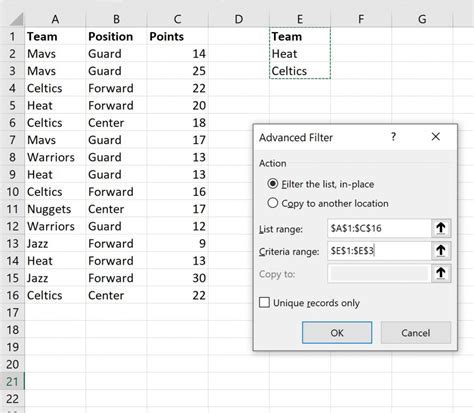
One of the most straightforward ways to filter data in Excel to show records less than a specific date is by using the built-in filter feature. Here’s how you can do it:
- Select the entire data range that you want to filter, including headers.
- Go to the "Data" tab in the ribbon.
- Click on "Filter" to enable filtering for your selected data range. You'll see filter arrows appear in the header cells.
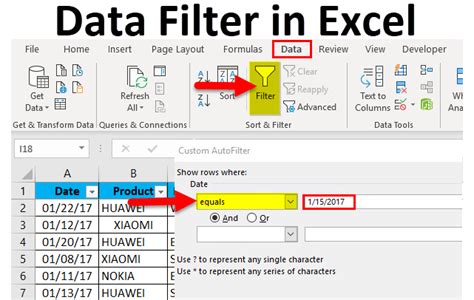
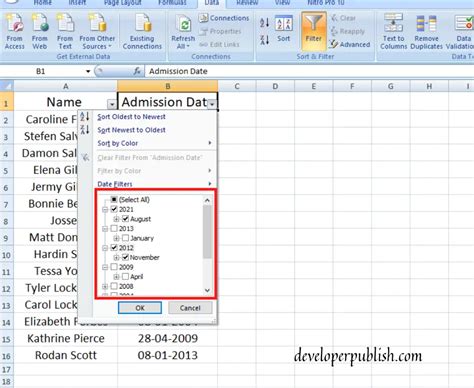
- Click on the filter arrow in the column containing the dates you want to filter.
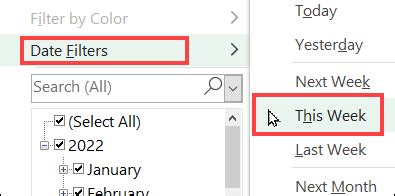
- Select "Date Filters" and then choose "Before" from the dropdown menu.
- In the dialog box that appears, select the date you want to filter by. You can either type the date directly or use the calendar tool to select it.
- Click "OK" to apply the filter. Your data will now be filtered to show only the rows where the date is before the date you specified.
Using Formulas for Date Filtering
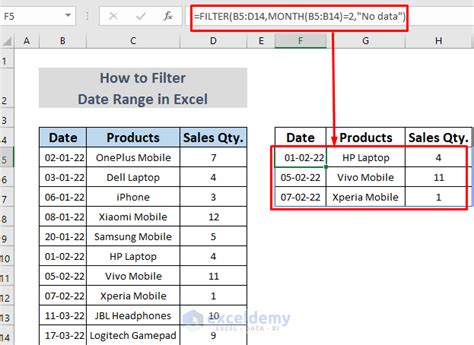
For more complex filtering needs or when you want to filter data without directly altering the original dataset, using formulas can be a powerful approach. One common method is to use the IF function in combination with the TODAY function or a specific date to filter data.
For example, if you have a list of dates in column A and you want to identify which dates are before January 1, 2023, you can use the following formula in a new column:
=IF(A2This formula checks if the date in cell A2 is before January 1, 2023. If it is, the formula returns "Before 2023"; otherwise, it returns "Not Before 2023". You can then filter this new column to show only the rows where the result is "Before 2023".
Using Pivot Tables for Date Filtering
Pivot tables offer another flexible way to filter data by date in Excel. Here’s a basic outline of how to use a pivot table for this purpose:
- Select your data range, including headers.
- Go to the "Insert" tab and click on "PivotTable".
- Choose a cell to place your pivot table and click "OK".
- Drag the date field from the "Fields" pane to the "Row Labels" area.
- Right-click on the date field in the "Row Labels" area and select "Group".
- In the "Grouping" dialog box, you can group your dates by year, quarter, month, etc.
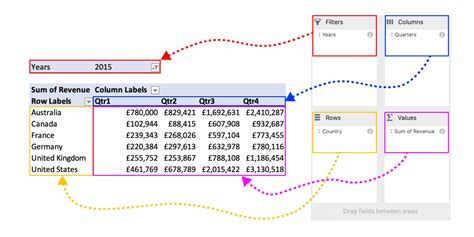
- To filter the dates, drag the date field to the "Filter" area as well.
- Click on the filter arrow next to the date field in the "Filter" area and select the dates you want to show.
Benefits of Using Pivot Tables for Date Filtering
Using pivot tables for date filtering offers several benefits, including the ability to easily group dates, apply multiple filters, and create interactive dashboards. Pivot tables also allow for quick summarization of data, making it easier to analyze trends and patterns over time.
Practical Applications and Examples

The ability to filter data by date has numerous practical applications across various fields. For instance:
- Sales Analysis: Filtering sales data by date can help identify seasonal trends, track sales performance over time, and inform marketing strategies.
- Financial Reporting: Accurately filtering financial transactions by date is crucial for generating timely and accurate financial reports, which are essential for making informed business decisions.
- Project Management: In project management, filtering tasks and milestones by date helps in tracking progress, identifying delays, and planning resources effectively.
Step-by-Step Guide to Filtering Data by Date

For those looking for a more detailed, step-by-step approach to filtering data by date in Excel, here’s a summary:
- Prepare Your Data: Ensure your data is organized with dates in a consistent format.
- Enable Filtering: Select your data range and go to the "Data" tab to enable filtering.
- Apply Date Filter: Use the filter arrow in the date column to select "Date Filters" and then choose the appropriate filter (e.g., "Before").
- Specify the Date: Enter or select the specific date you want to filter by.
- Apply and Refine: Click "OK" to apply the filter and refine your analysis as needed.
Gallery of Excel Date Filtering Examples
Excel Date Filtering Gallery


Frequently Asked Questions
How do I filter dates in Excel to show only records before a specific date?
+You can use Excel's built-in filter feature, formulas, or pivot tables to filter dates. For the built-in filter, select your data, go to the "Data" tab, click "Filter", and then use the "Date Filters" option in the date column to select "Before" and choose your date.
Can I use formulas to filter data by date in Excel?
+Yes, you can use formulas like the IF function combined with the DATE or TODAY function to filter data by date. For example, =IF(A2
How do pivot tables help in filtering data by date?
+Pivot tables allow you to group dates, apply filters, and summarize data easily. You can drag the date field to the "Row Labels" area, group the dates as needed, and then use the filter option in the "Filter" area to select specific dates or date ranges.
In conclusion, filtering data by date in Excel is a versatile and powerful tool that can significantly enhance your data analysis capabilities. Whether through the built-in filter feature, formulas, or pivot tables, Excel provides multiple methods to achieve this, catering to different needs and preferences. By mastering these techniques, you can more effectively manage, analyze, and draw insights from your data, ultimately making more informed decisions in your personal or professional endeavors. We invite you to share your experiences, tips, or questions regarding date filtering in Excel in the comments below, and don't forget to share this article with anyone who might benefit from learning more about Excel's date filtering capabilities.