Intro
Highlighting a selected row in Excel can greatly enhance the visibility and readability of your spreadsheets, especially when dealing with large datasets. This feature allows you to easily identify and focus on specific data points or records within your spreadsheet. In this article, we will delve into the importance of highlighting selected rows, the various methods to achieve this in Excel, and provide practical examples to guide you through the process.
The ability to highlight a selected row is not only aesthetically pleasing but also serves a functional purpose. It can help in data analysis by making it easier to compare data across different columns for a specific row, identify trends, or spot anomalies. Moreover, when collaborating with others or presenting data, highlighting important rows can draw attention to key information, facilitating clearer communication and understanding.
Why Highlight Selected Rows in Excel?
Highlighting selected rows in Excel is beneficial for several reasons. Firstly, it improves the visual appeal of your spreadsheet, making it more engaging and easier to navigate. Secondly, it aids in data analysis by allowing you to quickly identify and work with specific data points. Lastly, it enhances collaboration by providing a clear and visually appealing way to communicate important information to others.
Methods to Highlight Selected Rows
There are several methods to highlight selected rows in Excel, catering to different needs and preferences. The most straightforward method involves using the "Format as Table" feature, which not only highlights the selected row but also applies a professional-looking table format to your data. Another approach is to use Conditional Formatting, a powerful tool that allows you to highlight cells based on specific conditions, including the selection of a row.
Using Conditional Formatting
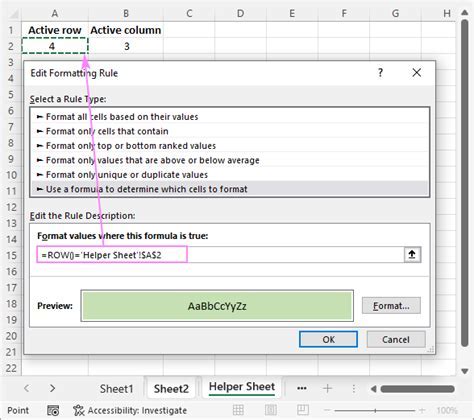
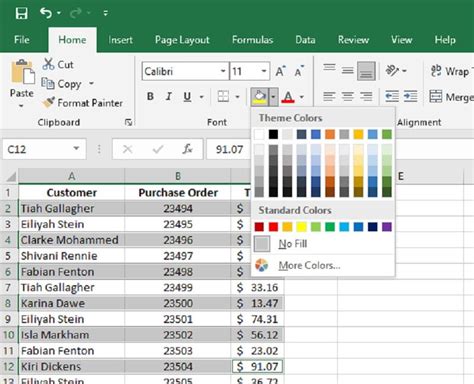
Conditional Formatting is a versatile feature in Excel that enables you to highlight cells based on various conditions, such as values, formulas, or formatting. To highlight a selected row using Conditional Formatting, follow these steps: - Select the range of cells you want to format. - Go to the "Home" tab and click on "Conditional Formatting." - Choose "New Rule" and then select "Use a formula to determine which cells to format." - Enter a formula that refers to the row number, such as "=ROW()=ROW(A1)" if you want to highlight the row of the active cell. - Click "Format" and choose how you want to highlight the cells. - Click "OK" to apply the rule.Practical Applications of Highlighting Selected Rows

Highlighting selected rows has numerous practical applications in data analysis, presentation, and collaboration. For instance, in financial analysis, highlighting rows that represent different quarters can help in comparing performance over time. In educational settings, teachers can use this feature to draw students' attention to specific examples or case studies. In business, highlighting key performance indicators (KPIs) or sales data can facilitate decision-making and strategy development.
Enhancing Data Analysis
Highlighting selected rows can significantly enhance data analysis by making it easier to identify patterns, trends, and outliers. By visually distinguishing specific rows, analysts can quickly focus on the most relevant data, reducing the time spent on data interpretation and increasing the accuracy of insights. Moreover, this feature can be used in conjunction with other Excel tools, such as charts and pivot tables, to create comprehensive and interactive dashboards.Advanced Techniques for Row Highlighting

For more complex highlighting needs, Excel offers advanced techniques, including the use of macros and VBA scripting. These methods allow for dynamic highlighting based on user interactions, such as selecting a cell or changing a value. Although they require a basic understanding of programming, macros and VBA can automate repetitive tasks and create customized highlighting solutions tailored to specific workflows or applications.
Using Macros for Dynamic Highlighting
Macros are sequences of actions that can be recorded and played back to automate tasks in Excel. To create a macro that dynamically highlights a selected row, follow these steps: - Open the Visual Basic Editor by pressing "Alt + F11" or navigating to "Developer" tab and clicking "Visual Basic." - In the Editor, insert a new module by right-clicking on any of the objects for your workbook in the "Project" window and choosing "Insert" > "Module." - Write or paste the VBA code that will handle the row highlighting. For example, you can use the "Worksheet_SelectionChange" event to highlight the row of the active cell. - Save the macro by clicking "File" > "Save" and then close the Visual Basic Editor.Best Practices for Highlighting Selected Rows

When highlighting selected rows, it's essential to follow best practices to ensure that your spreadsheets remain organized, readable, and easy to maintain. This includes using consistent formatting, limiting the use of colors to avoid visual overload, and documenting any macros or complex formulas used for highlighting. Additionally, regularly reviewing and updating your highlighting rules can help in adapting to changing data analysis needs and preventing errors.
Consistency in Formatting
Consistency is key when it comes to formatting in Excel. Using a consistent color scheme and formatting style throughout your spreadsheet can enhance its professional appearance and make it easier for others to understand. When highlighting selected rows, choose colors that contrast well with your background and are easy on the eyes. It's also a good practice to use themes or templates that Excel provides, as they offer pre-designed formatting options that are both visually appealing and consistent.Highlight Selected Row Excel Image Gallery


How do I highlight a selected row in Excel?
+To highlight a selected row in Excel, you can use the "Format as Table" feature or apply Conditional Formatting. For Conditional Formatting, select the range of cells, go to the "Home" tab, click on "Conditional Formatting," choose "New Rule," and then select "Use a formula to determine which cells to format." Enter a formula that refers to the row number, such as "=ROW()=ROW(A1)" for the active cell's row, and then format the cells as desired.
What are the benefits of highlighting selected rows in Excel?
+Highlighting selected rows in Excel improves the visual appeal of your spreadsheet, aids in data analysis by making specific data points stand out, and enhances collaboration by clearly communicating important information to others.
Can I use VBA macros to dynamically highlight rows in Excel?
+Yes, you can use VBA macros to dynamically highlight rows in Excel. By writing or recording a macro that responds to the "Worksheet_SelectionChange" event, you can automatically highlight the row of the active cell or implement more complex highlighting logic based on your needs.
In conclusion, highlighting selected rows in Excel is a powerful feature that can significantly enhance your spreadsheet's readability, facilitate data analysis, and improve collaboration. By understanding the various methods to achieve row highlighting, including the use of Conditional Formatting and VBA macros, you can tailor your Excel spreadsheets to meet your specific needs and workflows. Whether you're a seasoned Excel user or just starting out, mastering the art of row highlighting can take your data analysis and presentation skills to the next level. Feel free to share your experiences, tips, or questions about highlighting selected rows in Excel in the comments below, and don't forget to share this article with anyone who might benefit from learning more about this valuable Excel feature.