Intro
Discover 5 ways to add lines in various formats, including documents, spreadsheets, and design tools, using shortcuts, formulas, and editing features, to enhance readability and organization with line breaks, borders, and separators.
The art of adding lines to various mediums has become an essential skill in today's digital age. Whether you're a graphic designer, an artist, or simply someone who wants to add a personal touch to their documents, knowing how to add lines can be incredibly useful. In this article, we will explore five ways to add lines, including using Microsoft Word, Adobe Illustrator, and other tools.
Adding lines can be a great way to break up text, create visual interest, and add emphasis to important information. With the right techniques and tools, you can create professional-looking lines that enhance the overall appearance of your document or design. So, let's dive in and explore the five ways to add lines.
Method 1: Using Microsoft Word
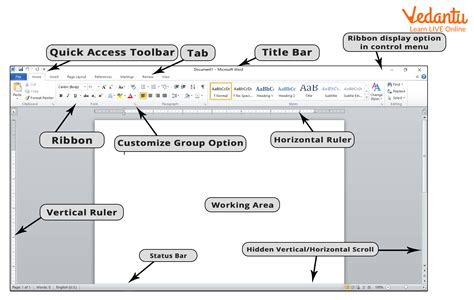
To add a line in Microsoft Word, follow these steps:
- Select the text or paragraph where you want to add the line
- Go to the "Home" tab in the ribbon
- Click on the "Paragraph" group
- Select "Borders and Shading"
- Choose the line style and color you want to use
- Adjust the line width and other settings as needed
Method 2: Using Adobe Illustrator
To add a line in Adobe Illustrator, follow these steps:
- Select the "Pen" or "Line" tool from the toolbar
- Click and drag the tool to create the line
- Customize the line style, color, and width using the control panel
- Use the "Stroke" panel to adjust the line width, color, and other settings
Method 3: Using Online Tools

To add a line using online tools, follow these steps:
- Go to the online tool website
- Select the template or design you want to use
- Click on the "Line" or "Shape" tool
- Customize the line style, color, and width as needed
- Download or share your design
Method 4: Using Keyboard Shortcuts
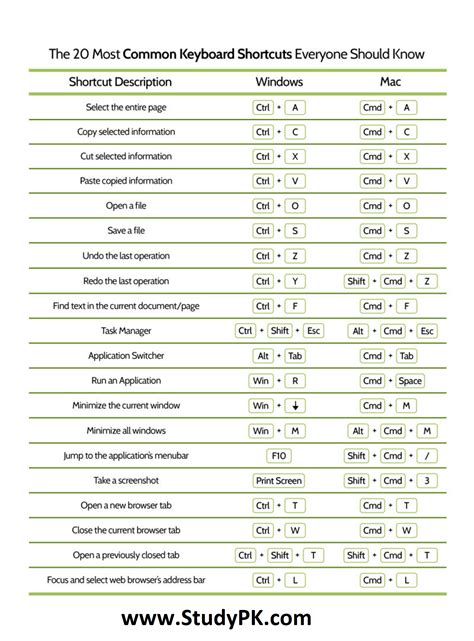
To add a line using keyboard shortcuts, follow these steps:
- Press the "Shift" and "-" keys to create a horizontal line
- Press the "Shift" and "=" keys to create a vertical line
- Use the "Ctrl" and "Shift" keys to customize the line style and width
Method 5: Using HTML and CSS

To add a line using HTML and CSS, follow these steps:
- Use the "
" tag to create a horizontal line - Use the "" tag to create a custom line
- Customize the line style, color, and width using CSS
- Use the "border" property to add a line to an element
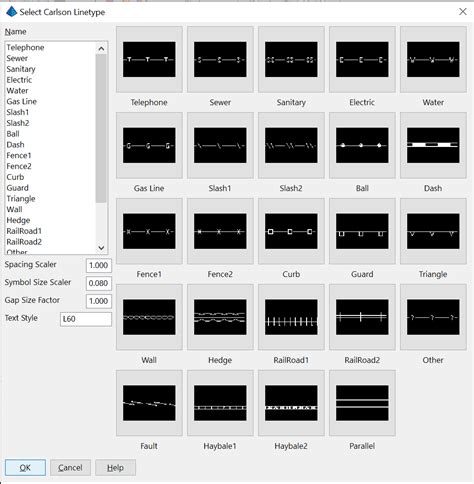
Benefits of Adding Lines
Adding lines can have many benefits, including: * Breaking up text and creating visual interest * Adding emphasis to important information * Creating a professional-looking design * Enhancing the overall appearance of a document or designCommon Uses of Lines
Lines are commonly used in a variety of contexts, including: * Graphic design * Web design * Document creation * Art and illustration * Architecture and engineeringLine Image Gallery


What is the purpose of adding lines in a document?
+The purpose of adding lines in a document is to break up text, create visual interest, and add emphasis to important information.
How do I add a line in Microsoft Word?
+To add a line in Microsoft Word, select the text or paragraph where you want to add the line, go to the "Home" tab, click on the "Paragraph" group, select "Borders and Shading", and choose the line style and color you want to use.
Can I use online tools to add lines to my documents?
+How do I customize the line style and width in Adobe Illustrator?
+To customize the line style and width in Adobe Illustrator, select the "Pen" or "Line" tool, click and drag the tool to create the line, and customize the line style, color, and width using the control panel.
Can I use keyboard shortcuts to add lines?
+×