Intro
Learn to create an Outlook list from Excel by importing contacts and data, using tools like Outlook plugins and VBA scripts, to streamline email marketing and contact management tasks efficiently.
Managing contacts and lists is a crucial aspect of both personal and professional communication. Microsoft Outlook and Excel are two powerful tools that can be integrated to streamline your contact management. If you have a list of contacts in Excel and want to import them into Outlook, you're taking a significant step towards organizing your communication efficiently. This process can save you a considerable amount of time and effort, especially when dealing with large lists.
Excel is a versatile spreadsheet program that allows for easy data manipulation and management, making it a common platform for storing and editing contact lists. On the other hand, Outlook is a comprehensive email client that offers advanced features for managing emails, calendars, and contacts. Combining the strengths of both applications can significantly enhance your productivity.
To create an Outlook list from Excel, you'll need to follow a series of steps that involve preparing your Excel list, saving it in a compatible format, and then importing it into Outlook. This process might seem daunting at first, but with the right guidance, you can achieve it with ease.
Preparing Your Excel List
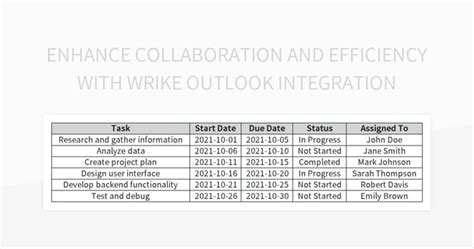
Before you start the import process, it's essential to ensure your Excel list is properly formatted. Outlook requires specific information to be in certain columns for the import to be successful. Typically, you'll want to have columns for first name, last name, email address, phone number, and any other relevant details you wish to import.
- First Name: This column should contain the first names of your contacts.
- Last Name: This column should contain the last names of your contacts.
- Email Address: This is crucial for sending emails to your contacts through Outlook.
- Phone Number: You can include home, work, or mobile phone numbers.
Here are some tips for preparing your list:
- Ensure each piece of information is in its own column.
- Verify that there are no duplicate entries.
- Check for any spelling mistakes or inconsistencies in formatting.
Saving Your Excel List

Once your list is ready, you need to save it in a format that Outlook can import. The most compatible format is a CSV (Comma Separated Values) file.
- Open your Excel spreadsheet.
- Click on "File" > "Save As".
- Choose a location to save your file.
- In the "Save as type" dropdown, select "CSV (Comma delimited)".
- Click "Save".
Importing into Outlook
With your list saved as a CSV file, you're now ready to import it into Outlook.
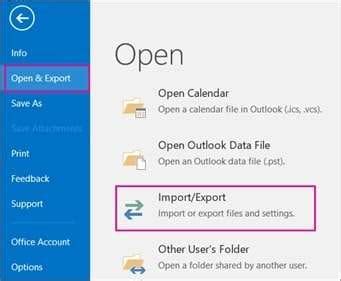
- Open Outlook.
- Click on "File" > "Open & Export" > "Import/Export".
- Select "Import from another program or file" and click "Next".
- Choose "Comma Separated Values" and click "Next".
- Browse to the location of your CSV file and select it.
- Choose how you want to handle duplicates (e.g., replace duplicates with items imported, allow duplicates to be created, or do not import duplicates).
- Click "Next" and then "Finish" to start the import process.
Benefits of Integrating Excel with Outlook

The integration of Excel and Outlook offers several benefits, including:
- Efficient Contact Management: Easily manage and update your contact lists.
- Streamlined Communication: Use your imported lists to send targeted emails or newsletters.
- Enhanced Productivity: Automate tasks and reduce the time spent on manually entering contact information.
Common Issues and Solutions

Sometimes, you might encounter issues during the import process. Here are a few common problems and their solutions:
- Duplicate Entries: Ensure you've selected the appropriate option for handling duplicates during the import process.
- Formatting Issues: Verify that your Excel list is correctly formatted and that there are no unnecessary commas or quotes that could interfere with the import.
- Import Errors: Check the Outlook import log for specific error messages that can guide you in resolving the issue.
Best Practices for List Management

To get the most out of your integrated list management system, consider the following best practices:
- Regularly Update Your Lists: Keep your contacts up to date to ensure effective communication.
- Segment Your Lists: Organize your contacts into different groups based on their interests or demographics for targeted communication.
- Use Automation Tools: Explore Outlook and Excel's automation features to streamline tasks and workflows.
Gallery of Excel and Outlook Integration
Excel and Outlook Integration Gallery


How do I ensure my Excel list is compatible with Outlook?
+Ensure your list is in a CSV format and that the information is organized into columns that Outlook can recognize, such as first name, last name, and email address.
What if I encounter errors during the import process?
+Check the import log in Outlook for specific error messages. Common issues include duplicate entries and formatting problems in your Excel list.
Can I import other types of data from Excel into Outlook?
+Yes, besides contacts, you can also import calendar events and tasks from Excel into Outlook, provided they are in a compatible format.
In conclusion, creating an Outlook list from Excel is a straightforward process that can greatly enhance your productivity and communication efficiency. By following the steps outlined and adhering to best practices for list management, you can ensure that your contacts are well-organized and easily accessible. Whether you're a professional looking to streamline your workflow or an individual seeking to better manage your personal contacts, the integration of Excel and Outlook is a powerful tool at your disposal. We invite you to share your experiences with importing Excel lists into Outlook and any tips you might have for our readers. Feel free to comment below and explore more of our articles on productivity and technology integration.