Intro
Locking cells in Excel on a Mac is a crucial skill for anyone who wants to protect their spreadsheets from unintended changes. Whether you're sharing a budget with your team or creating a template for others to use, locking cells can help prevent errors and ensure data integrity. In this article, we'll explore the importance of locking cells, how to do it, and provide tips and tricks for getting the most out of this feature.
Locking cells is essential when working with sensitive data or when you want to prevent others from modifying specific parts of your spreadsheet. For instance, if you're creating a budget template, you may want to lock the formulas and formatting to prevent users from accidentally changing them. By locking cells, you can ensure that your data remains consistent and accurate, even when multiple people are working on the same spreadsheet.
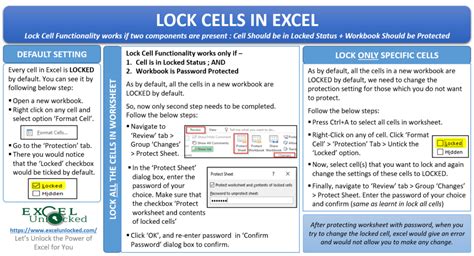
To get started with locking cells in Excel on a Mac, you'll need to understand the basics of cell protection. Cell protection allows you to lock specific cells or ranges of cells, making them read-only or preventing them from being modified altogether. This feature is particularly useful when working with large datasets or complex formulas, where a single mistake can have significant consequences.
Why Lock Cells in Excel?
Benefits of Locking Cells
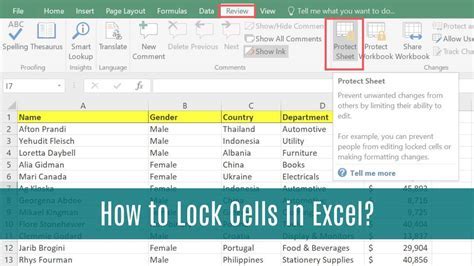
Some of the key benefits of locking cells in Excel on a Mac include: * Data protection: Locking cells helps prevent sensitive data from being modified or deleted. * Error prevention: By locking cells, you can prevent errors from occurring due to unintended changes. * Improved collaboration: Locking cells allows multiple users to work on the same spreadsheet without worrying about others changing their work. * Increased security: Locking cells can help prevent unauthorized access to sensitive data.How to Lock Cells in Excel on a Mac
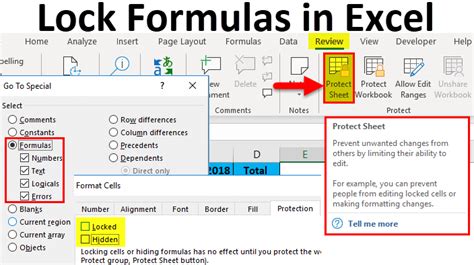
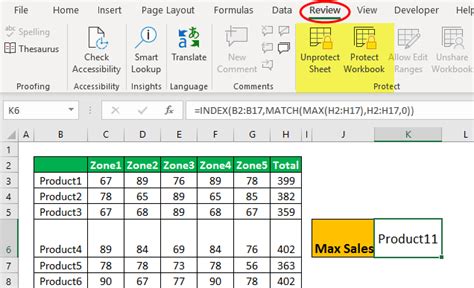
Locking Cells with Formulas
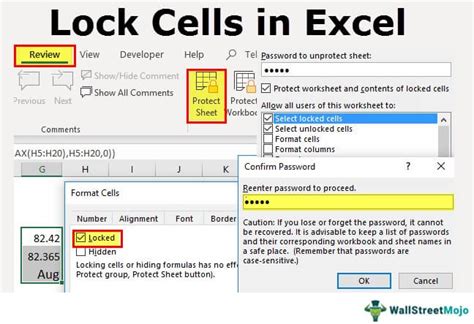
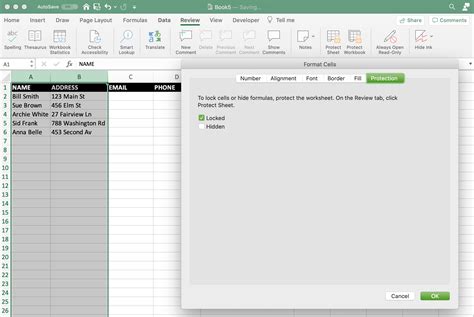
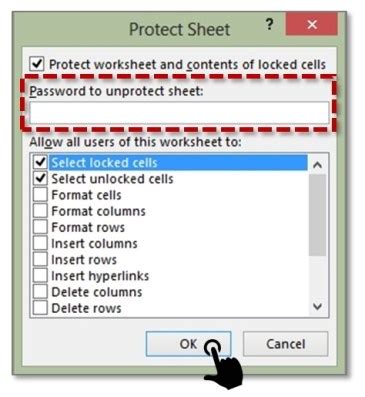
Locking cells with formulas requires a slightly different approach. To lock cells with formulas, you'll need to: 1. Select the cells with formulas: Choose the cells that contain the formulas you want to protect. 2. Go to the "Review" tab: Click on the "Review" tab in the ribbon. 3. Click on "Protect Sheet": Click on the "Protect Sheet" button in the "Protect" group. 4. Set a password: Enter a password to protect the sheet. 5. Choose the protection options: Select the protection options, including locking the formulas.Tips and Tricks for Locking Cells

Common Mistakes to Avoid
When locking cells in Excel on a Mac, there are several common mistakes to avoid, including: * Not setting a password: Failing to set a password can leave your sheet unprotected. * Locking the wrong cells: Locking the wrong cells can prevent you from making necessary changes. * Not testing protection: Failing to test your protection can leave your sheet vulnerable to errors.Best Practices for Locking Cells

Locking Cells in Excel Templates
Locking cells in Excel templates requires a slightly different approach. To lock cells in Excel templates, you'll need to: 1. Create a template: Create a template with the cells you want to lock. 2. Lock the cells: Lock the cells using the steps outlined above. 3. Save the template: Save the template with the locked cells.Lock Cells Image Gallery


What is the purpose of locking cells in Excel?
+The purpose of locking cells in Excel is to protect sensitive data or formulas from being modified or deleted.
How do I lock cells in Excel on a Mac?
+To lock cells in Excel on a Mac, select the cells you want to lock, go to the "Review" tab, and click on "Protect Sheet."
What are the benefits of locking cells in Excel?
+The benefits of locking cells in Excel include data protection, error prevention, and improved collaboration.
Can I lock cells with formulas in Excel?
+Yes, you can lock cells with formulas in Excel by selecting the cells, going to the "Review" tab, and clicking on "Protect Sheet."
How do I unlock cells in Excel?
+To unlock cells in Excel, go to the "Review" tab, click on "Protect Sheet," and enter the password to unlock the cells.
In conclusion, locking cells in Excel on a Mac is an essential skill for anyone who wants to protect their spreadsheets from unintended changes. By following the steps outlined in this article, you can lock cells, protect your data, and ensure that your spreadsheet remains accurate and reliable. Whether you're working with sensitive data or creating a template for others to use, locking cells is a crucial step in maintaining data integrity and preventing errors. So why not give it a try? Lock your cells today and take the first step towards protecting your valuable data. If you have any further questions or would like to share your experiences with locking cells in Excel, please don't hesitate to comment below.