Intro
Learn to remove time from date in Excel using formulas and functions, including DATE, INT, and TEXT, to extract and format dates effectively.
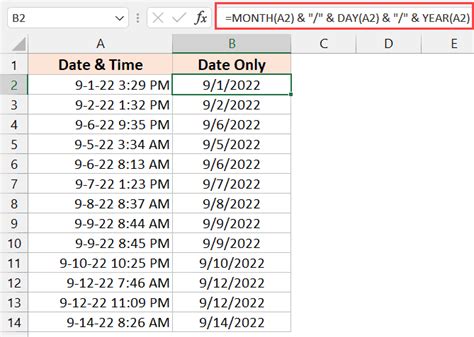
When working with dates in Excel, it's common to encounter situations where you need to remove the time component from a date. This can be particularly useful when you're dealing with dates that have been automatically generated or imported from another source, and you only need to work with the date itself. Removing the time from a date in Excel can be accomplished in several ways, depending on your specific needs and the version of Excel you're using.
The importance of removing time from dates in Excel cannot be overstated. It simplifies data analysis, ensures consistency in your datasets, and prevents potential errors that could arise from unwanted time components. For instance, when calculating differences between dates or grouping data by date, having the time component can lead to incorrect results or unexpected grouping. Therefore, understanding how to efficiently remove time from dates is a valuable skill for anyone working with Excel.
Removing time from dates is also crucial for maintaining data integrity. When dates are imported from external sources, such as databases or other applications, they often include time information that may not be relevant to your analysis. By removing this unnecessary information, you can ensure that your data is clean, consistent, and ready for analysis. Moreover, in reports or presentations, displaying only the date without the time can make your data more readable and easier to understand.
Understanding Dates in Excel

Before diving into the methods of removing time from dates, it's essential to understand how Excel treats dates. Excel stores dates as serial numbers, starting from January 1, 1900, which is assigned the serial number 1. This means that each subsequent date is represented by a unique serial number. The time component is stored as a decimal fraction of the day. For example, 12:00 PM (noon) is represented as 0.5, indicating half a day has passed.
Methods to Remove Time from Date
There are several methods to remove the time component from a date in Excel, ranging from using formulas to formatting cells. The choice of method depends on whether you want to change the actual value stored in the cell or just the display format.
Using the INT Function
One of the simplest ways to remove the time from a date is by using the INT function. The INT function returns the integer part of a number, effectively truncating the decimal part, which represents the time.
- Assume the date with time is in cell A1.
- Use the formula:
=INT(A1) - Press Enter to apply the formula.
This formula will return the date without the time component, but it will still be recognized as a date by Excel.
Using the TRUNC Function
Similar to the INT function, the TRUNC function can be used to remove the time from a date. However, the TRUNC function provides more flexibility by allowing you to specify the number of decimal places to truncate to.
- Assume the date with time is in cell A1.
- Use the formula:
=TRUNC(A1) - Press Enter to apply the formula.
Using Number Formatting
If you only need to display the date without the time, without changing the underlying value, you can use number formatting.
- Select the cell(s) containing the date(s) with time.
- Right-click on the selected cell(s) and choose "Format Cells..."
- In the Format Cells dialog box, click on the "Number" tab.
- Select "Custom" from the Category list.
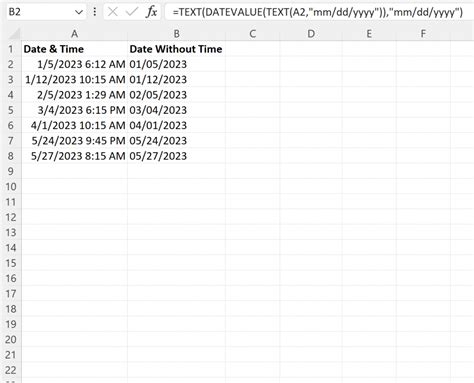
- In the "Type" field, enter:
mm/dd/yyyy(or your preferred date format). - Click OK to apply the format.
This method changes how the date is displayed but does not alter the actual value stored in the cell.
Practical Applications

Removing time from dates has numerous practical applications in data analysis, reporting, and automation. For instance, when analyzing sales data, you might want to group sales by date without considering the time of sale. By removing the time component, you can accurately group and analyze your data.
In automated workflows, removing time can be crucial for scheduling tasks or appointments. For example, if you're using Excel to manage appointments, you might want to schedule reminders or notifications at specific times of the day, regardless of the exact time an appointment was booked.
Common Challenges and Solutions

One common challenge when removing time from dates is ensuring that the resulting date is correctly formatted and recognized by Excel. This can be particularly problematic when working with dates imported from other systems or applications, as the format might not be immediately compatible with Excel's date handling.
To overcome this, it's essential to verify that the date is correctly formatted after removing the time. You can do this by checking the cell's formatting and ensuring that it matches your expected date format. Additionally, using the formulas mentioned earlier (INT or TRUNC) can help ensure that the date is correctly recognized as a serial number by Excel.
Best Practices

When working with dates in Excel, especially when removing time components, it's crucial to follow best practices to avoid potential issues:
- Consistency: Ensure that all dates in your dataset are in a consistent format. This makes it easier to remove time components and perform date-related calculations.
- Verification: Always verify that the dates are correctly recognized by Excel after removing the time. This can be done by checking the cell's formatting and performing simple date calculations to ensure accuracy.
- Documentation: Document your process, especially if you're using formulas to remove time from dates. This helps in maintaining transparency and makes it easier for others to understand your workflow.
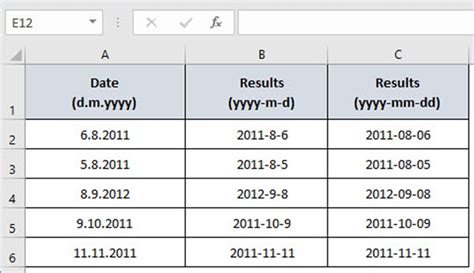
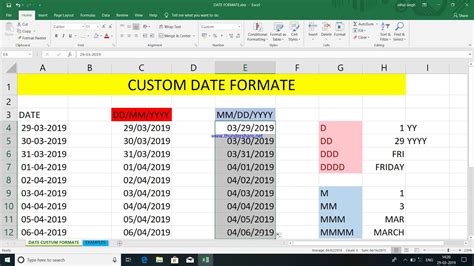
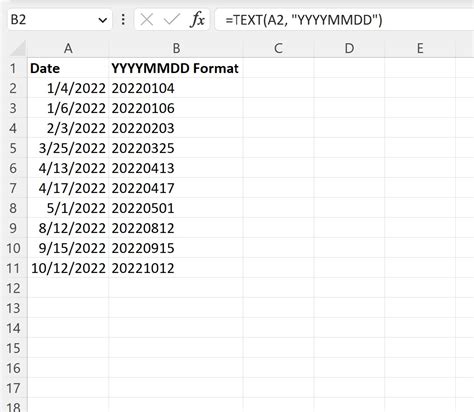
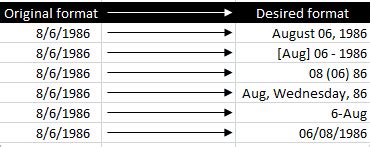
Gallery of Date Formatting Examples
Date Formatting Examples


Frequently Asked Questions
How do I remove the time from a date in Excel?
+You can remove the time from a date in Excel by using the INT or TRUNC function, or by changing the cell's number formatting to a custom date format that does not include time.
What is the difference between the INT and TRUNC functions in Excel?
+Both the INT and TRUNC functions in Excel are used to truncate numbers, but the TRUNC function allows you to specify the number of decimal places to truncate to, making it more flexible for certain applications.
How do I ensure that my dates are correctly formatted after removing the time?
+After removing the time, verify that the date is correctly formatted by checking the cell's formatting and performing simple date calculations to ensure accuracy.
In conclusion, removing time from dates in Excel is a fundamental skill that can significantly enhance your data analysis and management capabilities. By understanding the different methods available, including the use of formulas and number formatting, you can efficiently and effectively work with dates in your Excel spreadsheets. Whether you're a beginner or an advanced user, mastering date manipulation techniques will make you more proficient in using Excel for a wide range of applications. So, take a moment to practice these methods and explore the possibilities of what you can achieve with dates in Excel. Share your experiences, tips, or questions about working with dates in Excel in the comments below, and don't forget to share this article with anyone who might benefit from learning more about this essential Excel skill.