Intro
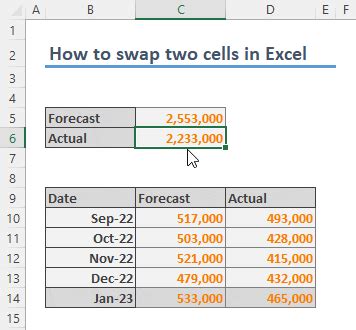
Swapping two rows in Excel can be a useful technique when you need to rearrange data for better analysis, presentation, or organization. Excel, being a powerful spreadsheet program, offers several methods to accomplish this task, each with its own advantages depending on the specific situation and the version of Excel you are using. Whether you're working with a small dataset or a large, complex spreadsheet, understanding how to swap rows efficiently can save you time and improve your productivity.
The importance of knowing how to manipulate data in Excel cannot be overstated. As a fundamental skill, it allows users to manage, analyze, and present data effectively. Swapping rows is just one aspect of data manipulation, but it's a crucial one, especially when you need to reorder data based on specific criteria, correct errors in data entry, or simply reorganize your spreadsheet for clarity. In this article, we will explore the different methods of swapping two rows in Excel, including using the mouse, keyboard shortcuts, and formulas, to help you become more proficient in data management.
Swapping rows in Excel is not just about moving data around; it's also about understanding the implications of such actions on your dataset and any formulas or references that might be affected. Therefore, it's essential to approach this task with a clear understanding of what you want to achieve and how your actions might impact other parts of your spreadsheet. With practice and experience, you'll find that swapping rows becomes second nature, allowing you to focus on more complex aspects of data analysis and presentation.
Introduction to Row Swapping in Excel

To begin with, let's consider the simplest methods of swapping rows, which involve direct manipulation of the data using the Excel interface. These methods are intuitive and easy to learn, making them accessible to users of all skill levels. The first method involves using the mouse to select and move rows, which is straightforward but requires some caution to avoid overwriting data or disrupting formulas.
Method 1: Using the Mouse to Swap Rows
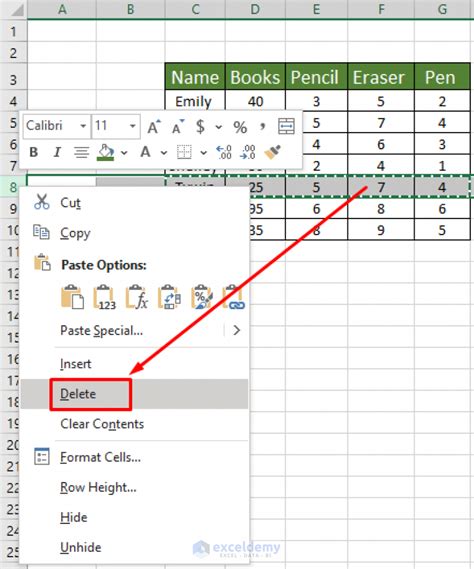
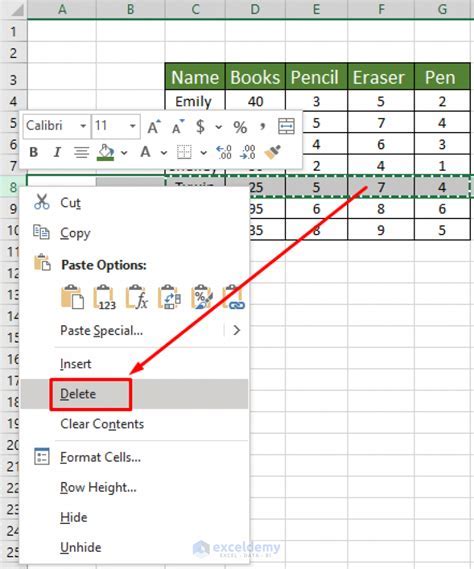
Swapping rows using the mouse is a straightforward process. Here's how you can do it: 1. Select the first row you want to swap by clicking on the row number on the left side of the Excel window. 2. Hold down the Ctrl key and select the second row you want to swap. 3. With both rows selected, go to the "Home" tab on the ribbon, find the "Cells" group, and click on "Delete" or use the keyboard shortcut Ctrl + (-) to delete the rows. However, this method doesn't directly swap rows but rather allows you to insert one row above or below the other after deletion. 4. To actually swap, you would typically cut one row (Ctrl + X), select the insertion point for the other row, and then paste (Ctrl + V).Using Keyboard Shortcuts for Row Swapping

Keyboard shortcuts can significantly speed up your workflow in Excel. While there isn't a single shortcut to directly swap two rows, you can use a combination of shortcuts to achieve this efficiently:
- Select the first row by pressing Ctrl + Space (this selects the entire row).
- Press Ctrl + X to cut the row.
- Select the row below or above where you want to paste the cut row.
- Press Ctrl + V to paste the row.
This method is quicker and more precise than using the mouse, especially for those familiar with Excel's keyboard shortcuts.
Method 2: Using Formulas to Swap Rows
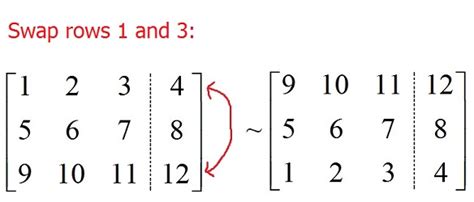
If you need to swap rows based on specific conditions or as part of a larger data manipulation task, using formulas can be a powerful approach. However, directly swapping rows with formulas in the traditional sense isn't possible without using macros or add-ins. Instead, you can use formulas to create a new range that reflects the swapped data: 1. Assume you have data in rows 1 and 2 that you want to swap. 2. In a new row or column, you can use the formula `=A2` in the first cell of your new range and `=A1` in the second cell to effectively swap the values of cells A1 and A2. 3. Copy this pattern down or across for all columns or rows you wish to swap.This method doesn't physically move the rows but creates a new dataset with the rows swapped, which can then be used for further analysis or presentation.
Advanced Row Swapping Techniques
For more complex datasets or when you need to automate the row swapping process, Excel's built-in features like macros or the use of add-ins can be invaluable. Macros, for example, allow you to record or write scripts that can perform repetitive tasks, including swapping rows based on specific conditions.
- To record a macro, go to the "Developer" tab (you may need to activate this tab in Excel settings), click on "Record Macro," and then perform the actions you want to automate, such as swapping rows.
- Once you've recorded your macro, you can run it whenever you need to perform the same task.
Add-ins, on the other hand, can provide additional functionalities not native to Excel, including more sophisticated data manipulation tools.
Method 3: Using Macros for Automated Row Swapping
Using macros for row swapping involves a bit of programming but offers unparalleled flexibility: 1. Open the Visual Basic for Applications (VBA) editor by pressing Alt + F11 or navigating to the "Developer" tab and clicking on "Visual Basic." 2. In the VBA editor, you can write a script to swap rows. For example, to swap rows 1 and 2, you might use a script like: ```vb Sub SwapRows() Dim ws As Worksheet Set ws = ThisWorkbook.Sheets("YourSheetName") ws.Rows(1).Cut ws.Rows(2).Insert Shift:=xlDown ws.Rows(2).Cut ws.Rows(1).Insert Shift:=xlDown End Sub ``` Replace "YourSheetName" with the name of your sheet. This script cuts the first row, inserts it below the second row, then cuts the new second row (originally the first row) and inserts it above, effectively swapping them.Best Practices for Row Swapping in Excel
When swapping rows in Excel, it's crucial to follow best practices to avoid errors and ensure your data remains consistent and reliable:
- Always make a backup of your original data before making significant changes.
- Use absolute references ($A$1) instead of relative references (A1) in formulas when swapping rows to avoid formula errors.
- Test your macros or formulas in a sample dataset before applying them to critical data.
- Document your changes, especially if you're working with shared spreadsheets or collaborating with others.
By following these guidelines and mastering the techniques outlined in this article, you'll be well-equipped to manage your data effectively and efficiently.
Gallery of Row Swapping Techniques
Row Swapping Image Gallery


How do I swap two rows in Excel using the mouse?
+To swap two rows using the mouse, select the first row, hold down the Ctrl key, and then select the second row. You can then use the "Cut" and "Paste" functions or drag and drop to swap the rows.
Can I use keyboard shortcuts to swap rows in Excel?
+Yes, you can use keyboard shortcuts. Select the row you want to move, press Ctrl + X to cut, move to the destination, and press Ctrl + V to paste. This method is efficient for swapping rows.
How do I automate row swapping in Excel?
+You can automate row swapping by using macros. Record a macro that performs the row swap, and then you can run this macro whenever you need to swap rows, making it a time-saving technique for repetitive tasks.
In conclusion, swapping rows in Excel is a versatile skill that can enhance your data management capabilities. Whether you're using the mouse, keyboard shortcuts, formulas, or macros, understanding the different methods and choosing the most appropriate one for your task can significantly improve your productivity. As you explore the world of Excel and delve deeper into its functionalities, you'll discover more sophisticated ways to manipulate data, ensuring that your spreadsheets are always organized, efficient, and easy to analyze. So, take the first step today, and start mastering the art of row swapping in Excel to unlock new possibilities in data analysis and presentation. Share your experiences, tips, and questions about row swapping in Excel in the comments below, and don't forget to share this article with anyone who might benefit from learning more about this essential Excel skill.