Intro
Discover 5 ways to perform Excel normality testing, including statistical methods and data analysis techniques, to ensure data distribution is normally distributed, using tools like Anderson-Darling and Shapiro-Wilk tests for accurate results.
Normality testing is a crucial step in statistical analysis, particularly when working with continuous data. It helps determine whether the data follows a normal distribution, which is essential for many statistical tests and models. Microsoft Excel, a widely used spreadsheet software, provides several methods for normality testing. In this article, we will explore five ways to perform normality testing in Excel.
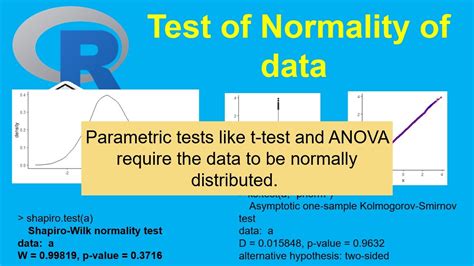
The importance of normality testing cannot be overstated. Many statistical tests, such as t-tests and ANOVA, assume that the data follows a normal distribution. If the data is not normally distributed, these tests may not provide accurate results, leading to incorrect conclusions. Therefore, it is essential to perform normality testing before applying these statistical tests.
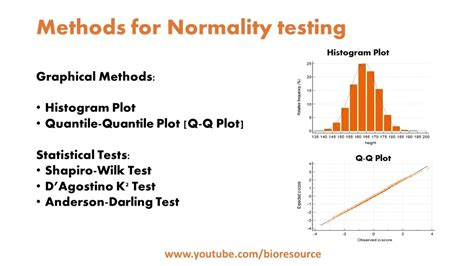
Normality testing can be performed using various methods, including graphical methods, statistical methods, and a combination of both. Graphical methods, such as histograms and Q-Q plots, provide a visual representation of the data distribution, while statistical methods, such as the Shapiro-Wilk test and the Anderson-Darling test, provide a numerical measure of normality.
Understanding Normality Testing
Normality testing is a statistical technique used to determine whether a dataset follows a normal distribution. A normal distribution, also known as a Gaussian distribution or bell curve, is a continuous probability distribution that is symmetric about the mean. The normal distribution is characterized by its mean and standard deviation, which are used to calculate probabilities and make predictions.
Why Normality Testing is Important
Normality testing is essential in statistical analysis because many statistical tests and models assume that the data follows a normal distribution. If the data is not normally distributed, these tests and models may not provide accurate results, leading to incorrect conclusions. For example, if we want to compare the means of two groups using a t-test, we need to ensure that the data follows a normal distribution. If the data is not normally distributed, we may need to use alternative tests, such as non-parametric tests.Method 1: Histograms
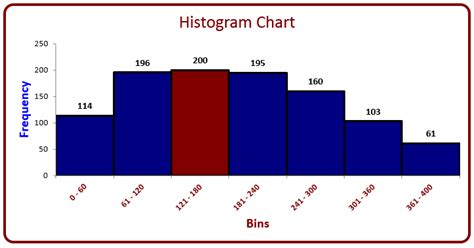
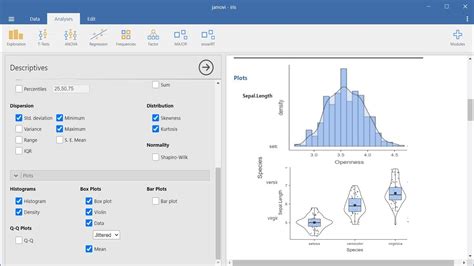
One of the simplest ways to perform normality testing in Excel is by creating a histogram. A histogram is a graphical representation of the data distribution, which can help us visualize whether the data follows a normal distribution. To create a histogram in Excel, follow these steps:
- Select the data range that you want to test for normality.
- Go to the "Insert" tab and click on "Histogram" in the "Charts" group.
- Follow the prompts to create the histogram.
A histogram can provide a rough estimate of normality, but it is not a precise method. If the histogram appears to be bell-shaped and symmetric, it may indicate that the data follows a normal distribution. However, if the histogram is skewed or has outliers, it may indicate that the data is not normally distributed.
Interpreting Histograms
Interpreting histograms requires some practice and expertise. A normal distribution should be symmetric about the mean, with most of the data points clustered around the mean. The histogram should also be bell-shaped, with the majority of the data points in the middle and fewer data points at the extremes.Method 2: Q-Q Plots
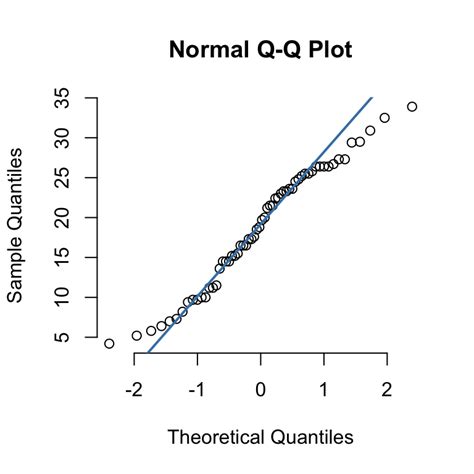
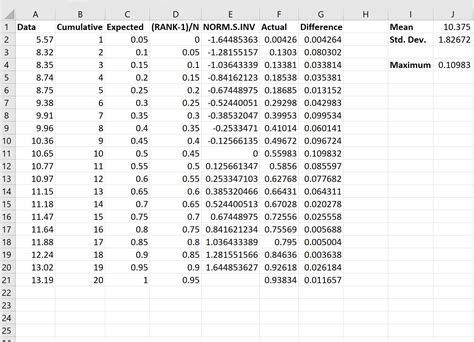
Another graphical method for normality testing is the Q-Q plot, also known as a quantile-quantile plot. A Q-Q plot is a scatter plot that compares the quantiles of the data with the quantiles of a normal distribution. To create a Q-Q plot in Excel, follow these steps:
- Select the data range that you want to test for normality.
- Go to the "Data" tab and click on "Data Analysis" in the "Analysis" group.
- Select "Q-Q Plot" from the list of available tools.
- Follow the prompts to create the Q-Q plot.
A Q-Q plot can provide a more precise estimate of normality than a histogram. If the data points on the Q-Q plot lie close to a straight line, it may indicate that the data follows a normal distribution. However, if the data points are scattered or deviate significantly from the line, it may indicate that the data is not normally distributed.
Interpreting Q-Q Plots
Interpreting Q-Q plots requires some practice and expertise. A normal distribution should have data points that lie close to a straight line, with no significant deviations. If the data points are scattered or deviate significantly from the line, it may indicate that the data is not normally distributed.Method 3: Shapiro-Wilk Test
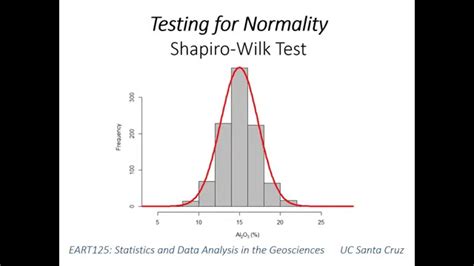
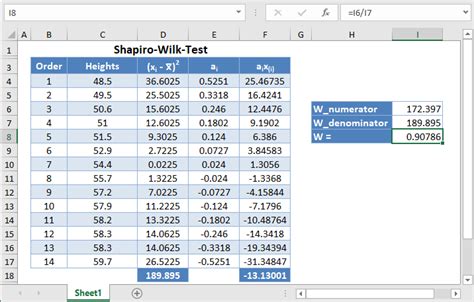
The Shapiro-Wilk test is a statistical method for normality testing that is widely used in Excel. The test calculates a statistic called the W-statistic, which measures the degree of normality. To perform the Shapiro-Wilk test in Excel, follow these steps:
- Select the data range that you want to test for normality.
- Go to the "Data" tab and click on "Data Analysis" in the "Analysis" group.
- Select "Shapiro-Wilk Test" from the list of available tools.
- Follow the prompts to perform the test.
The Shapiro-Wilk test provides a p-value that indicates the probability of observing the test statistic under the null hypothesis that the data follows a normal distribution. If the p-value is less than a certain significance level (usually 0.05), we reject the null hypothesis and conclude that the data is not normally distributed.
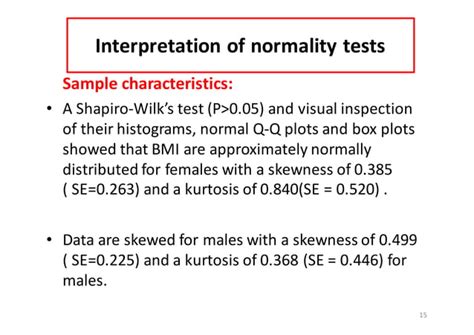
Interpreting Shapiro-Wilk Test Results
Interpreting Shapiro-Wilk test results requires some practice and expertise. A p-value less than 0.05 indicates that the data is not normally distributed, while a p-value greater than 0.05 indicates that the data may be normally distributed. However, the Shapiro-Wilk test is sensitive to sample size, and large samples may result in significant p-values even if the data is normally distributed.Method 4: Anderson-Darling Test
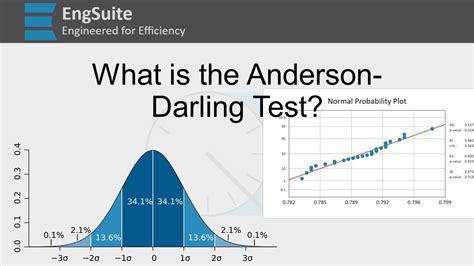
The Anderson-Darling test is another statistical method for normality testing that is widely used in Excel. The test calculates a statistic called the A-statistic, which measures the degree of normality. To perform the Anderson-Darling test in Excel, follow these steps:
- Select the data range that you want to test for normality.
- Go to the "Data" tab and click on "Data Analysis" in the "Analysis" group.
- Select "Anderson-Darling Test" from the list of available tools.
- Follow the prompts to perform the test.
The Anderson-Darling test provides a p-value that indicates the probability of observing the test statistic under the null hypothesis that the data follows a normal distribution. If the p-value is less than a certain significance level (usually 0.05), we reject the null hypothesis and conclude that the data is not normally distributed.
Interpreting Anderson-Darling Test Results
Interpreting Anderson-Darling test results requires some practice and expertise. A p-value less than 0.05 indicates that the data is not normally distributed, while a p-value greater than 0.05 indicates that the data may be normally distributed. However, the Anderson-Darling test is sensitive to sample size, and large samples may result in significant p-values even if the data is normally distributed.Method 5: Kolmogorov-Smirnov Test
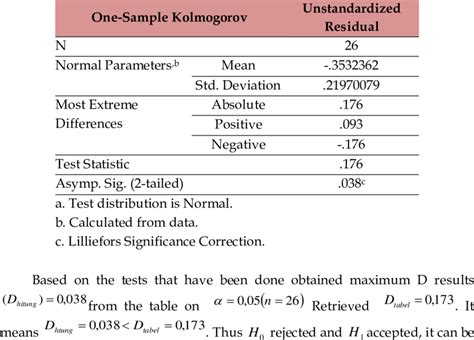
The Kolmogorov-Smirnov test is a statistical method for normality testing that is widely used in Excel. The test calculates a statistic called the D-statistic, which measures the degree of normality. To perform the Kolmogorov-Smirnov test in Excel, follow these steps:
- Select the data range that you want to test for normality.
- Go to the "Data" tab and click on "Data Analysis" in the "Analysis" group.
- Select "Kolmogorov-Smirnov Test" from the list of available tools.
- Follow the prompts to perform the test.
The Kolmogorov-Smirnov test provides a p-value that indicates the probability of observing the test statistic under the null hypothesis that the data follows a normal distribution. If the p-value is less than a certain significance level (usually 0.05), we reject the null hypothesis and conclude that the data is not normally distributed.
Interpreting Kolmogorov-Smirnov Test Results
Interpreting Kolmogorov-Smirnov test results requires some practice and expertise. A p-value less than 0.05 indicates that the data is not normally distributed, while a p-value greater than 0.05 indicates that the data may be normally distributed. However, the Kolmogorov-Smirnov test is sensitive to sample size, and large samples may result in significant p-values even if the data is normally distributed.Normality Testing Image Gallery


What is normality testing?
+Normality testing is a statistical technique used to determine whether a dataset follows a normal distribution.
Why is normality testing important?
+Normality testing is important because many statistical tests and models assume that the data follows a normal distribution. If the data is not normally distributed, these tests and models may not provide accurate results.
What are the different methods for normality testing in Excel?
+There are several methods for normality testing in Excel, including histograms, Q-Q plots, Shapiro-Wilk test, Anderson-Darling test, and Kolmogorov-Smirnov test.
In conclusion, normality testing is an essential step in statistical analysis, and Excel provides several methods for performing normality testing. By understanding the different methods and their interpretations, we can ensure that our data is normally distributed and apply the appropriate statistical tests and models. We encourage you to try out these methods and explore the resources provided in this article to improve your understanding of normality testing. If you have any questions or comments, please feel free to share them below. Additionally, we invite you to share this article with others who may benefit from learning about normality testing in Excel.