Intro
Discover 5 ways lock cells protect data, preventing unauthorized access with cell locking, worksheet protection, and password security, ensuring spreadsheet integrity and confidentiality.
Protecting sensitive information and maintaining data integrity are crucial in today's digital age. One effective way to achieve this is by locking cells in spreadsheets, which prevents unauthorized edits and ensures that critical data remains unchanged. Whether you're working with Microsoft Excel, Google Sheets, or another spreadsheet software, locking cells is a fundamental skill that can greatly enhance your data management capabilities.
Locking cells is particularly important in collaborative environments where multiple users have access to the same spreadsheet. By locking specific cells or ranges, you can control who can edit what, thereby reducing the risk of accidental changes or intentional tampering. This feature is also useful when creating templates or forms that need to be filled out by others, as it allows you to protect formulas, headers, and other essential elements from being altered.
In addition to security benefits, locking cells can also help in organizing and streamlining your workflow. By designating certain areas of your spreadsheet as read-only, you can guide users through the document more efficiently, making it clear where inputs should be made and where data should not be altered. This can significantly reduce errors and improve overall productivity.
Given the importance of cell locking, it's essential to understand how to apply this feature effectively. The process can vary slightly depending on the spreadsheet software you're using, but the core concept remains the same: to protect specific cells from being edited while still allowing other parts of the document to be modified as needed.
Understanding Cell Locking
Before diving into the methods of locking cells, it's crucial to understand the basics of how cell locking works. In most spreadsheet applications, all cells are unlock by default, meaning anyone with access to the spreadsheet can edit them. To lock a cell, you must first select the cell or range of cells you want to protect, then apply the lock through the software's formatting or protection options.
It's also important to note that locking cells is just one part of protecting a spreadsheet. To fully secure your data, you'll often need to combine cell locking with other protection features, such as password protection for the spreadsheet or specific ranges within it. This ensures that even if someone tries to override the cell locking by accessing the spreadsheet's protection settings, they will be prompted for a password.
Benefits of Cell Locking
- Security: Protects sensitive data from unauthorized changes.
- Organization: Helps in guiding users through a spreadsheet by clearly defining editable areas.
- Error Reduction: Minimizes the risk of accidental changes to critical data or formulas.
- Collaboration: Facilitates secure collaboration by allowing different levels of access to the same document.
How to Lock Cells in Excel

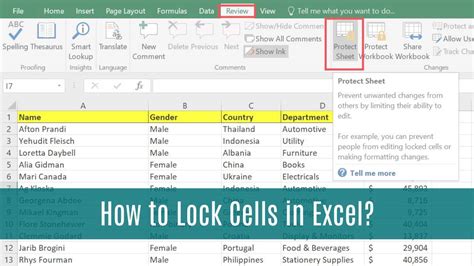
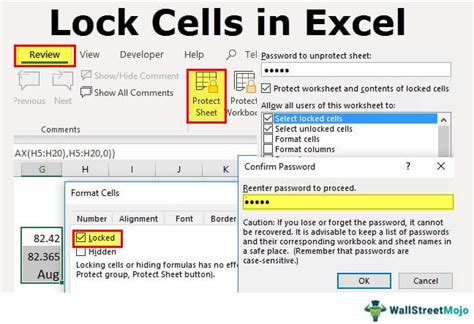
Locking cells in Microsoft Excel is a straightforward process that involves selecting the cells you want to lock, formatting them to be locked, and then protecting the worksheet. Here’s a step-by-step guide:
- Select the Cells: Choose the cells or range of cells you wish to lock.
- Format Cells: Right-click on the selected cells, go to "Format Cells," and check the "Locked" checkbox in the Protection tab.
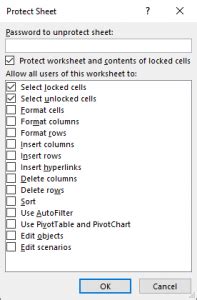
- Protect Worksheet: Go to the "Review" tab on the Ribbon, click on "Protect Sheet," and select the permissions you want to allow or deny.
Locking Cells in Google Sheets
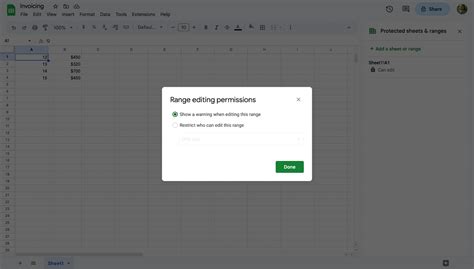
Google Sheets offers a similar functionality through its "Protect sheets and ranges" feature. To lock cells in Google Sheets:
- Select the Range: Choose the cells you want to protect.
- Open Protection Settings: Right-click on the selection and choose "Protect sheets and ranges."
- Set Permissions: In the sidebar, you can choose who can edit the protected range and add a description for the protection.
Advanced Cell Locking Techniques

Beyond the basic locking functionality, spreadsheet software often provides advanced techniques for more nuanced control over cell protection. This can include conditional formatting to highlight locked cells, using formulas to dynamically protect ranges based on specific conditions, or even scripting to automate the protection process.
For example, in Excel, you can use VBA (Visual Basic for Applications) to create custom scripts that lock or unlock cells based on various criteria, such as the current date, user input, or changes to other parts of the spreadsheet. Similarly, Google Sheets supports Apps Script, which can be used to create custom functions and automate tasks, including the protection of sheets and ranges.
Best Practices for Cell Locking
- Test Thoroughly: After applying protection, test your spreadsheet to ensure that the locking behaves as expected.
- Document Changes: Keep a record of what protections have been applied and why, especially in collaborative environments.
- Review Regularly: Periodically review the protections in place to ensure they remain relevant and effective.
Common Challenges and Solutions

While cell locking is a powerful tool, users may encounter challenges when implementing it, such as issues with password protection, problems with conditional formatting, or difficulties in managing protections across multiple worksheets. Solving these challenges often requires a deep understanding of the spreadsheet software's protection features and how they interact with other functionalities.
For instance, if you're experiencing issues with protected ranges not updating correctly when using formulas, you might need to adjust the calculation settings or the order of operations within your formulas. Similarly, if you're finding it difficult to manage complex protection scenarios across several sheets, you might consider using a template or creating a master sheet that controls protections across the entire workbook.
Troubleshooting Tips
- Check Permissions: Ensure that the issue isn't due to a misunderstanding of the permissions set for the spreadsheet or range.
- Update Software: Sometimes, protection issues can be resolved by updating your spreadsheet software to the latest version.
- Seek Community Help: Online forums and communities can be invaluable resources for troubleshooting protection-related issues.
Cell Locking Image Gallery


How do I lock cells in Excel to prevent editing?
+To lock cells in Excel, select the cells, right-click and choose "Format Cells," then check the "Locked" checkbox in the Protection tab. Afterward, go to the "Review" tab and click "Protect Sheet" to apply the protection.
Can I lock cells in Google Sheets?
+Yes, you can lock cells in Google Sheets by selecting the range, right-clicking, and choosing "Protect sheets and ranges." This opens a sidebar where you can set permissions and add a description for the protection.
How do I unlock cells in a protected Excel sheet?
+To unlock cells, you first need to unprotect the sheet. Go to the "Review" tab, click "Unprotect Sheet," and enter the password if prompted. Then, select the cells, right-click, choose "Format Cells," and uncheck the "Locked" checkbox in the Protection tab.
In conclusion, locking cells is a vital feature in spreadsheet management that offers a layer of protection and organization to your data. By understanding how to apply this feature effectively, you can enhance the security, integrity, and usability of your spreadsheets. Whether you're working in Excel, Google Sheets, or another platform, mastering cell locking techniques can significantly improve your productivity and collaboration capabilities. We invite you to share your experiences, tips, and questions about cell locking in the comments below, and don't forget to share this article with anyone who might benefit from learning more about protecting their spreadsheet data.