Intro
Automate tasks with Power Automate, getting data from Excel and sending emails using workflows, connectors, and templates, streamlining productivity and workflow automation.
The ability to automate tasks has become a cornerstone of modern productivity, allowing individuals and businesses to streamline processes, reduce manual labor, and increase efficiency. Among the array of tools designed to facilitate automation, Power Automate (formerly known as Microsoft Flow) stands out for its versatility and user-friendly interface. One of the most useful applications of Power Automate is in retrieving data from Excel spreadsheets and using this information to send automated emails. This process can significantly simplify tasks such as reporting, notifications, and data dissemination, making it an invaluable asset for both personal and professional use.
The integration of Power Automate with Excel and Outlook (or other email services) opens up a wide range of possibilities. For instance, imagine being able to automatically send weekly sales reports to your team, with the data directly pulled from an Excel spreadsheet that is updated in real-time. Or, picture a scenario where new customer information is automatically sent to the sales team as soon as it is entered into an Excel database. These scenarios not only reduce the time spent on mundane tasks but also minimize the chance of human error, ensuring that critical information is communicated promptly and accurately.
Getting Started with Power Automate
To begin leveraging Power Automate for getting data from Excel and sending emails, you first need to create an account. Microsoft offers a free plan that includes a limited number of flows you can create per month, making it accessible to individuals and small businesses. Once you have your account set up, you can start building your first flow. The process involves selecting a trigger (in this case, possibly a scheduled trigger or a trigger based on changes to your Excel file), then adding actions to connect to your Excel file, retrieve the necessary data, and finally, send an email with the data.
Connecting to Excel
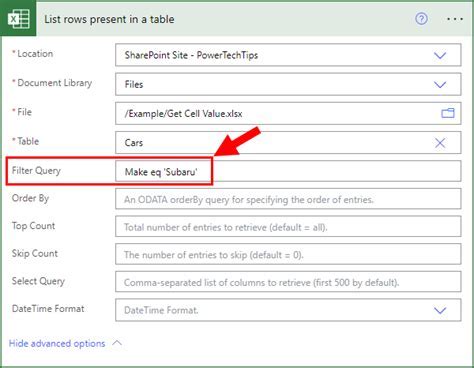
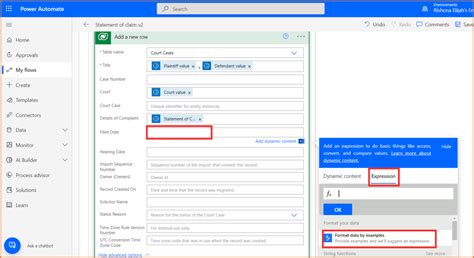
Connecting to Excel involves using the "List rows present in a table" action in Power Automate, which allows you to specify the Excel file and the table from which you want to retrieve data. This step requires you to have your Excel file stored in a location accessible by Power Automate, such as OneDrive or SharePoint. The action prompts you to sign in to the respective service and authorize Power Automate to access your files. Once connected, you can select the specific table and choose which columns of data you wish to retrieve.
Specifying Data Retrieval
When specifying which data to retrieve, you have the flexibility to select entire tables, specific columns, or even apply filters to only retrieve rows that meet certain criteria. This level of granularity ensures that you can tailor the data retrieval process to fit the exact needs of your automated task, whether it's sending a summary of sales data, notifying team members of upcoming deadlines, or distributing contact information to new team members.
Sending Emails with Retrieved Data
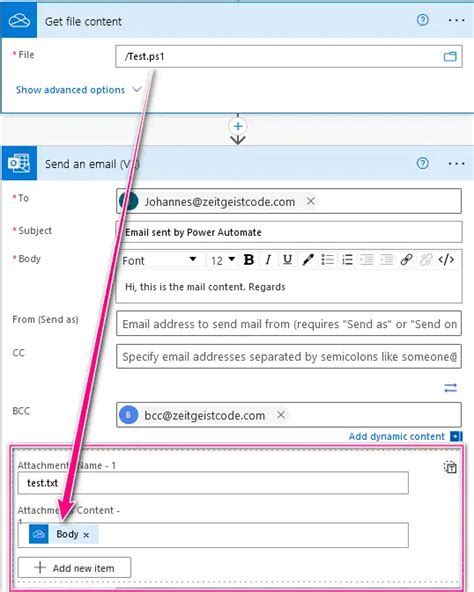
After retrieving the necessary data from Excel, the next step is to send an email that includes this information. Power Automate offers actions for various email services, including Outlook, Gmail, and more. The "Send an email" action allows you to compose an email where you can insert the retrieved data directly into the body of the message. This can be done using the dynamic content feature in Power Automate, which provides a list of outputs from previous actions that you can insert into your email.
Customizing Email Content
Customizing the email content to fit your needs is straightforward. You can add plain text, HTML content, or even attachments. For instance, if you're sending a report, you might choose to attach the Excel file itself or a PDF summary. The dynamic content feature makes it easy to personalize emails by including specific data points, such as names, figures, or dates, directly from your Excel spreadsheet.
Tips for Effective Automation

To get the most out of Power Automate, consider the following tips:
- Test Thoroughly: Before relying on your flow for critical tasks, test it multiple times to ensure it works as expected.
- Use Comments: For complex flows, use comments to explain what each section does, making it easier to understand and modify later.
- Monitor Flows: Regularly check the run history of your flows to catch and fix any errors promptly.
- Explore Templates: Power Automate offers a range of templates that can give you a head start on common automation tasks.
Common Scenarios for Automation
Some common scenarios where automating the process of getting data from Excel and sending emails can be particularly beneficial include:
- Weekly or Monthly Reports: Automate the generation and distribution of reports to save time and ensure consistency.
- New Lead Notifications: Set up a flow to notify sales teams of new leads as soon as their information is entered into an Excel database.
- Reminder Emails: Use Power Automate to send reminder emails based on dates stored in an Excel spreadsheet, such as upcoming deadlines or birthdays.
Power Automate Image Gallery


What is Power Automate and how does it work?
+Power Automate, formerly Microsoft Flow, is a cloud-based software tool that allows users to create and automate workflows across multiple applications and services. It works by connecting to various data sources and services, triggering actions based on specific events or schedules, and automating tasks to increase productivity and efficiency.
How do I connect Excel to Power Automate?
+To connect Excel to Power Automate, you will need to use the "List rows present in a table" action. This requires your Excel file to be stored in a location accessible by Power Automate, such as OneDrive or SharePoint. You will be prompted to sign in and authorize Power Automate to access your files.
Can I customize the emails sent by Power Automate?
+Yes, Power Automate allows you to customize the emails sent through its "Send an email" action. You can compose the email body using plain text or HTML, add attachments, and insert dynamic content from previous actions, such as data retrieved from Excel.
In conclusion, leveraging Power Automate to get data from Excel and send emails is a powerful way to automate routine tasks, enhance productivity, and ensure timely communication. By following the steps and tips outlined above, you can create customized flows that meet your specific needs, whether personal or professional. As you explore the capabilities of Power Automate, you'll likely discover even more innovative ways to streamline your workflows and make the most of your time. We encourage you to share your experiences, tips, and questions about using Power Automate for Excel and email automation in the comments below.