Intro
Discover 5 ways to enhance Excel reports with shading, including conditional formatting, highlighting cells, and using formulas to create dynamic shading, making data visualization and analysis more effective with Excel shading techniques.
In today's world of data analysis and presentation, Microsoft Excel remains a cornerstone tool for professionals and individuals alike. One of the key features that enhance the readability and visual appeal of Excel spreadsheets is shading. Shading can be used to highlight important information, differentiate between various types of data, and even add aesthetic value to your spreadsheets. In this article, we will delve into 5 ways Excel shading can be utilized to enhance your spreadsheet's effectiveness.
The importance of visual aids in data presentation cannot be overstated. When data is presented in a clear and visually appealing manner, it becomes easier for the audience to understand and engage with the information. Excel shading is a simple yet powerful tool that can significantly improve the clarity and impact of your data presentations. Whether you're a student working on a project, a business professional creating reports, or an individual managing personal finances, mastering Excel shading techniques can elevate your spreadsheet game.
Excel shading is not just about making your spreadsheets look more appealing; it's also about using visual cues to draw attention to critical information, organize data, and facilitate quicker understanding. By applying different shading techniques, you can create a hierarchical structure within your data, making it easier for viewers to navigate and comprehend complex information. Moreover, with the ever-increasing volume of data being analyzed and presented, the ability to highlight key trends, patterns, and insights through shading becomes invaluable.
Understanding Excel Shading Basics
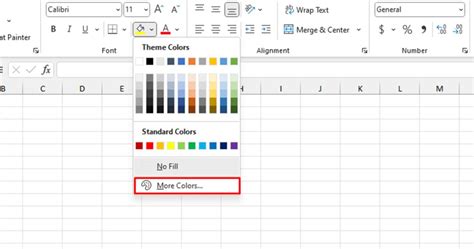
Before diving into the advanced techniques, it's essential to grasp the basics of Excel shading. Excel provides a straightforward way to apply shading to cells through the "Fill Color" tool found in the Home tab of the ribbon. This tool allows you to select from a variety of colors to fill the background of your cells. Additionally, Excel offers more nuanced shading options, including gradients and patterns, which can be accessed through the "Format Cells" dialog box.
Step-by-Step Guide to Basic Shading
- Select the Cells: Choose the cells you want to apply shading to.
- Open the Home Tab: Navigate to the Home tab in the Excel ribbon.
- Click on Fill Color: Find the "Fill Color" button and click on it to open the color palette.
- Select a Color: Pick the color you want to use for shading from the palette.
- Apply the Color: The selected color will be applied to the background of the chosen cells.
Advanced Shading Techniques
Beyond the basic application of fill colors, Excel offers several advanced shading techniques that can add depth and sophistication to your spreadsheets. These include conditional formatting, which allows cells to be shaded based on specific conditions or formulas, and the use of gradients and patterns to create more complex and visually interesting backgrounds.
Conditional Formatting
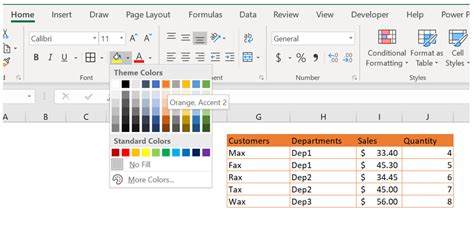
Conditional formatting is a powerful tool in Excel that enables you to highlight cells based on specific conditions. This can include formatting cells based on their values, formatting cells that contain specific text, or even formatting cells based on formulas. To apply conditional formatting:
- Select the Cells: Choose the cells you want to format.
- Go to the Home Tab: Navigate to the Home tab.
- Find Conditional Formatting: Click on the "Conditional Formatting" button in the Styles group.
- Select a Rule: Choose from the predefined rules or select "New Rule" to create a custom rule.
- Apply the Rule: Once you've defined your rule, click "OK" to apply it.
Using Gradients and Patterns

Gradients and patterns offer a more advanced way to shade cells in Excel, allowing for the creation of subtle, multi-colored backgrounds that can add a professional touch to your spreadsheets. To apply gradients or patterns:
- Select the Cells: Choose the cells you want to format.
- Right-Click: Right-click on the selected cells and choose "Format Cells."
- Go to the Fill Tab: In the Format Cells dialog box, click on the "Fill" tab.
- Select Gradient or Pattern: Choose either the "Gradient" or "Pattern" fill option.
- Customize: Customize your gradient or pattern by selecting colors and adjusting settings as desired.
- Apply: Click "OK" to apply your chosen fill effect.
Best Practices for Excel Shading

When using Excel shading, it's crucial to follow best practices to ensure that your spreadsheets remain clear, readable, and effective. This includes:
- Consistency: Maintain consistency in your shading to avoid confusion.
- Clarity: Ensure that shading does not obscure data; it should enhance, not hinder, readability.
- Purpose: Use shading with a purpose, such as to highlight important information or differentiate between types of data.
Common Mistakes to Avoid

While Excel shading can be a powerful tool, there are common mistakes to avoid. These include overusing shading, which can make a spreadsheet look cluttered and confusing, and failing to consider the color scheme, which can lead to poor contrast and readability issues.
Tips for Effective Shading
- Limit Your Palette: Stick to a limited color palette to maintain consistency and avoid visual overload.
- Consider Your Audience: Think about the needs and preferences of your audience when choosing colors and shading techniques.
- Test and Adjust: Always test your shading choices and be prepared to make adjustments for better clarity and effectiveness.
Gallery of Excel Shading Examples
Excel Shading Image Gallery


What is the purpose of using shading in Excel?
+The primary purpose of using shading in Excel is to visually differentiate between various types of data, highlight important information, and add aesthetic value to spreadsheets, making them more readable and engaging.
How do I apply basic shading to cells in Excel?
+To apply basic shading, select the cells you want to shade, go to the Home tab, click on the "Fill Color" button, select a color from the palette, and the color will be applied to the background of the chosen cells.
What is conditional formatting in Excel, and how is it used?
+Conditional formatting is a feature in Excel that allows cells to be formatted automatically based on the value of the cell. It can be used to highlight cells that meet certain conditions, such as values above or below a certain threshold, and is accessed through the "Conditional Formatting" button in the Home tab.
In conclusion, mastering the art of Excel shading can significantly enhance the effectiveness of your spreadsheets, making them more visually appealing, readable, and engaging. By understanding the basics of Excel shading, leveraging advanced techniques such as conditional formatting and gradients, and following best practices, you can create spreadsheets that not only present data clearly but also tell a story. Whether you're a seasoned Excel user or just starting out, incorporating shading into your spreadsheet design can take your data presentation to the next level. So, don't hesitate to experiment with the different shading options Excel has to offer, and watch your spreadsheets transform into powerful tools for communication and analysis. Feel free to share your favorite Excel shading tips or ask questions in the comments below, and don't forget to share this article with anyone who could benefit from enhancing their Excel skills.