Intro
Highlight Excel active row with conditional formatting, VBA macros, and formulas to enhance spreadsheet visibility and usability, improving data analysis and workflow efficiency.
Excel is a powerful tool used for data analysis, visualization, and management. One of its key features that enhances user experience and efficiency is the ability to highlight the active row. Highlighting the active row in Excel makes it easier to focus on the data you are currently working with, especially when dealing with large spreadsheets. This feature can be particularly useful in a variety of scenarios, such as data entry, data analysis, and presentation.
The importance of highlighting the active row cannot be overstated. It improves visibility, reduces errors, and increases productivity. For instance, when you are working with a large dataset, being able to quickly identify the row you are on can save you a significant amount of time. Moreover, in collaborative environments, highlighting the active row can facilitate communication among team members by clearly indicating which data points are being discussed or analyzed.
To leverage this feature effectively, it's essential to understand how to activate and customize it according to your needs. Excel provides several ways to highlight the active row, ranging from simple formatting techniques to more advanced macro-enabled solutions. By mastering these methods, you can tailor your Excel worksheets to better suit your workflow, making your work more efficient and less prone to errors.
Why Highlight the Active Row in Excel?

Highlighting the active row in Excel serves several purposes. Firstly, it aids in data identification. When working with extensive datasets, it can be challenging to keep track of the specific row you are analyzing or editing. By highlighting the active row, you can instantly recognize which row your cursor is on, thereby reducing the likelihood of working on the wrong data. Secondly, it enhances the visual appeal of your spreadsheet. A highlighted row can draw attention to specific data, making it easier to discuss or present findings to others. Lastly, it can be a tool for organizing and prioritizing tasks within your spreadsheet, helping you to focus on the most critical data first.
Methods to Highlight the Active Row

There are several methods to highlight the active row in Excel, each with its own set of advantages. The most straightforward method involves using Conditional Formatting, a feature that allows you to apply formatting to a cell or a range of cells based on specific conditions. To highlight the active row using Conditional Formatting, you can use a formula that checks if the row number of the cell is equal to the row number of the active cell. Another approach is to use macros, which provide more flexibility and automation. By writing a simple VBA script, you can create a macro that automatically highlights the active row whenever you select a new cell.
Using Conditional Formatting
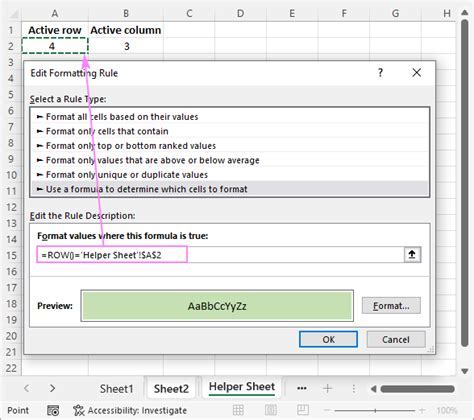
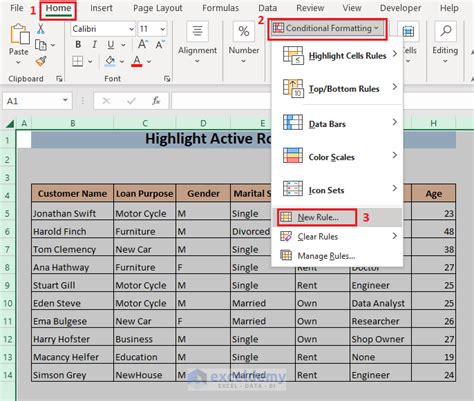
Conditional Formatting is a powerful tool in Excel that allows you to highlight cells based on various conditions, including formulas. To highlight the active row using this method, follow these steps: - Select the range of cells you want to apply the formatting to. - Go to the Home tab and click on Conditional Formatting. - Choose "New Rule" and then select "Use a formula to determine which cells to format." - Enter a formula that identifies the active row, such as `=ROW()=ROW(A1)`, assuming A1 is the first cell in your selected range. - Click Format and choose how you want the active row to be highlighted. - Click OK to apply the rule.Using Macros
For a more dynamic approach, you can use Excel VBA to create a macro that highlights the active row. Here’s how: - Open the Visual Basic Editor by pressing Alt + F11 or navigating to Developer > Visual Basic. - In the Editor, insert a new module by right-clicking on any of the objects for your workbook listed in the "Project" window and choosing Insert > Module. - Paste the following code into the module: `Private Sub Worksheet_SelectionChange(ByVal Target As Range) / Target.EntireRow.Interior.ColorIndex = 6 / End Sub` - Save the module and return to your Excel worksheet. - Whenever you select a new cell, the entire row will be highlighted.Customizing the Highlight
The default highlight color and style might not suit everyone's preferences or needs. Fortunately, Excel allows you to customize the appearance of the highlighted active row. You can change the fill color, add borders, or even apply a specific font style to make the active row stand out more. When using Conditional Formatting, you can adjust these settings in the Format dialog box. For macros, you can modify the VBA code to apply different formatting options.
Changing the Highlight Color
To change the highlight color of the active row, you can modify the Conditional Formatting rule or the VBA code. For Conditional Formatting, after selecting the range and applying the rule, you can edit the rule by going back to Conditional Formatting > Manage Rules, selecting the rule, and clicking Edit. Then, in the Format dialog box, you can choose a different fill color. For VBA, you can change the `ColorIndex` property in the code to a different number that corresponds to the color you prefer.Adding Borders
Adding borders to the active row can further enhance its visibility. In Conditional Formatting, after selecting the format, you can click on the Border tab and choose the style and color of the border. In VBA, you can add lines of code to apply borders, such as `Target.EntireRow.Borders.LineStyle = xlContinuous` and specify the border color with `Target.EntireRow.Borders.ColorIndex = 1`.Benefits of Highlighting the Active Row

Highlighting the active row in Excel offers several benefits that can improve your productivity and the overall quality of your work. Firstly, it reduces errors by ensuring that you are working on the correct data. Secondly, it saves time by quickly identifying the row you are on, especially in large datasets. Thirdly, it enhances collaboration by clearly indicating which data is being discussed or analyzed. Lastly, it contributes to a more organized and visually appealing spreadsheet, which can be crucial for presentations or reports.
Reducing Errors
One of the most significant advantages of highlighting the active row is the reduction of errors. By clearly indicating which row you are currently working on, you minimize the risk of mistakenly editing or analyzing the wrong data. This is particularly important in financial or scientific applications where accuracy is paramount.Improving Collaboration
In team environments, highlighting the active row can facilitate communication and collaboration. When discussing specific data points, being able to quickly and easily identify the relevant row can streamline meetings and reduce confusion. This feature can also be useful in training scenarios, where highlighting specific rows can help illustrate points or demonstrate techniques.Gallery of Excel Active Row Highlights
Excel Active Row Image Gallery


Frequently Asked Questions
How do I highlight the active row in Excel?
+You can highlight the active row in Excel using Conditional Formatting or by creating a VBA macro. For Conditional Formatting, select the range, go to Home > Conditional Formatting, choose "New Rule," and use a formula like `=ROW()=ROW(A1)`. For VBA, insert a module and paste the code `Private Sub Worksheet_SelectionChange(ByVal Target As Range) / Target.EntireRow.Interior.ColorIndex = 6 / End Sub`.
Can I customize the highlight color of the active row?
+Yes, you can customize the highlight color. For Conditional Formatting, edit the rule and change the fill color in the Format dialog box. For VBA, modify the `ColorIndex` property in the code to the number corresponding to your preferred color.
What are the benefits of highlighting the active row in Excel?
+Highlighting the active row reduces errors by ensuring you work on the correct data, saves time by quickly identifying the row, enhances collaboration, and contributes to a more organized and visually appealing spreadsheet.
In conclusion, highlighting the active row in Excel is a simple yet powerful technique that can significantly enhance your productivity and the quality of your work. By understanding how to apply and customize this feature, you can leverage Excel more effectively, whether you are working individually or as part of a team. We invite you to share your experiences and tips on using this feature in the comments below and to explore more ways to optimize your Excel workflow.