Intro
When working with Excel, it's often useful to link a text box to a cell, allowing the text box to display the contents of the cell. This can be particularly helpful for creating dynamic and interactive worksheets, dashboards, or reports. The process of linking a text box to a cell in Excel is straightforward and can be accomplished in a few steps.
To begin with, understanding the importance of linking a text box to a cell can significantly enhance the functionality and visual appeal of your Excel worksheets. It allows for real-time updates, making your worksheets more dynamic and easier to understand. Whether you're creating a dashboard, a report, or simply organizing data, this feature can be incredibly useful.
The benefits of linking a text box to a cell are numerous. For one, it enables automatic updates. When the data in the linked cell changes, the text box updates automatically, reflecting the new information. This is particularly useful for tracking changes over time or displaying live data. Additionally, it enhances the visual presentation of your worksheet, allowing you to highlight important information in a more readable and accessible format.
How to Link a Text Box to a Cell in Excel
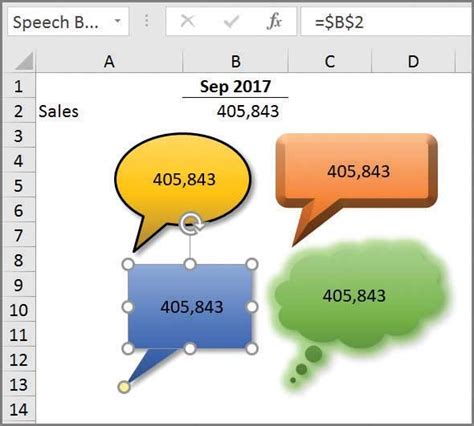
To link a text box to a cell in Excel, you first need to insert a text box into your worksheet. This can be done by navigating to the "Insert" tab on the ribbon, clicking on "Text Box" under the "Text" group, and then drawing the text box to the desired size on your worksheet. Once the text box is inserted, you can link it to a cell by following these steps:
- Select the Text Box: Click on the text box you've just inserted to select it. You'll know it's selected when you see the border around it and the formula bar changes to reflect the text box's contents.
- Formula Bar: With the text box selected, click in the formula bar. This is where you'll enter the formula to link the text box to a cell.
- Enter the Formula: Type "=" and then select the cell you want to link the text box to. For example, if you want to link the text box to cell A1, you would type "=A1" in the formula bar.
- Press Enter: After entering the formula, press Enter to apply it. The text box will now display the contents of the cell you linked it to.
Benefits of Linking a Text Box to a Cell

The benefits of linking a text box to a cell are multifaceted:
- Automatic Updates: The text box will update automatically whenever the data in the linked cell changes.
- Enhanced Presentation: Text boxes can be formatted to stand out, making important data more visible and accessible.
- Dynamic Content: Useful for creating interactive worksheets where data changes frequently.
Formatting the Text Box

After linking the text box to a cell, you can format it to better suit your needs. Excel offers a variety of formatting options for text boxes, including changing the font, size, color, and alignment of the text, as well as the background color and border of the text box itself. To access these options, right-click on the text box and select "Format Shape" or use the tools available in the "Home" tab of the ribbon when the text box is selected.
Common Uses for Linked Text Boxes
Linked text boxes have a variety of applications in Excel:
- Dashboards: Useful for highlighting key performance indicators (KPIs) or important metrics.
- Reports: Can be used to dynamically display report titles, dates, or other information that changes between reports.
- Interactive Worksheets: Enhance user experience by providing real-time feedback or updates based on user input.
Tips and Tricks

When working with linked text boxes, it's useful to remember a few tips and tricks:
- Keep it Simple: Start with simple links and formulas before moving on to more complex setups.
- Use Absolute References: If you plan to move the text box or the linked cell, consider using absolute references ($A$1) to prevent the link from breaking.
- Test Thoroughly: Always test your linked text boxes to ensure they update correctly and display the expected information.
Advanced Linking Techniques
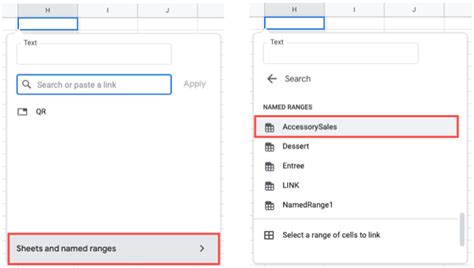
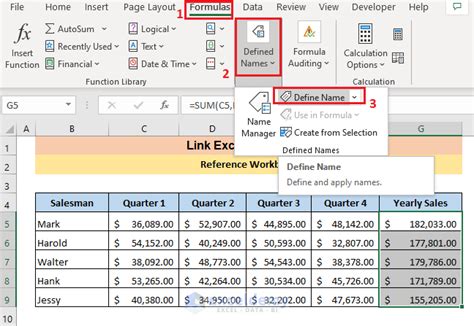
For more advanced users, Excel offers additional techniques for linking text boxes, including the use of named ranges, formulas that reference multiple cells, and even linking to data in other worksheets or workbooks. These techniques can significantly expand the capabilities of linked text boxes, allowing for more complex and dynamic interactions within your worksheets.
Gallery of Linked Text Boxes in Excel
Linked Text Boxes Gallery


How do I link a text box to a cell in Excel?
+To link a text box to a cell, select the text box, click in the formula bar, type "=" followed by the cell reference (e.g., "=A1"), and press Enter.
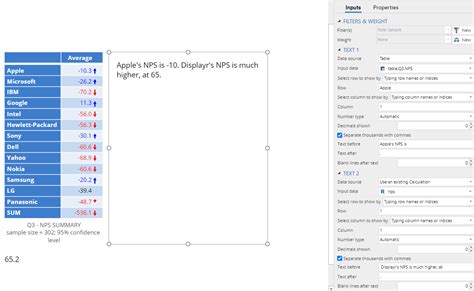
Can I link a text box to multiple cells?
+Yes, you can link a text box to multiple cells by using a formula that references those cells, such as "=A1&B1" to concatenate the contents of cells A1 and B1.
How do I format a linked text box?
+You can format a linked text box by right-clicking on it and selecting "Format Shape," or by using the tools in the "Home" tab of the ribbon when the text box is selected.
In conclusion, linking a text box to a cell in Excel is a powerful feature that can enhance the functionality and visual appeal of your worksheets. By following the steps and tips outlined above, you can create dynamic and interactive worksheets that update in real-time, making your work more efficient and effective. Whether you're a beginner or an advanced user, exploring the capabilities of linked text boxes can open up new possibilities for how you work with Excel. So, take a moment to experiment with linking text boxes to cells, and discover how this simple yet powerful technique can revolutionize your Excel experience. Feel free to share your thoughts, ask questions, or explore more topics related to Excel and its applications in the comments below.