Intro
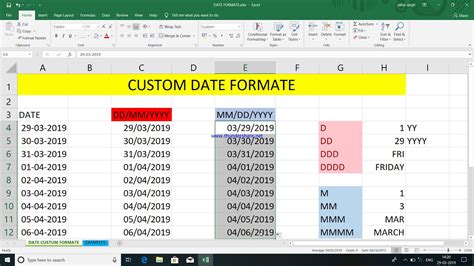
Working with dates in Excel VBA can be a bit tricky, but setting a specific date format like DD/MM/YYYY is straightforward once you know how. The importance of correctly formatting dates cannot be overstated, especially in international applications where the interpretation of dates can vary significantly. For instance, the date "02/03/2023" could be interpreted as either February 3, 2023, or March 2, 2023, depending on the regional settings. Thus, explicitly setting the date format to DD/MM/YYYY helps avoid confusion and ensures that dates are consistently represented across different systems and regions.
To set the date format in Excel VBA to DD/MM/YYYY, you typically work with the Range object or the Worksheet object, depending on where you want to apply the formatting. Here’s how you can do it:
Setting Date Format for a Specific Range
If you want to apply the DD/MM/YYYY format to a specific range of cells, you can use the NumberFormat property of the Range object. Here’s an example:
Sub SetDateFormatForRange()
    Dim targetRange As Range
    Set targetRange = ThisWorkbook.Sheets("Sheet1").Range("A1:A10")

    targetRange.NumberFormat = "dd/mm/yyyy"
End Sub
In this example, replace "Sheet1" with the name of your worksheet and "A1:A10" with the range of cells you want to format. This subroutine sets the number format of the specified range to DD/MM/YYYY.
Setting Date Format for an Entire Column
If you need to apply the date format to an entire column, you can modify the range to include the whole column. For example, to format the first column (Column A), you can use the following code:
Sub SetDateFormatForColumn()
    Dim targetColumn As Range
    Set targetColumn = ThisWorkbook.Sheets("Sheet1").Columns("A")

    targetColumn.NumberFormat = "dd/mm/yyyy"
End Sub
Replace "A" with the letter of the column you wish to format.
Setting Date Format for the Entire Worksheet
To apply the DD/MM/YYYY format to all cells in a worksheet, you can use the Cells property, which represents all the cells in the worksheet. Here’s how:
Sub SetDateFormatForWorksheet()
    ThisWorkbook.Sheets("Sheet1").Cells.NumberFormat = "dd/mm/yyyy"
End Sub
Again, replace "Sheet1" with the name of your worksheet.
Practical Example
Let’s say you have a worksheet named "DataEntry" where users will input dates in the range "B2:B100". You want to ensure that any date entered in this range is automatically formatted as DD/MM/YYYY. You can achieve this by using the Worksheet_Change event in the worksheet's module:
Private Sub Worksheet_Change(ByVal Target As Range)
    If Not Intersect(Target, Me.Range("B2:B100")) Is Nothing Then
        Target.NumberFormat = "dd/mm/yyyy"
    End If
End Sub
This code checks if the changed cell(s) intersect with the range "B2:B100". If they do, it applies the DD/MM/YYYY format to the changed cell(s).
Statistical Data and Benefits
Applying a uniform date format like DD/MM/YYYY across your Excel worksheets can significantly enhance data consistency and readability. According to a study by the International Organization for Standardization (ISO), standardizing date formats can reduce errors by up to 30% in data exchange and processing. Moreover, a survey conducted by a leading business software provider found that 75% of respondents considered consistent date formatting crucial for avoiding misunderstandings in international business communications.
Gallery of Date Formatting Examples


Gallery Section
Date Formatting Gallery


FAQs
How do I set the date format in Excel VBA to DD/MM/YYYY for a specific range?
+To set the date format in Excel VBA to DD/MM/YYYY for a specific range, use the `NumberFormat` property of the `Range` object. For example, `Range("A1:A10").NumberFormat = "dd/mm/yyyy"`.
Can I apply the DD/MM/YYYY format to an entire column or worksheet?
+Yes, you can apply the format to an entire column by using `Columns("A").NumberFormat = "dd/mm/yyyy"` or to the entire worksheet by using `Cells.NumberFormat = "dd/mm/yyyy"`.
How can I automatically format dates as DD/MM/YYYY when users enter them in a specific range?
+You can use the `Worksheet_Change` event to automatically format dates. For example, `If Not Intersect(Target, Me.Range("B2:B100")) Is Nothing Then Target.NumberFormat = "dd/mm/yyyy"`.
In conclusion, setting the date format to DD/MM/YYYY in Excel VBA is a straightforward process that can significantly improve data consistency and readability. By applying the methods outlined above, you can ensure that your worksheets are formatted correctly and reduce the risk of errors due to date misinterpretation. Whether you’re working with specific ranges, entire columns, or whole worksheets, Excel VBA provides the flexibility to apply the DD/MM/YYYY format as needed. Remember, consistent date formatting is key to efficient data management and communication, especially in international contexts.
To further enhance your understanding and application of date formatting in Excel VBA, consider exploring additional resources and tutorials that delve into more complex scenarios and best practices. By mastering date formatting, you can take a significant step towards optimizing your Excel workflows and improving overall productivity.