Intro
Exporting Salesforce reports to Excel is a common task for many professionals who use Salesforce to manage their customer relationships, sales, and marketing efforts. Salesforce provides a robust reporting feature that allows users to create custom reports to analyze their data. However, sometimes it's necessary to export these reports to Excel for further analysis, sharing, or integration with other systems. In this article, we'll explore the importance of exporting Salesforce reports to Excel and provide a step-by-step guide on how to do it easily.
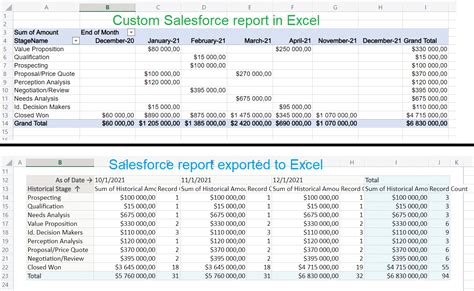
Salesforce reports are a powerful tool for businesses to gain insights into their operations, customer behavior, and market trends. By analyzing these reports, companies can make informed decisions to improve their sales, marketing, and customer service strategies. However, Salesforce reports have limitations when it comes to data analysis and manipulation. Excel, on the other hand, offers advanced features for data analysis, charting, and formatting, making it an ideal tool for further analysis and presentation of Salesforce data.
Exporting Salesforce reports to Excel can be beneficial in various ways. For instance, it allows users to perform advanced data analysis, create custom charts and dashboards, and share reports with stakeholders who may not have access to Salesforce. Additionally, Excel provides a range of formulas and functions that can be used to manipulate and transform Salesforce data, enabling users to gain deeper insights into their business operations.
Benefits of Exporting Salesforce Reports to Excel
The benefits of exporting Salesforce reports to Excel are numerous. Some of the key advantages include:
- Advanced data analysis: Excel provides a range of tools and functions for data analysis, including pivot tables, charts, and formulas.
- Customization: Excel allows users to customize their reports and dashboards to meet their specific needs.
- Sharing: Excel reports can be easily shared with stakeholders who may not have access to Salesforce.
- Integration: Excel reports can be integrated with other systems and tools, enabling users to combine data from multiple sources.
Step-by-Step Guide to Exporting Salesforce Reports to Excel
Exporting Salesforce reports to Excel is a straightforward process that can be completed in a few steps. Here's a step-by-step guide:
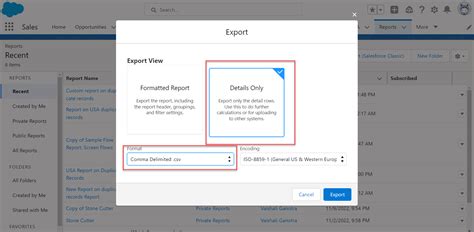
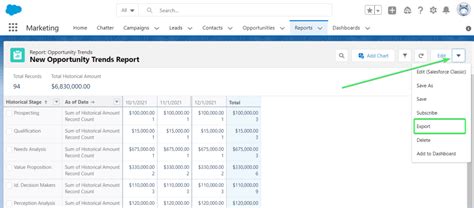
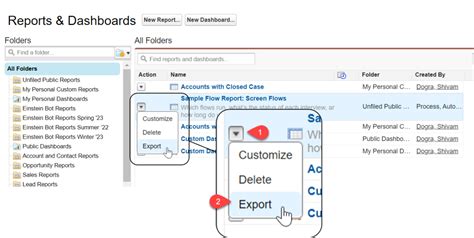
- Log in to your Salesforce account and navigate to the Reports tab.
- Select the report you want to export to Excel.
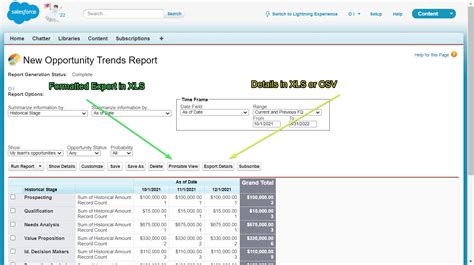
- Click on the "Export" button and select "Excel" as the export format.
- Choose the Excel format you want to use, such as CSV or XLSX.
- Select the fields you want to include in the export.
- Click "Export" to start the export process.
Best Practices for Exporting Salesforce Reports to Excel

To ensure that your Salesforce reports are exported to Excel correctly, follow these best practices:
- Use the correct export format: Choose the correct Excel format for your report, such as CSV or XLSX.
- Select the right fields: Only select the fields that are necessary for your report to avoid cluttering your Excel spreadsheet.
- Use filters: Use filters to narrow down the data in your report and make it more manageable.
- Test your export: Test your export to ensure that it is working correctly and that the data is accurate.
Tips and Tricks for Working with Salesforce Data in Excel

Here are some tips and tricks for working with Salesforce data in Excel:
- Use pivot tables: Pivot tables are a powerful tool for analyzing and summarizing large datasets.
- Use charts and graphs: Charts and graphs can help to visualize your data and make it more engaging.
- Use formulas and functions: Formulas and functions can be used to manipulate and transform your data.
- Use conditional formatting: Conditional formatting can be used to highlight important trends and patterns in your data.
Common Challenges and Solutions
When exporting Salesforce reports to Excel, you may encounter some common challenges. Here are some solutions to these challenges:
- Data formatting issues: Make sure to select the correct export format and use the correct data types in your Excel spreadsheet.
- Data inconsistencies: Use filters and sorting to ensure that your data is consistent and accurate.
- Performance issues: Use pivot tables and charts to summarize and analyze large datasets.
Gallery of Exporting Salesforce Reports to Excel
Exporting Salesforce Reports to Excel Image Gallery


What is the best way to export Salesforce reports to Excel?
+The best way to export Salesforce reports to Excel is to use the built-in export feature in Salesforce. This feature allows you to export your reports in a variety of formats, including CSV and XLSX.
How do I export Salesforce data to Excel?
+To export Salesforce data to Excel, navigate to the Reports tab in Salesforce and select the report you want to export. Click on the "Export" button and select "Excel" as the export format. Choose the fields you want to include in the export and click "Export" to start the export process.
What are the benefits of exporting Salesforce reports to Excel?
+The benefits of exporting Salesforce reports to Excel include advanced data analysis, customization, sharing, and integration with other systems. Excel provides a range of tools and functions for data analysis, including pivot tables, charts, and formulas.
In conclusion, exporting Salesforce reports to Excel is a straightforward process that can be completed in a few steps. By following the best practices and tips outlined in this article, you can ensure that your Salesforce reports are exported to Excel correctly and that you can take advantage of the advanced features and functions that Excel has to offer. Whether you're looking to perform advanced data analysis, create custom charts and dashboards, or share reports with stakeholders, exporting Salesforce reports to Excel is a great way to get the most out of your Salesforce data. So why not give it a try today and see how it can benefit your business?