Intro
Create a waterfall chart in Excel to visualize financial data, track profits, and illustrate cumulative totals with ease, using formulas and formatting techniques for a clear and concise representation.
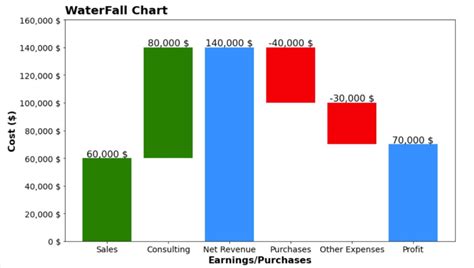
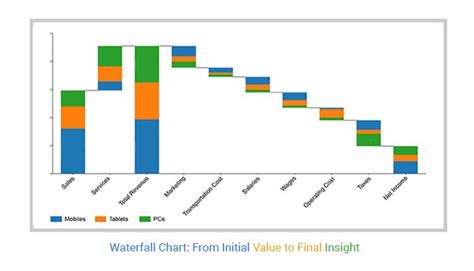
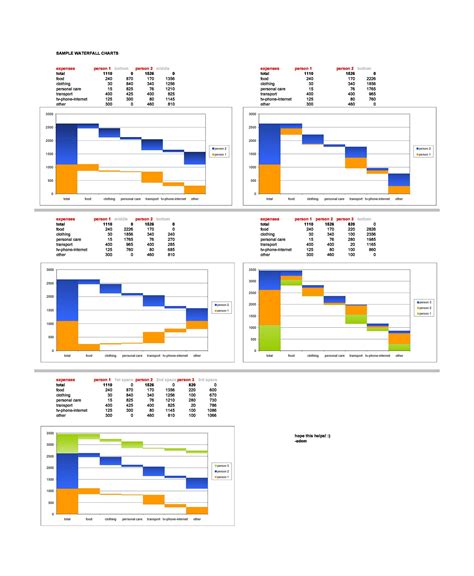
Building a waterfall chart in Excel is a great way to visualize how an initial value is affected by a series of positive or negative values. This type of chart is particularly useful for understanding the cumulative effect of various factors on a starting number, making it a popular choice for financial analysis, such as showing how a company's net income is affected by different expenses and revenues.
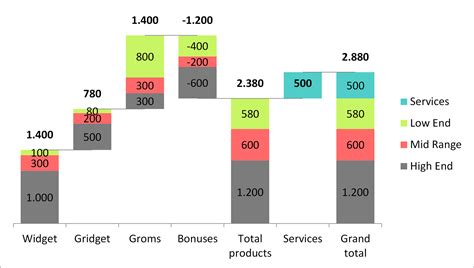
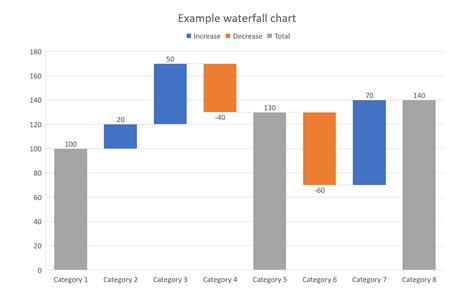
The concept of a waterfall chart is straightforward: it starts with a base value, and then each subsequent column either adds to or subtracts from this base, depending on whether the value is positive or negative. The chart helps in tracing the impact of each addition or subtraction, providing a clear picture of how the final value is reached.
In recent years, Excel has made creating waterfall charts much simpler than it used to be. Prior to Excel 2016, creating a waterfall chart required a bit of a workaround, involving the use of formulas and careful data manipulation. However, with the introduction of the built-in waterfall chart feature in Excel 2016 and later versions, users can now easily create these informative charts directly from their data.
Here's a step-by-step guide to building a waterfall chart in Excel for those using Excel 2016 or later versions:
Preparing Your Data
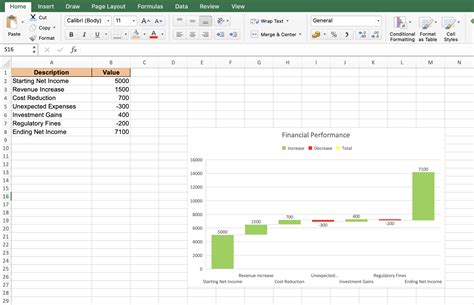
Before creating the chart, it's essential to have your data organized properly. Typically, you'll have two columns: one for the category names (e.g., starting value, addition 1, subtraction 1, etc.) and another for the corresponding values. Ensure that your data is clean and correctly formatted, as this will directly affect the accuracy and appearance of your chart.
Creating the Waterfall Chart

- Select Your Data: Choose the entire range of your data, including headers.
- Go to the Insert Tab: In the ribbon at the top of Excel, click on the "Insert" tab.
- Click on Waterfall: In the "Charts" group, you'll find the "Waterfall" icon. Click on it to open the waterfall chart options.
- Select the Chart Type: Choose the standard waterfall chart (the first option).
- Customize Your Chart: Once the chart is created, you can customize it as needed. This includes changing colors, adding titles, and adjusting the layout.
Customizing Your Waterfall Chart
After creating the chart, you might want to make some adjustments to better suit your presentation needs. This could involve changing the colors of the columns to differentiate between positive and negative values more clearly, adding data labels to show the exact values, or modifying the chart title and axis labels for clarity.
Using Waterfall Charts for Financial Analysis
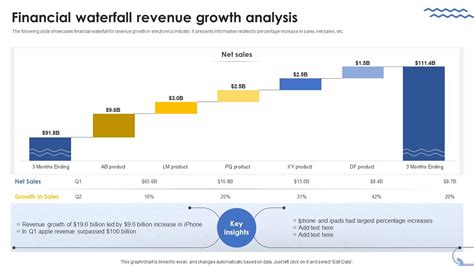
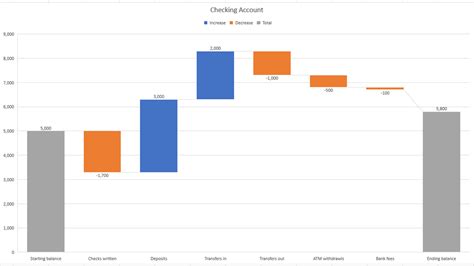
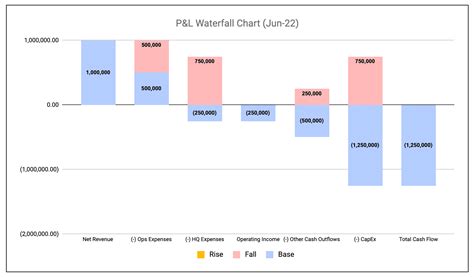
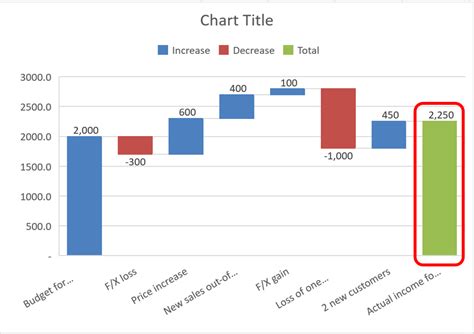
Waterfall charts are particularly useful in financial analysis, where they can be used to show how an initial budget or revenue figure is affected by various expenses, investments, or income streams. By visually representing these changes, stakeholders can quickly understand the impact of different financial decisions on the bottom line.
Benefits of Waterfall Charts in Financial Reporting
- Clarity: Waterfall charts provide a clear and concise visual representation of complex financial data.
- Ease of Understanding: Stakeholders can quickly grasp the financial situation and the factors influencing it.
- Decision Making: By clearly showing the impact of different factors, waterfall charts can aid in making informed financial decisions.
Common Challenges and Solutions
While waterfall charts are powerful tools, users may encounter some challenges, especially when dealing with large datasets or trying to customize the chart's appearance. Common issues include difficulty in labeling each segment of the chart or ensuring that the chart accurately reflects the data when there are many categories.
To overcome these challenges, it's essential to carefully plan your data layout before creating the chart and to take advantage of Excel's formatting options to customize the chart as needed.
Tips for Effective Waterfall Chart Creation
- Keep it Simple: Avoid cluttering the chart with too much data.
- Use Clear Labels: Ensure that each segment of the chart is clearly labeled.
- Customize for Clarity: Adjust colors, sizes, and other visual elements to make the chart easy to understand.
Waterfall Chart Examples Gallery


What is a waterfall chart used for?
+A waterfall chart is used to show how an initial value is affected by a series of positive or negative values, providing a clear picture of how the final value is reached.
How do I create a waterfall chart in Excel?
+To create a waterfall chart in Excel, select your data, go to the Insert tab, click on the Waterfall chart option, and follow the prompts to customize your chart.
What are the benefits of using a waterfall chart in financial analysis?
+The benefits include clarity, ease of understanding, and aiding in decision-making by visually representing complex financial data and the factors influencing it.
In conclusion, building a waterfall chart in Excel is a straightforward process that can significantly enhance the presentation and understanding of financial and other types of data. By following the steps outlined and taking advantage of Excel's built-in features, users can create informative and engaging charts that help in making informed decisions. Whether you're analyzing financial data, tracking changes in a budget, or simply looking for a more engaging way to present information, the waterfall chart is a versatile and powerful tool that can meet your needs.