Intro
Highlighting cells in a spreadsheet or table can be a powerful way to draw attention to important information, differentiate between various types of data, and enhance the overall readability of the document. Whether you're working with Microsoft Excel, Google Sheets, or another spreadsheet program, highlighting cells can be accomplished in several ways, each serving a different purpose or offering a unique advantage. In this article, we'll explore five methods to highlight cells, discussing their applications, benefits, and how they can be implemented.
The ability to highlight cells is crucial for data analysis, presentation, and collaboration. It allows users to visually distinguish between different sets of data, track changes, and emphasize key points. Moreover, highlighting can be used to create a more engaging and understandable spreadsheet, which is particularly important in professional settings where data is frequently shared and discussed among team members or presented to clients.
Highlighting cells can also serve as a tool for organizing and prioritizing tasks or data points within a spreadsheet. By using different colors or patterns, users can categorize information based on its urgency, type, or the department it pertains to. This visual system enables quick identification of specific data, reducing the time spent searching through extensive spreadsheets and improving overall productivity.
Conditional Formatting
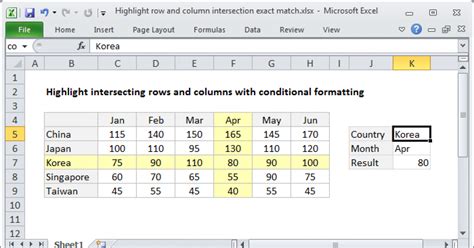
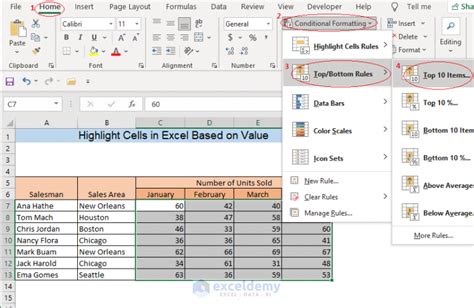
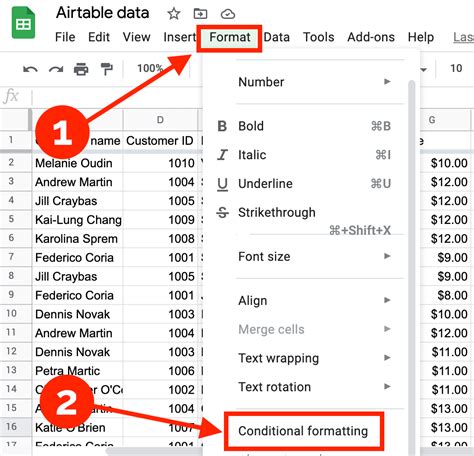
Conditional formatting is one of the most powerful and versatile methods to highlight cells in a spreadsheet. It allows users to apply formatting to a cell or a range of cells based on specific conditions, such as the cell's value, the value of another cell, or even the result of a formula. This feature is available in most spreadsheet software, including Excel and Google Sheets, and can be used to highlight cells that meet certain criteria, such as being greater than, less than, or equal to a specific value, or even to highlight duplicates or unique values.
To apply conditional formatting, users typically select the range of cells they wish to format, then navigate to the "Home" tab in Excel or the "Format" tab in Google Sheets, where they can find the conditional formatting options. From there, they can choose from a variety of pre-set rules or create their own custom rules using formulas. Conditional formatting can significantly enhance the visual appeal and usability of a spreadsheet, making it easier for users to identify trends, patterns, and outliers at a glance.
Manual Highlighting

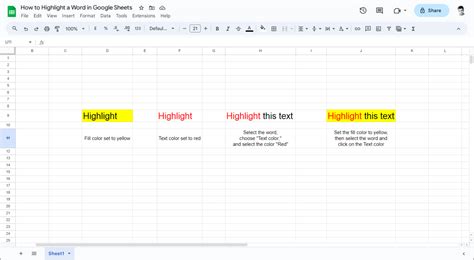
Manual highlighting involves selecting cells and applying a fill color directly. This method is straightforward and can be used to draw immediate attention to specific cells or ranges. It's particularly useful for quick, one-time highlighting tasks or when the criteria for highlighting are not based on the cell's value but rather on external factors or personal preference.
To manually highlight cells, users select the desired cells, then use the fill color tool, usually found in the toolbar or ribbon, to choose a color. This method provides a simple way to visually differentiate between various parts of a spreadsheet without needing to create rules or formulas. However, for larger datasets or for highlighting that needs to update dynamically based on changing data, conditional formatting might be more efficient.
Using Formulas for Highlighting

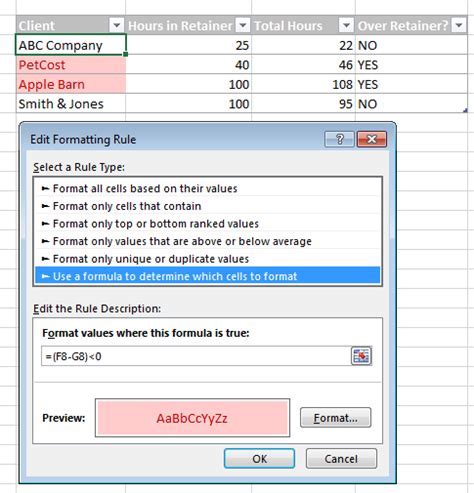
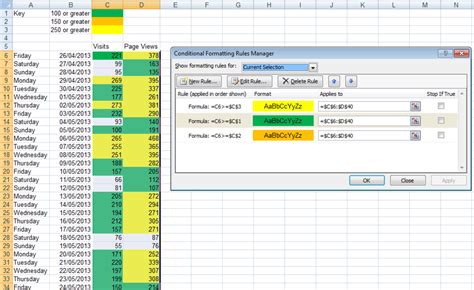
Another approach to highlighting cells involves using formulas directly within the conditional formatting feature. This method allows for highly customized and dynamic highlighting based on complex conditions that might not be covered by the pre-set rules. By using formulas, users can compare values across different sheets, apply highlighting based on the results of other calculations, or even incorporate user-defined functions.
To use formulas for highlighting, users would typically select the range of cells, open the conditional formatting dialog, and choose the option to "Use a formula to determine which cells to format." They would then enter their formula, which needs to evaluate to TRUE or FALSE, indicating whether the formatting should be applied or not. This method requires a good understanding of spreadsheet formulas and functions but offers unparalleled flexibility in highlighting cells based on virtually any condition imaginable.
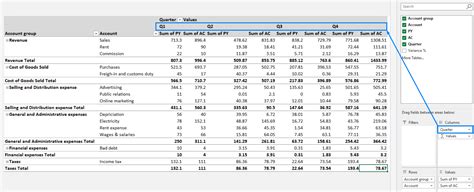
Highlighting with PivotTables
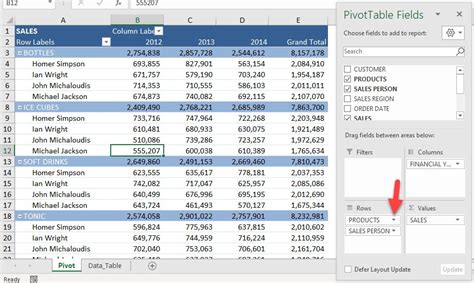
PivotTables are a powerful tool in spreadsheet analysis, allowing users to summarize, analyze, and visualize large datasets. They can also be used to highlight cells, particularly when the goal is to emphasize certain trends, patterns, or anomalies within the summarized data. By applying conditional formatting directly to a PivotTable, users can highlight cells based on their values, percentages, or rankings, which can be especially useful in reports and presentations.
To highlight cells in a PivotTable, users would first create the PivotTable, then select the field or value area they wish to format. From there, they can apply conditional formatting as they would with any other range of cells. The unique aspect of PivotTables is their ability to dynamically update and reflect changes in the underlying data, making them an excellent choice for ongoing analysis and reporting tasks.
Macro-Enabled Highlighting

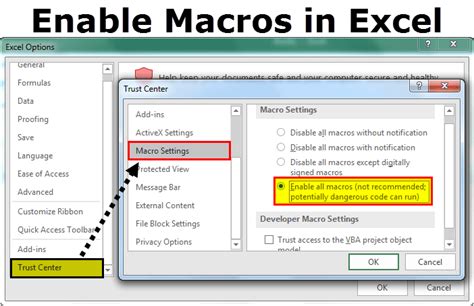
For advanced users, macros offer another method to highlight cells, particularly when the highlighting task is complex, repetitive, or needs to be automated. Macros are small programs that can be recorded or written in Visual Basic for Applications (VBA) to perform specific tasks. By creating a macro, users can automate the process of highlighting cells based on virtually any criteria, including those that might be too complex for conditional formatting.
To use macros for highlighting, users would first need to enable the Developer tab in their spreadsheet software, then either record a macro that applies the desired highlighting or write a custom VBA script. Macros can be run manually or set to run automatically upon certain events, such as opening the spreadsheet. This method requires familiarity with VBA programming but offers the ultimate in customization and automation for highlighting and other spreadsheet tasks.
Cell Highlighting Image Gallery
What is the purpose of highlighting cells in a spreadsheet?
+The purpose of highlighting cells is to draw attention to specific data, differentiate between types of information, and enhance the readability of the spreadsheet.
How do I apply conditional formatting in Excel?
+To apply conditional formatting in Excel, select the cells you want to format, go to the Home tab, find the Styles group, and click on Conditional Formatting. From there, you can choose from several pre-set rules or create your own custom rule using a formula.
Can I use macros to automate the highlighting process in Excel?
+Yes, you can use macros to automate the highlighting process in Excel. This involves recording or writing a VBA script that applies the highlighting based on your criteria, which can then be run manually or set to run automatically upon certain events.
In conclusion, highlighting cells in a spreadsheet is a versatile and powerful tool that can significantly enhance data analysis, presentation, and collaboration. Whether through conditional formatting, manual highlighting, using formulas, PivotTables, or macros, each method offers unique benefits and applications, catering to different needs and preferences. By mastering these techniques, users can unlock the full potential of their spreadsheets, making them more informative, engaging, and effective. We invite you to share your experiences with highlighting cells, ask questions about the methods discussed, or explore more advanced techniques for spreadsheet customization and automation.