Intro
Importing data from Excel into a SQL table can be a common requirement for many database administrators and developers. This process can be efficiently handled using SQL queries, especially when dealing with large datasets. Here's a step-by-step guide on how to insert Excel data into a SQL table using a query.
First, it's essential to understand that the process might slightly vary depending on the specific database management system (DBMS) you're using, such as Microsoft SQL Server, MySQL, PostgreSQL, etc. The examples provided here will be tailored for Microsoft SQL Server, but the concept applies broadly across different DBMS platforms.
Step 1: Prepare Your Excel File
Before importing data, ensure your Excel file is structured in a way that can be easily mapped to your SQL table. Each column in your Excel sheet should correspond to a column in your SQL table. Save your Excel file in a format that can be easily read by SQL Server, such as .xlsx or .xls.
Step 2: Create a SQL Table
If you haven't already, create a SQL table that matches the structure of your Excel data. You can do this using a CREATE TABLE statement. For example:
CREATE TABLE Customers (
    CustomerID int,
    Name varchar(255),
    Email varchar(255),
    Country varchar(100)
);
Step 3: Use the OPENROWSET Function
In SQL Server, you can use the OPENROWSET function to import data from an Excel file. This function allows you to access remote data from an OLE DB data source. Here's an example query:
INSERT INTO Customers (CustomerID, Name, Email, Country)
SELECT *
FROM OPENROWSET('Microsoft.ACE.OLEDB.12.0',
                'Excel 12.0;Database=C:\Path\To\Your\File.xlsx',
                'SELECT * FROM [Sheet1$]');
In this query:
Microsoft.ACE.OLEDB.12.0is the provider for Excel 2007 and later versions.Excel 12.0;Database=C:\Path\To\Your\File.xlsxspecifies the Excel file path.SELECT * FROM [Sheet1$]selects data from the first sheet (Sheet1) in your Excel file.
Step 4: Using the OPENDATASOURCE Function
Alternatively, you can use the OPENDATASOURCE function, which provides a way to access data from an external data source. The syntax is similar to OPENROWSET, but it's often used for ad-hoc queries:
SELECT * INTO #TempTable
FROM OPENDATASOURCE('Microsoft.ACE.OLEDB.12.0',
                    'Data Source=C:\Path\To\Your\File.xlsx;Extended Properties=Excel 12.0')...[Sheet1$]

INSERT INTO Customers (CustomerID, Name, Email, Country)
SELECT CustomerID, Name, Email, Country
FROM #TempTable
Step 5: Handling Errors and Data Types
When importing data, you might encounter errors due to data type mismatches or invalid data. Ensure that the data types in your Excel file match those in your SQL table. You can also use TRY_PARSE or TRY_CONVERT functions in SQL Server to handle potential errors during data type conversions.
Step 6: Importing Data from Other Sources
If you're working with other DBMS like MySQL or PostgreSQL, you might use different commands. For example, in MySQL, you can use the LOAD DATA INFILE statement to import data from a text file, but for Excel, you might first need to export your Excel data to a CSV file and then import it.
Example Use Cases
- Regular Data Imports: Automate the process of importing data from Excel files into your SQL database on a regular basis, such as daily or weekly, using SQL Server Agent jobs.
- Data Migration: When migrating data from an old system to a new one, Excel can serve as an intermediate format, especially if the data needs to be cleaned or transformed before import.
Best Practices
- Validate Data: Always validate the data after import to ensure it matches your expectations and is free from errors.
- Use Transactions: Wrap your import process in a transaction to ensure that either all data is imported successfully, or none is, maintaining data integrity.
- Optimize Performance: For large datasets, consider optimizing your import process by importing data in batches or using more efficient data types.

Using SQL Server Integration Services (SSIS)
For more complex data import tasks or when dealing with different data sources, SQL Server Integration Services (SSIS) can be a powerful tool. SSIS provides a graphical interface to design workflows, including data import tasks from Excel to SQL Server.
Steps to Use SSIS
- Install SSIS: Ensure SSIS is installed on your machine. It's part of the SQL Server installation package.
- Create a New Project: Open Visual Studio and create a new SSIS project.
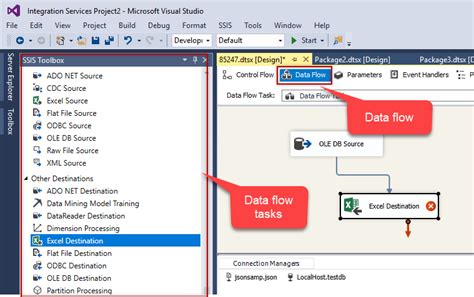
- Add an Excel Source: Drag and drop an "Excel Source" component into your data flow task.
- Configure the Excel Source: Specify the path to your Excel file, the sheet you want to import, and the data access mode.
- Add an OLE DB Destination: Drag and drop an "OLE DB Destination" component to import data into your SQL Server database.
- Configure the OLE DB Destination: Specify your SQL Server connection, the database, and the table where you want to import the data.
- Execute the Package: Run the SSIS package to execute the data import.
Gallery of Excel to SQL Import Methods
Excel to SQL Import Gallery


What is the most efficient way to import Excel data into SQL Server?
+The most efficient way often involves using SQL Server Integration Services (SSIS) for complex tasks or the `OPENROWSET` function for simpler, ad-hoc imports.
How do I handle data type mismatches during import?
+Use `TRY_PARSE` or `TRY_CONVERT` functions to handle potential errors during data type conversions, and ensure your SQL table and Excel file have matching data types.
Can I automate the import process?
+Yes, you can automate the import process using SQL Server Agent jobs for regular imports or by creating a scheduled task for your SSIS package.
We hope this comprehensive guide has provided you with the knowledge and tools necessary to efficiently import Excel data into your SQL table. Whether you're using SQL queries, SSIS, or other methods, the key to success lies in understanding your data, preparing it correctly, and choosing the right import method for your specific needs. If you have any further questions or need more detailed information on any of the steps outlined above, please don't hesitate to ask. Share your experiences or tips for importing Excel data into SQL in the comments below.