Intro
Removing duplicates in Excel can be a crucial task for data management and analysis. Duplicates can skew results, make data interpretation more difficult, and generally reduce the quality of your dataset. Excel provides several methods to remove duplicates, each with its own advantages depending on your specific needs. Let's delve into the importance of removing duplicates and the various methods Excel offers.
The presence of duplicate data can lead to inaccurate analysis and reporting. For instance, if you're analyzing customer data and there are duplicates, you might end up counting the same customer multiple times, leading to an overestimation of your customer base. Similarly, in financial data, duplicates can lead to incorrect totals and averages. Thus, removing duplicates is a fundamental step in data cleaning and preparation.
Excel's built-in feature to remove duplicates is straightforward and effective for most users. However, there are scenarios where you might need more control over the process, such as when working with large datasets or when the duplicates are not exact but similar. In such cases, using formulas or pivot tables can provide more flexibility.
Understanding Duplicates in Excel

Before diving into the removal methods, it's essential to understand what constitutes a duplicate in Excel. A duplicate is a row (or set of rows, depending on the selection) that has the same values in all columns (or selected columns) as another row. Excel's default behavior is to consider a row as a duplicate if all values in the selected columns are identical.
Removing Duplicates Using Excel's Built-in Feature
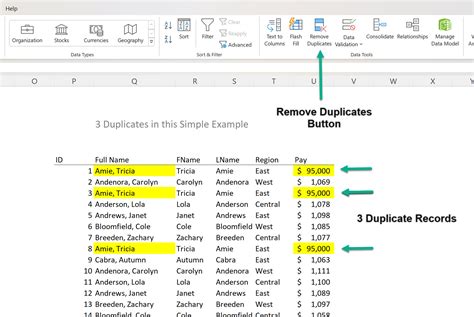
Excel's built-in feature for removing duplicates is accessible through the "Data" tab on the ribbon. Here's a step-by-step guide:
- Select the range of cells from which you want to remove duplicates. Ensure the range includes headers.
- Go to the "Data" tab.
- Click on "Remove Duplicates."
- In the "Remove Duplicates" dialog box, you can choose which columns to consider for duplicate removal. By default, Excel selects all columns.
- Click "OK" to remove the duplicates.
Considerations for Removing Duplicates
When removing duplicates, it's crucial to consider the following: - **Backup Your Data:** Always make a copy of your original dataset before removing duplicates to prevent data loss. - **Selecting Columns:** Choose the columns that define a duplicate for your specific needs. If you only select certain columns, Excel will remove rows where those selected columns have duplicate values, regardless of the values in other columns. - **My Data Has Headers:** Ensure this checkbox is selected if your data range includes headers. This tells Excel not to consider the header row as a potential duplicate.Using Formulas to Remove Duplicates

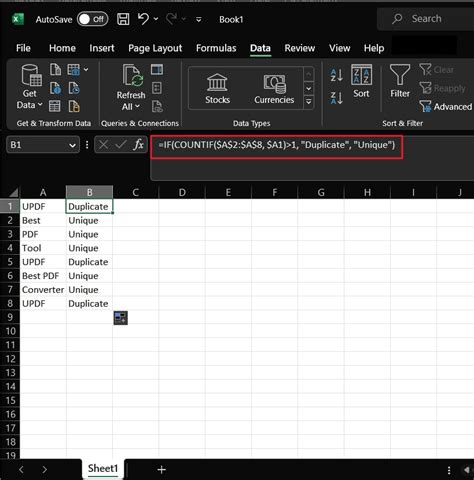
For more complex scenarios or when you need a formula-based approach, you can use Excel formulas to identify and remove duplicates. One common method involves using the IF function combined with the COUNTIF function to mark duplicates, and then filtering those out.
- Assume your data is in column A, starting from A2 (A1 being the header).
- In a new column (say, B2), enter the formula:
=IF(COUNTIF(A:A, A2)>1, "Duplicate", "Unique") - Drag this formula down for all your data rows.
- Filter your data to show only "Unique" rows.
Advanced Duplicate Removal Techniques
For scenarios where Excel's built-in feature is not sufficient, such as dealing with similar but not exact duplicates, or when working with large datasets, advanced techniques like using pivot tables or VBA scripts might be necessary.Pivot Tables for Duplicate Removal
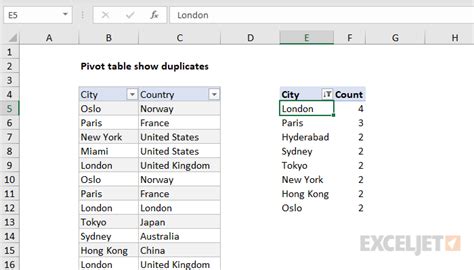
Pivot tables can be a powerful tool for removing duplicates, especially when you want to summarize data or perform analysis without duplicates interfering with your results.
- Select your data range.
- Go to the "Insert" tab and click on "PivotTable."
- Choose a cell to place your pivot table and click "OK."
- Drag the fields you're interested in to the "Row Labels" area.
- Right-click on any value in the "Row Labels" area and select "Value Field Settings."
- Under "Summarize value field by," select "Distinct Count" to count unique occurrences.
Gallery of Excel Duplicate Removal Techniques
Excel Duplicate Removal Techniques Gallery


Frequently Asked Questions
How do I remove duplicates in Excel without using the built-in feature?
+You can use formulas like the IF function combined with COUNTIF to identify and then remove duplicates manually.
Can I remove duplicates based on multiple columns in Excel?
+Yes, when using the built-in "Remove Duplicates" feature, you can select multiple columns to consider for duplicate removal.
How do I remove duplicates in a large dataset efficiently?
+For large datasets, using pivot tables or advanced techniques like VBA scripts can be more efficient than manual methods.
In conclusion, removing duplicates in Excel is a critical step in data preparation and analysis. With its built-in feature, formulas, and advanced techniques like pivot tables, Excel offers a range of methods to tackle duplicates, each suited to different scenarios and user needs. By mastering these techniques, you can ensure your data is clean, accurate, and ready for analysis, thereby making informed decisions based on reliable data. We invite you to share your experiences with removing duplicates in Excel, ask questions, or explore more topics related to Excel and data management. Your feedback and engagement are invaluable in creating a community that learns and grows together.