Intro
Learn how to Excel remove text from right using formulas and functions, including RIGHT, LEN, and SUBSTITUTE, to extract and manipulate data efficiently.
The ability to manipulate text within Excel is a crucial skill for anyone working with data in this popular spreadsheet program. One common task is removing text from the right side of a cell. This can be necessary for cleaning up data, especially when dealing with imported data that may have unnecessary characters or strings at the end of each entry. Excel provides several methods to achieve this, ranging from using formulas to employing built-in functions. Let's explore how to remove text from the right side of a cell in Excel.
Understanding the Need to Remove Text from the Right
Before diving into the methods, it's essential to understand why you might need to remove text from the right side of a cell. This could be due to various reasons such as data import errors, incorrect formatting, or the presence of unwanted characters. Cleaning up this data is vital for accurate analysis and presentation.
Using Formulas to Remove Text from the Right
Excel formulas offer a flexible way to manipulate text. To remove text from the right side of a cell, you can use a combination of the LEFT, LEN, and FIND functions, depending on your specific needs.
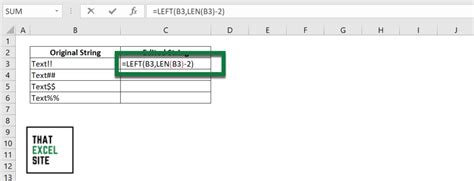
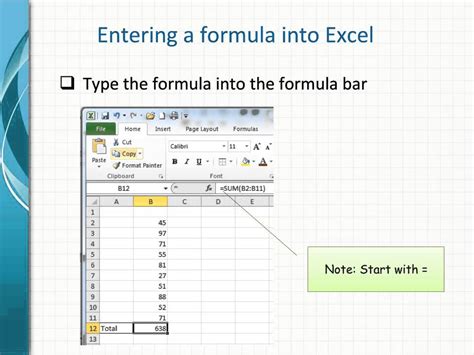
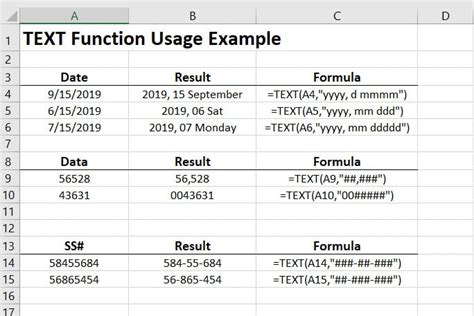
- Using the LEFT Function: If you know the exact number of characters you want to keep from the left, you can use the
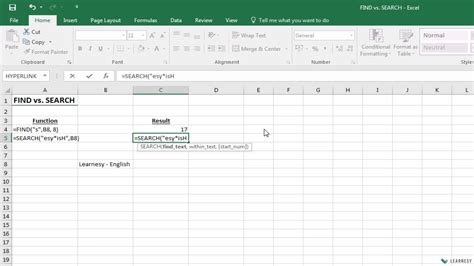
LEFTfunction. For example,=LEFT(A1,10)will return the first 10 characters from cell A1, effectively removing any text to the right of the 10th character. - Combining LEN and FIND: For more complex scenarios, where you might need to remove text based on a specific character or string, combining
LENandFINDcan be useful. For instance, to remove everything after a certain character, you could use=LEFT(A1, FIND(" ", A1) - 1), assuming you want to remove text after the first space.
Step-by-Step Guide to Using Formulas
1. **Select the Cell**: Choose the cell where you want to display the result. 2. **Enter the Formula**: Type in the appropriate formula based on your needs, such as `=LEFT(A1,10)` for removing text after the 10th character. 3. **Press Enter**: The formula will be executed, and the result will be displayed in the selected cell.Employing Built-in Functions and Tools

Besides formulas, Excel offers other built-in functions and tools that can help in removing text from the right side of a cell.
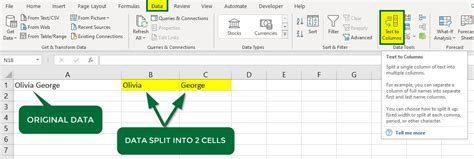
- Text to Columns: Although primarily used for splitting text into separate columns, the "Text to Columns" feature can also be utilized to remove unwanted text by splitting the data and then deleting the unnecessary parts.
- Flash Fill: For Excel 2013 and later versions, the "Flash Fill" feature can automatically detect patterns in your data and fill in or remove text accordingly. This can be a quick way to remove text from the right side if the pattern is consistent.
Using Text to Columns
1. **Select the Data Range**: Choose the cells containing the text you want to manipulate. 2. **Go to Data Tab**: Click on the "Data" tab in the ribbon. 3. **Text to Columns**: Click on "Text to Columns" and follow the wizard to split your text based on a delimiter or fixed width. 4. **Delete Unnecessary Columns**: After splitting, you can delete the columns that contain the text you wanted to remove from the right.Regular Expressions and VBA

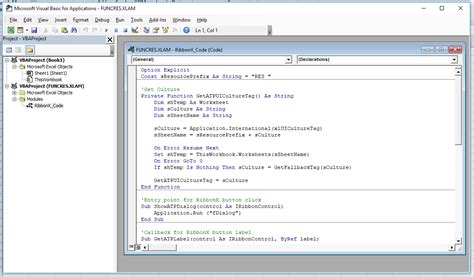
For more advanced users, Excel's Visual Basic for Applications (VBA) can be leveraged to remove text from the right side of a cell using regular expressions or custom scripts. This method provides unparalleled flexibility and power but requires programming knowledge.
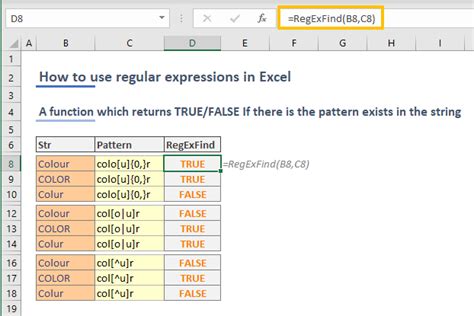
- Regular Expressions: By enabling the "Microsoft VBScript Regular Expressions" reference in the VBA editor, you can use regular expressions to match and remove patterns from the right side of cell contents.
- Custom VBA Scripts: Writing a custom script allows you to iterate through cells, analyze their contents, and remove text based on specific conditions or patterns.
Enabling Regular Expressions in VBA
1. **Open VBA Editor**: Press `Alt + F11` to open the VBA editor. 2. **Tools > References**: In the menu, go to "Tools" > "References". 3. **Check Microsoft VBScript Regular Expressions**: Scroll down and check the box next to "Microsoft VBScript Regular Expressions 1.0". 4. **OK**: Click "OK" to close the dialog box.Excel Text Manipulation Image Gallery

How do I remove text from the right side of a cell in Excel using formulas?
+You can use the LEFT function in combination with LEN and FIND to remove text from the right side of a cell. For example, =LEFT(A1,10) removes any text after the 10th character in cell A1.
What is the purpose of using Text to Columns in Excel for removing text?
+Text to Columns can be used to split text into separate columns based on a delimiter or fixed width, allowing you to delete the columns containing the text you want to remove from the right.
How do I enable regular expressions in Excel VBA?
+To enable regular expressions in Excel VBA, open the VBA editor, go to Tools > References, and check the box next to "Microsoft VBScript Regular Expressions 1.0".
In conclusion, removing text from the right side of a cell in Excel can be accomplished through various methods, ranging from simple formulas to advanced VBA scripting. Understanding the different approaches and when to use them can significantly enhance your data manipulation capabilities in Excel. Whether you're a beginner looking to clean up data or an advanced user seeking to automate complex tasks, Excel's versatility and the power of its functions and VBA make it an indispensable tool for anyone working with data. We hope this guide has been informative and helpful in your journey to master Excel's text manipulation capabilities. Feel free to share your thoughts, ask questions, or explore more topics related to Excel and data analysis.