Intro
Learn to create 2 pivot tables in the same sheet with ease, using data analysis and visualization techniques, including pivot table formatting and multiple table management.
Creating multiple pivot tables in the same sheet can be a powerful way to analyze and visualize data from different perspectives. Pivot tables are a fundamental tool in Excel for summarizing and analyzing large datasets. When you have multiple pivot tables in one sheet, it becomes easier to compare and contrast different aspects of your data. Here's a step-by-step guide on how to create two pivot tables in the same sheet.
First, let's understand the importance of pivot tables. Pivot tables allow you to rotate, aggregate, and disaggregate data, making it easier to understand and draw insights from your dataset. They are especially useful when dealing with large datasets, as they enable you to summarize data by different fields and perform various calculations without having to write complex formulas.
To begin creating your pivot tables, you'll need a dataset. This could be a list of sales data, customer information, or any other type of data you want to analyze. Ensure your data is organized in a table format with headers in the first row. This will make it easier to create and manage your pivot tables.
Setting Up Your Data

Before creating pivot tables, make sure your data is clean and well-organized. Check for any missing values, inconsistencies, or errors that could affect your analysis. Organizing your data into a structured format will make the process of creating pivot tables much smoother.
Creating the First Pivot Table
To create your first pivot table, follow these steps:
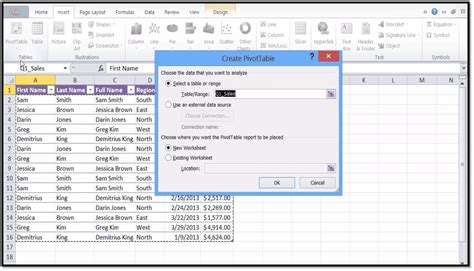
- Select a cell where you want to place your pivot table. It's a good idea to choose a location that is away from your data to avoid any overlap.
- Go to the "Insert" tab on the ribbon and click on "PivotTable."
- In the "Create PivotTable" dialog box, select a table or range for your data. If your data is in a table, Excel will automatically detect it. Otherwise, you can manually select the range.
- Choose where you want to place your pivot table. You can either place it in a new worksheet or in an existing one. For this example, we're placing it in the same sheet as our data.
- Click "OK" to create the pivot table.
Configuring the First Pivot Table
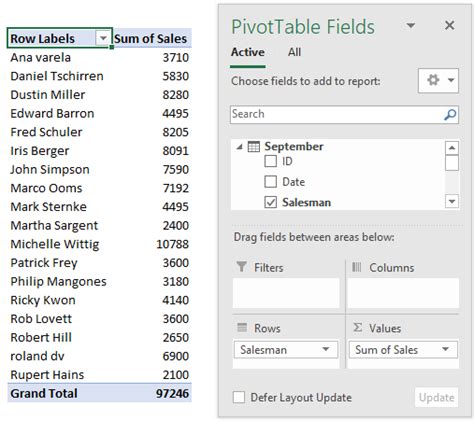
After creating your pivot table, you'll need to configure it to display the data you're interested in. Here's how:
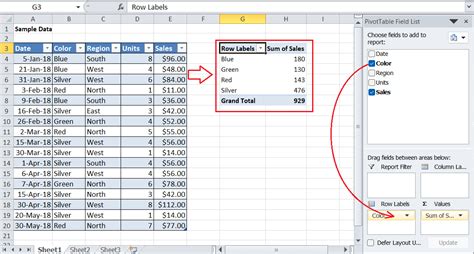
- Drag fields from the "PivotTable Fields" pane to the "Rows," "Columns," "Filters," and "Values" areas to structure your pivot table.
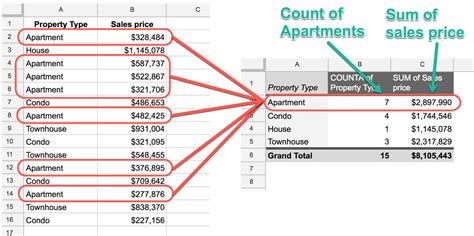
- For example, if you're analyzing sales data, you might drag "Region" to the "Rows" area and "Product" to the "Columns" area.
- To add a value field, drag a field like "Sales" to the "Values" area. You can then right-click on this field to change the summary type (e.g., from "Sum" to "Average").
Creating the Second Pivot Table

To create your second pivot table, follow the same steps as before, but this time, select a different location for your pivot table. It's essential to ensure that the second pivot table does not overlap with the first one or your data.
Configuring the Second Pivot Table
Configure your second pivot table by dragging different fields to the "PivotTable Fields" areas. This pivot table can provide a different view of your data. For instance, if your first pivot table shows sales by region and product, your second pivot table could show sales by date and customer type.
Managing Multiple Pivot Tables
Managing multiple pivot tables in the same sheet requires some planning. Ensure that each pivot table is positioned in a way that makes it easy to read and understand. You can use Excel's built-in tools to adjust the size and layout of your pivot tables.
Best Practices for Multiple Pivot Tables
Here are some best practices to keep in mind:
- Keep your pivot tables concise and focused on specific aspects of your data.
- Use clear and descriptive names for your pivot tables and fields.
- Regularly update your data and refresh your pivot tables to ensure you're working with the latest information.
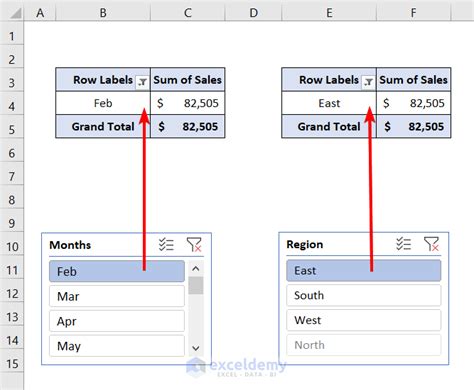
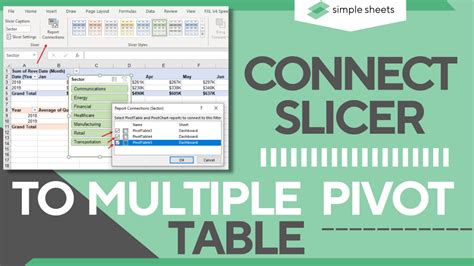
- Consider using slicers or filters to make your pivot tables more interactive and easier to analyze.
Gallery of Pivot Table Examples
Pivot Table Image Gallery


Frequently Asked Questions
What is a pivot table in Excel?
+A pivot table is a tool in Excel that allows you to summarize, analyze, and visualize large datasets.
How do I create a pivot table in Excel?
+To create a pivot table, select your data, go to the "Insert" tab, click on "PivotTable," and follow the prompts to choose where you want to place your pivot table.
Can I have multiple pivot tables in the same sheet?
+Yes, you can have multiple pivot tables in the same sheet. This allows for a more comprehensive analysis of your data from different perspectives.
How do I manage multiple pivot tables effectively?
+Managing multiple pivot tables involves keeping them concise, using clear names, regularly updating your data, and considering the use of slicers or filters for interactivity.
What are some best practices for creating pivot tables?
+Best practices include keeping your pivot tables focused, using descriptive names, and ensuring your data is clean and up-to-date before creating pivot tables.
In conclusion, creating two pivot tables in the same sheet is a straightforward process that can significantly enhance your data analysis capabilities. By following the steps outlined above and adhering to best practices, you can effectively manage multiple pivot tables and gain deeper insights into your data. Remember, the key to getting the most out of pivot tables is to keep them organized, focused, and regularly updated. With practice, you'll become proficient in using pivot tables to analyze complex datasets and make informed decisions. We hope this guide has been helpful in your journey to mastering Excel pivot tables. Feel free to share your experiences or ask further questions in the comments below.