Intro
Lock tabs in Excel to protect worksheets, freeze panes, and secure data with password protection, using formulas and VBA codes for spreadsheets.
Locking tabs in Excel is an essential feature for protecting and organizing your worksheets. When working on complex projects or sharing files with others, it's crucial to ensure that sensitive data and formulas are not accidentally modified or deleted. Excel provides various options for locking tabs, including locking entire worksheets, specific cells, or ranges. In this article, we will explore the different methods for locking tabs in Excel and provide step-by-step instructions on how to use them.
Excel is a powerful tool for data analysis and management, and locking tabs is an essential aspect of maintaining data integrity. By locking tabs, you can prevent unauthorized changes, protect sensitive data, and ensure that your worksheets remain organized and easy to navigate. Whether you're working on a personal project or collaborating with others, locking tabs in Excel is an essential skill to master.
Locking tabs in Excel can be achieved through various methods, including using passwords, protecting worksheets, and locking specific cells or ranges. Each method has its advantages and disadvantages, and the choice of method depends on the specific requirements of your project. In the following sections, we will explore each method in detail and provide examples of how to use them.
Locking Entire Worksheets

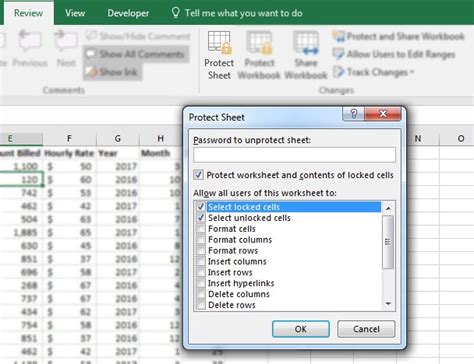
Locking entire worksheets is a straightforward method for protecting your data. To lock a worksheet, follow these steps:
- Select the worksheet you want to lock.
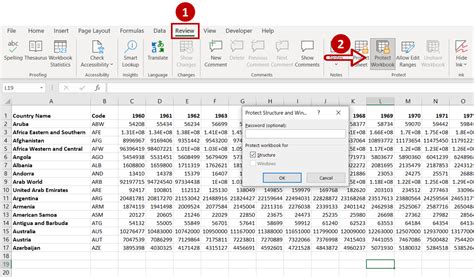
- Go to the "Review" tab in the ribbon.
- Click on "Protect Sheet" in the "Protect" group.
- Enter a password in the "Password" field.
- Select the permissions you want to allow, such as "Select locked cells" or "Format cells."
- Click "OK" to apply the protection.
Once you've locked a worksheet, you can prevent others from making changes to the data, formulas, or formatting. You can also specify which actions are allowed, such as selecting locked cells or formatting cells.
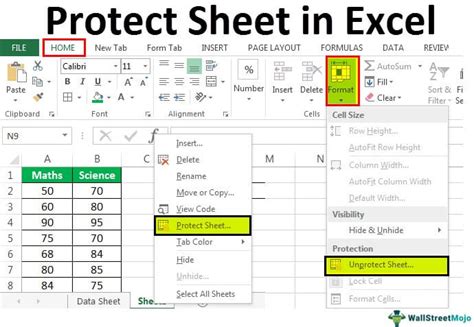
Locking Specific Cells or Ranges
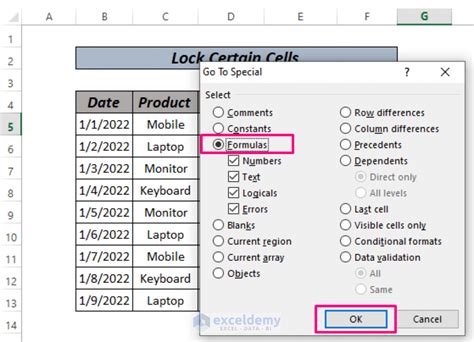
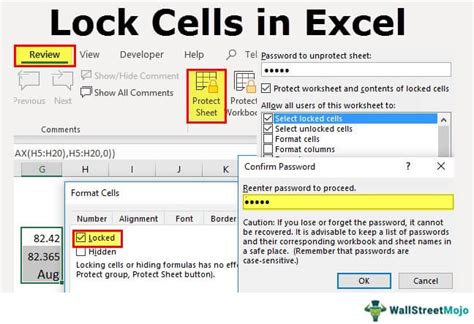
Locking specific cells or ranges is a more targeted approach to protecting your data. To lock a range of cells, follow these steps:
- Select the range of cells you want to lock.
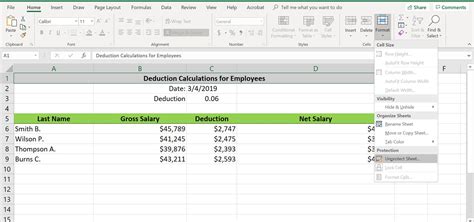
- Go to the "Home" tab in the ribbon.
- Click on "Format" in the "Cells" group.
- Select "Lock Cell" from the dropdown menu.
- Go to the "Review" tab in the ribbon.
- Click on "Protect Sheet" in the "Protect" group.
- Enter a password in the "Password" field.
- Select the permissions you want to allow, such as "Select locked cells" or "Format cells."
- Click "OK" to apply the protection.
By locking specific cells or ranges, you can protect sensitive data while still allowing others to make changes to other parts of the worksheet.
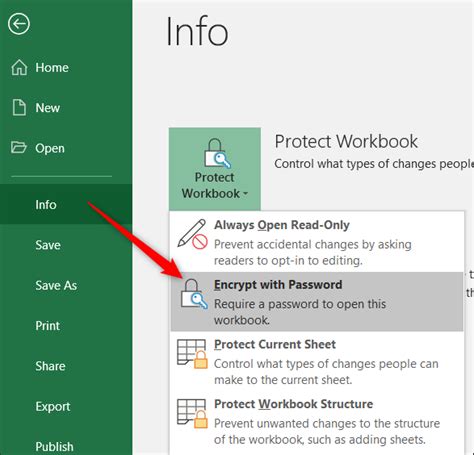
Using Passwords to Lock Tabs
Using passwords to lock tabs is a secure method for protecting your worksheets. To use a password to lock a tab, follow these steps:
- Select the worksheet you want to lock.
- Go to the "Review" tab in the ribbon.
- Click on "Protect Sheet" in the "Protect" group.
- Enter a password in the "Password" field.
- Re-enter the password in the "Verify Password" field.
- Click "OK" to apply the protection.
Once you've set a password, you can prevent others from accessing the worksheet without the password. You can also specify which actions are allowed, such as selecting locked cells or formatting cells.
Best Practices for Locking Tabs in Excel
When locking tabs in Excel, it's essential to follow best practices to ensure that your data is protected and your worksheets remain organized. Here are some tips to keep in mind:
- Use strong passwords to protect your worksheets.
- Keep your passwords secure and do not share them with others.
- Use locking tabs to protect sensitive data, such as financial information or personal data.
- Use locking tabs to prevent others from making changes to your worksheets.
- Test your locking tabs to ensure that they are working correctly.
By following these best practices, you can ensure that your data is protected and your worksheets remain organized and easy to navigate.
Benefits of Locking Tabs in Excel
Locking tabs in Excel has several benefits, including:- Protecting sensitive data from unauthorized changes or deletion.
- Preventing others from making changes to your worksheets.
- Ensuring that your worksheets remain organized and easy to navigate.
- Providing a secure method for sharing worksheets with others.
- Allowing you to specify which actions are allowed, such as selecting locked cells or formatting cells.
By locking tabs in Excel, you can ensure that your data is protected and your worksheets remain organized and easy to navigate.
Common Issues with Locking Tabs in Excel
When locking tabs in Excel, you may encounter some common issues, including:- Forgetting your password and being unable to access your worksheet.
- Accidentally locking a worksheet and being unable to make changes.
- Having trouble unlocking a worksheet due to a forgotten password.
- Experiencing issues with locking tabs in Excel due to software bugs or glitches.
To resolve these issues, you can try resetting your password, using a password recovery tool, or seeking assistance from an Excel expert.
Locking Tabs in Excel Image Gallery


How do I lock a tab in Excel?
+To lock a tab in Excel, select the worksheet you want to lock, go to the "Review" tab in the ribbon, click on "Protect Sheet" in the "Protect" group, enter a password, and select the permissions you want to allow.
What is the purpose of locking tabs in Excel?
+The purpose of locking tabs in Excel is to protect sensitive data from unauthorized changes or deletion, prevent others from making changes to your worksheets, and ensure that your worksheets remain organized and easy to navigate.
How do I unlock a tab in Excel?
+To unlock a tab in Excel, select the worksheet you want to unlock, go to the "Review" tab in the ribbon, click on "Unprotect Sheet" in the "Protect" group, and enter the password you used to lock the worksheet.
In conclusion, locking tabs in Excel is an essential feature for protecting and organizing your worksheets. By following the methods and best practices outlined in this article, you can ensure that your data is protected and your worksheets remain organized and easy to navigate. Whether you're working on a personal project or collaborating with others, locking tabs in Excel is an essential skill to master. We hope this article has provided you with the information and guidance you need to get started with locking tabs in Excel. If you have any further questions or comments, please don't hesitate to reach out. Share this article with others who may benefit from learning about locking tabs in Excel, and take the first step towards protecting your data and worksheets today.