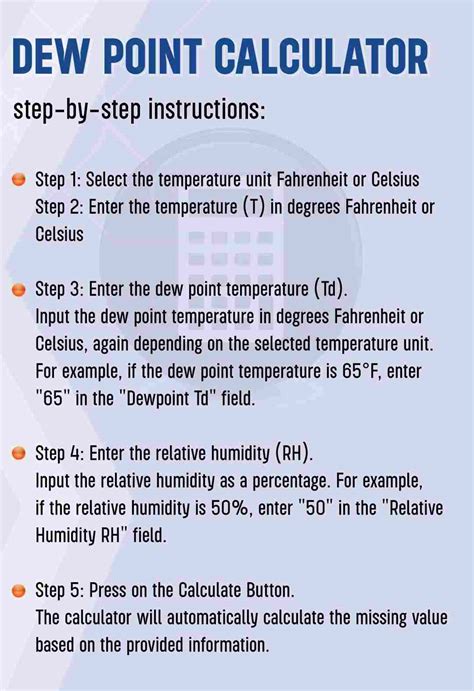
Intro
The dew point is a crucial factor in various fields, including meteorology, engineering, and agriculture. Calculating the dew point accurately is essential for predicting weather patterns, designing heating and cooling systems, and maintaining optimal growing conditions. One of the most convenient tools for calculating the dew point is Microsoft Excel. With its built-in formulas and functions, Excel allows users to create a dew point calculator that is both accurate and easy to use. In this article, we will explore five tips for creating a dew point calculator in Excel.
To begin with, it is essential to understand the concept of dew point and its importance in different industries. The dew point is the temperature at which the air becomes saturated with water vapor and dew or frost begins to form. Accurate calculation of the dew point is critical for predicting weather patterns, as it helps meteorologists forecast the likelihood of fog, frost, or precipitation. In engineering, the dew point is used to design heating and cooling systems, as it affects the performance and efficiency of these systems. In agriculture, the dew point is crucial for maintaining optimal growing conditions, as it affects the growth and development of crops.
The calculation of the dew point involves several factors, including the air temperature, relative humidity, and atmospheric pressure. The most commonly used formula for calculating the dew point is the Magnus-Tetens formula, which takes into account the air temperature and relative humidity. However, this formula is complex and requires a deep understanding of thermodynamics and mathematics. Fortunately, Excel provides a range of built-in functions and formulas that simplify the calculation of the dew point.
Dew Point Calculator Basics
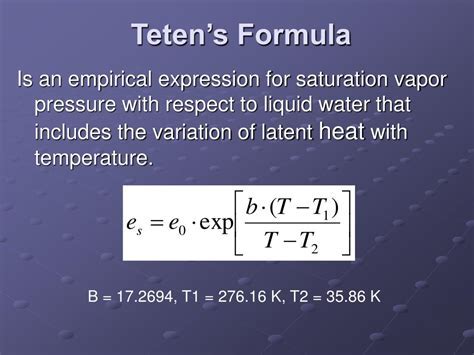
Understanding the Magnus-Tetens Formula
The Magnus-Tetens formula is the most commonly used formula for calculating the dew point. This formula takes into account the air temperature and relative humidity to calculate the dew point. The formula is as follows: T_d = (243.04 * (ln(RH/100) + ((17.625 * T) / (243.04 + T)))) / (17.625 - ln(RH/100) - ((17.625 * T) / (243.04 + T))) Where: T_d = dew point temperature (°C) T = air temperature (°C) RH = relative humidity (%) This formula is complex and requires a deep understanding of thermodynamics and mathematics. However, Excel provides a range of built-in functions and formulas that simplify the calculation of the dew point.Tip 1: Using the Magnus-Tetens Formula in Excel
Using Built-in Functions and Formulas
Excel provides a range of built-in functions and formulas that simplify the calculation of the dew point. One of the most useful functions is the LN function, which calculates the natural logarithm of a number. This function can be used to simplify the Magnus-Tetens formula and make it easier to calculate the dew point.Tip 2: Creating a User-Friendly Interface

Using Drop-Down Menus and Buttons
To make the interface even more user-friendly, you can use drop-down menus and buttons. Drop-down menus can be used to select the units of measurement for the air temperature and relative humidity, while buttons can be used to calculate the dew point temperature and display the result. This can be done using Excel's built-in tools and functions, such as the Data Validation tool and the Form Controls tool.Tip 3: Validating User Input

Using Error Messages and Warnings
To make the dew point calculator more user-friendly, you can use error messages and warnings to inform the user of any errors or invalid input. This can be done by using Excel's built-in tools and functions, such as the IF function and the ERROR function. These functions can be used to display an error message or warning if the input values are invalid or if the calculation fails.Tip 4: Using Conditional Formatting
Using Color Scales and Icons
To make the dew point calculator more visually appealing, you can use color scales and icons. Color scales can be used to display the result of the calculation in a specific format, such as a temperature scale or a humidity scale. Icons can be used to display error messages or warnings, or to indicate the status of the calculation. This can be done by using Excel's built-in tools and functions, such as the Conditional Formatting tool and the Icon Sets tool.Tip 5: Creating a Dynamic Chart
Using Real-Time Data
To make the dew point calculator more realistic, you can use real-time data. This can be done by connecting the calculator to a weather station or a sensor that provides real-time temperature and humidity data. The calculator can then use this data to calculate the dew point and display the result in real-time. This can be done by using Excel's built-in tools and functions, such as the Data Connection tool and the Real-Time Data tool.Dew Point Calculator Image Gallery


What is the dew point?
+The dew point is the temperature at which the air becomes saturated with water vapor and dew or frost begins to form.
How is the dew point calculated?
+The dew point is calculated using the Magnus-Tetens formula, which takes into account the air temperature and relative humidity.
What is the importance of the dew point?
+The dew point is crucial for predicting weather patterns, designing heating and cooling systems, and maintaining optimal growing conditions.
How can I create a dew point calculator in Excel?
+You can create a dew point calculator in Excel by using the Magnus-Tetens formula and built-in functions and formulas, such as the LN function and the Conditional Formatting tool.
What are the benefits of using a dew point calculator?
+The benefits of using a dew point calculator include accurate calculation of the dew point, user-friendly interface, and dynamic charting capabilities.
In conclusion, creating a dew point calculator in Excel is a simple and effective way to calculate the dew point temperature. By following the five tips outlined in this article, you can create a user-friendly and accurate dew point calculator that meets your needs. Whether you are a meteorologist, engineer, or farmer, a dew point calculator can help you make informed decisions and stay ahead of the game. So why not give it a try? Create your own dew point calculator in Excel today and start calculating the dew point with ease. We invite you to share your experiences and tips for creating a dew point calculator in Excel, and to ask any questions you may have about the topic.